This is a super easy tutorial that will show you how to use basic
Filters and simple Layer styles to create a bright colorful glass text
effect.
The Final Result:
 Notes:
* the software used in this tutorial is Adobe Photoshop CS6, but you can use CS3+ versions as well.
* you might want to check the Basix Page to see some useful topics on dealing with Photoshop basics, such as loading palettes and some shortcuts.
Note: You might need to load the Contours used in the tutorial, so check this image to see how to do so.
Step 1
- Create a new 1250 x 750 px document, fill the Background with Black, then duplicate the Background layer.
 - Set the Foreground and Background colors to Black and White, then
go to Filter -> Render -> Fibers. Change the Variance to 20 and
the Strength to 5.
- Set the Foreground and Background colors to Black and White, then
go to Filter -> Render -> Fibers. Change the Variance to 20 and
the Strength to 5.
 - Go to Filter -> Blur -> Motion Blur. Change the Angle to 90 and the Distance to 1000.
 - Change the Background copy layer’s Blend Mode to Linear Burn. This
will not create any effect for now, but it will once we add the colors
later on.
- Change the Background copy layer’s Blend Mode to Linear Burn. This
will not create any effect for now, but it will once we add the colors
later on.
 Step 2
- Create the text in white using the font Playball and the font Size 250 pt.
 - Change the text layer’s Fill value to 0, then duplicate it.
 Step 3
Double click the original text layer to apply the following Layer Style:
– Bevel and Emboss
Style : Outer Bevel
Technique : Chisel Hard
Gloss Contour : Cone – Inverted
Check the Anti-aliased box
Highlight Mode : Linear Light
Shadow Mode – Color : #b5b5b5
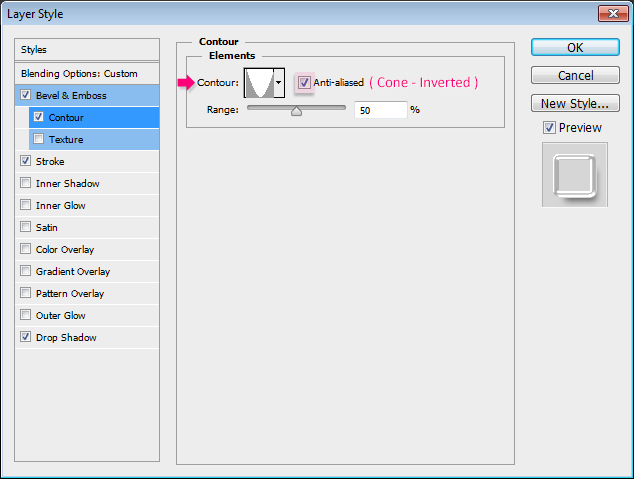
 – Contour
Contour : Cone – Inverted
Check the Anti-aliased box.
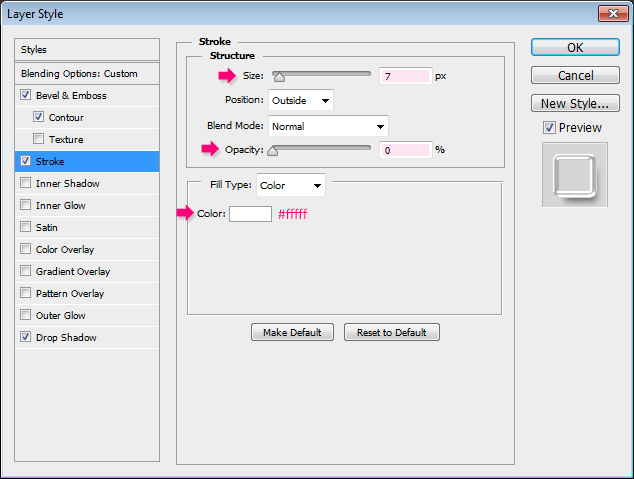
 – Stroke
Size : 7
Opacity : 0 %
Color : #ffffff
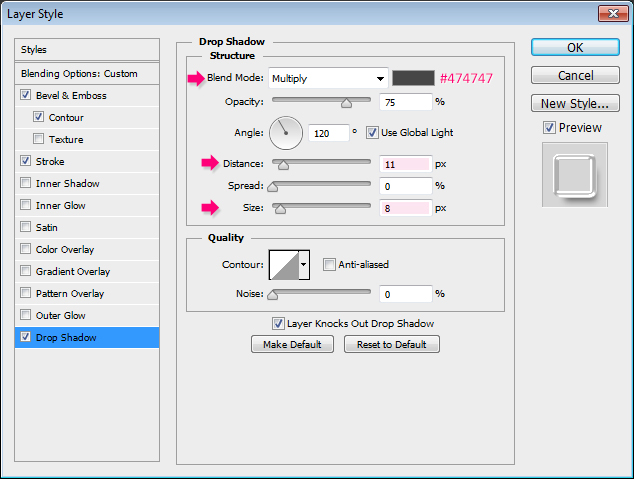
 – Drop Shadow
Color : #474747
Distance : 11
Size : 8
 This will create the first layer of the glass effect.
 Step 4
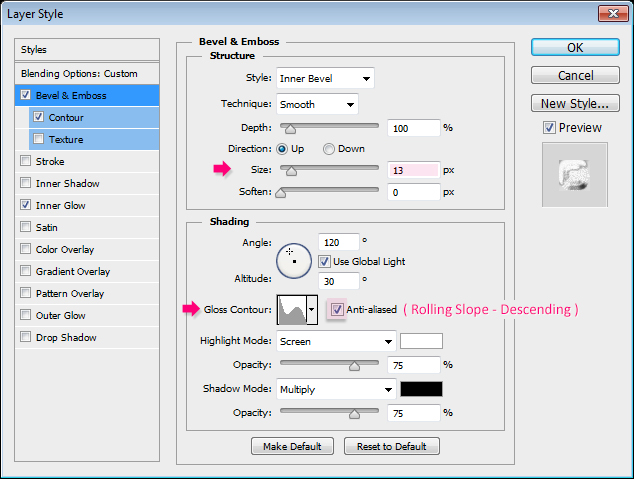
Double click the copy text layer to apply the following Layer Style:
– Bevel and Emboss
Size : 13
Gloss Contour : Rolling Slope – Descending
Check the Anti-aliased box
 – Contour
Contour : Guassian – Inverse
Check the Anti-aliased box.
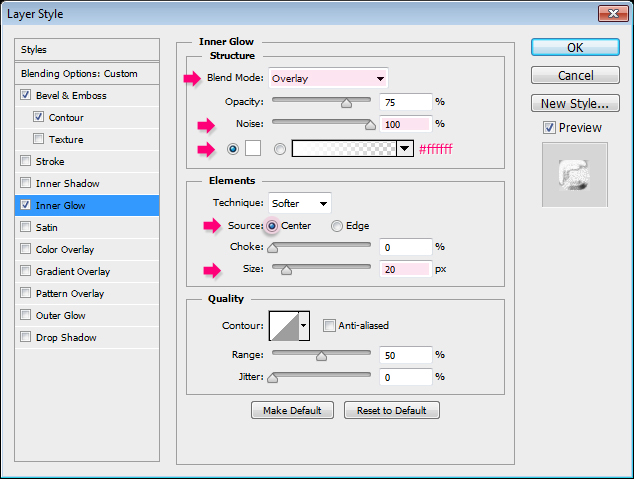
 – Inner Glow
Blend Mode : Overlay
Noise : 100
Color : #ffffff
Source : Center
Size : 20
The Noise value will add a subtle sparkling effect to the text when the colors are added. You can decrease the value if you want a more clear-looking glass/result.
 This will create the second layer of the glass effect.
 Step 5
- Pick the Brush Tool, choose a big soft round brush, and set the Size to a value around 450 px. Then, create a new layer between the two Background layers and call it “Color”.
 - Next, you’ll need to pick different Foreground colors, then for
each one, click once behind the text to add dots of color. Make sure to
choose lighter colors as they will create a better effect.
- Next, you’ll need to pick different Foreground colors, then for
each one, click once behind the text to add dots of color. Make sure to
choose lighter colors as they will create a better effect.
You can increase or decrease the brush size if needed as well.
The colors used in the tutorial are shown below, but you can choose any other colors you like.
 And that’s it! Very simple, but bright and fun.
Hope you enjoyed the tutorial
The Final Result:

* the software used in this tutorial is Adobe Photoshop CS6, but you can use CS3+ versions as well.
* you might want to check the Basix Page to see some useful topics on dealing with Photoshop basics, such as loading palettes and some shortcuts.
Note: You might need to load the Contours used in the tutorial, so check this image to see how to do so.
Step 1
- Create a new 1250 x 750 px document, fill the Background with Black, then duplicate the Background layer.
- Create the text in white using the font Playball and the font Size 250 pt.
Double click the original text layer to apply the following Layer Style:
– Bevel and Emboss
Style : Outer Bevel
Technique : Chisel Hard
Gloss Contour : Cone – Inverted
Check the Anti-aliased box
Highlight Mode : Linear Light
Shadow Mode – Color : #b5b5b5

Contour : Cone – Inverted
Check the Anti-aliased box.
Size : 7
Opacity : 0 %
Color : #ffffff
Color : #474747
Distance : 11
Size : 8
Double click the copy text layer to apply the following Layer Style:
– Bevel and Emboss
Size : 13
Gloss Contour : Rolling Slope – Descending
Check the Anti-aliased box
Contour : Guassian – Inverse
Check the Anti-aliased box.

Blend Mode : Overlay
Noise : 100
Color : #ffffff
Source : Center
Size : 20
The Noise value will add a subtle sparkling effect to the text when the colors are added. You can decrease the value if you want a more clear-looking glass/result.
- Pick the Brush Tool, choose a big soft round brush, and set the Size to a value around 450 px. Then, create a new layer between the two Background layers and call it “Color”.
You can increase or decrease the brush size if needed as well.
The colors used in the tutorial are shown below, but you can choose any other colors you like.
Hope you enjoyed the tutorial
Colorful Sparkling Glass Text Effect >>>>> Download Now
ReplyDelete>>>>> Download Full
Colorful Sparkling Glass Text Effect >>>>> Download LINK
>>>>> Download Now
Colorful Sparkling Glass Text Effect >>>>> Download Full
>>>>> Download LINK qO