One of the classic Photoshop tutorial topics is the creation of a
pencil drawing effect from a photograph. It’s one of those quick and
simple techniques that produces a satisfying result, which makes the
tutorial great for beginners. Throughout its history, Photoshop has
featured lots of built-in filters that produce various sketch and
artistic effects, but they don’t exactly produce a realistic outcome. In
this tutorial I’ll show some clever steps that will transform a
photograph into a hand drawn pencil sketch, which can even be fine tuned
to find the most authentic look.

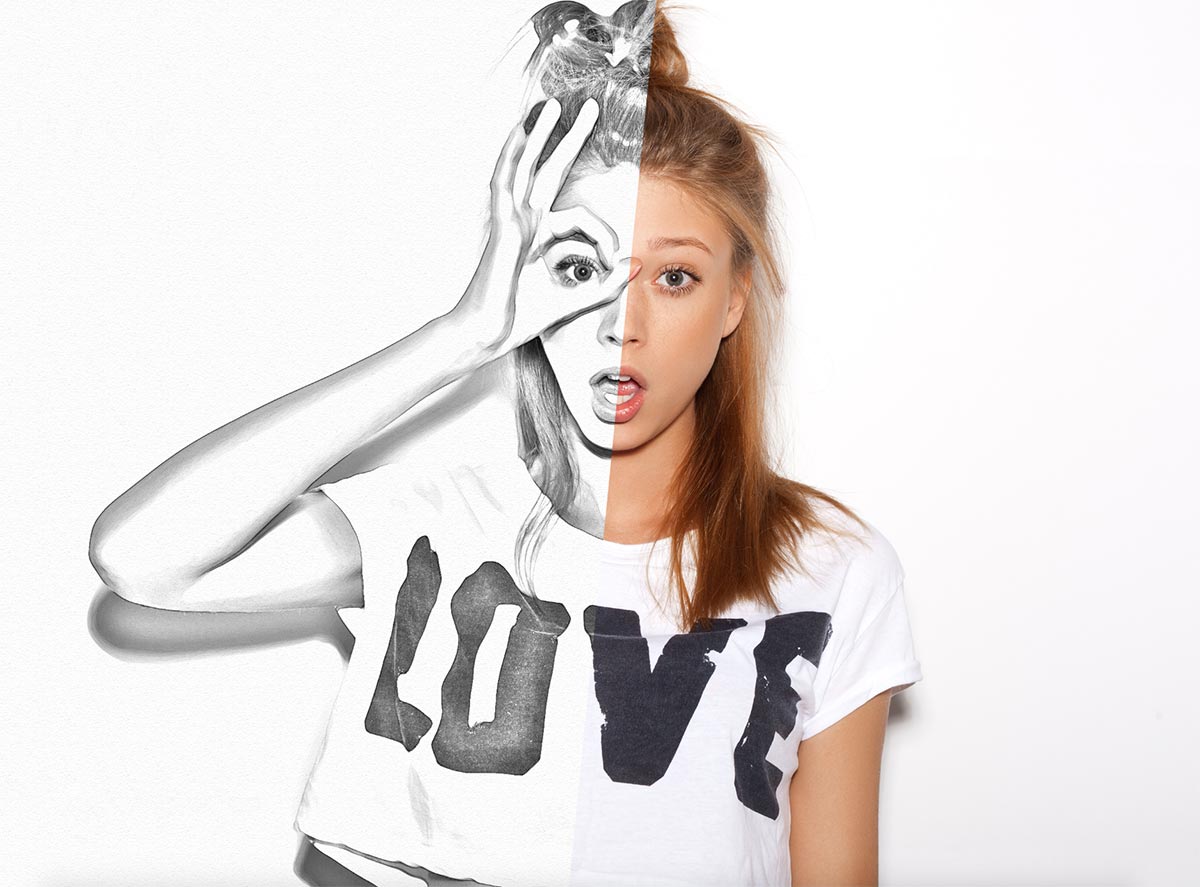
The effect we’ll be creating in this tutorial mimics the lines and shading of a pencil drawing. Producing this style of artwork for real would take hours of work for even the most talented artist, but the power of Photoshop gives us the ability to replicate it pretty well in just minutes. This makes it much more feasible to use the sketched look within your designs that might require an ‘artsy’ theme. If you don’t fancy creating this effect manually, you might be interested in my free Artistic Paint, Sketch & Ink Photo Effect Actions.

Begin by opening up your chosen source photograph in Adobe Photoshop. The effect works best with images that have a clean background in good lighting and focus, so working with a professional studio shot like this stock image from Shutterstock provides the best results.

Drag the Background layer over the New Layer icon in the Layers panel, or use the shortcut CMD+J to create a duplicate of the layer. Go to Image > Adjustments > Invert (or hit CMD+I) then right click and select Convert to Smart Object.

Under the Filter menu, select Gaussian Blur and alter the radius to around 40 pixels. The use of the Smart Object will apply this filter as a Smart Filter so we can fine tune the settings if necessary, rather than permanently apply the effect.

Change the blending mode of the duplicate background layer to Color Dodge, which dramatically boosts the contrast and brings out the grainy details of the image.

Click the Adjustment Layer icon at the bottom of the Layers panel and choose Levels. Move the shadows and midtones sliders slightly to the right to darken the image a little.

Add another Adjustment Layer, this time select the Black and White option. The default settings will suffice to remove the colour and generate more of a standard pencil appearance.

Use the shortcut CMD+A to Select All, then go to Edit > Copy Merged (or CMD+Shift+C). This will make a clipping of all the visible layers. Press CMD+V to paste this copy at the top of the layer stack.

Go to Filter > Filter Gallery, then navigate to Glowing Edges from under the Stylize menu. Change the settings to 1 Edge Width, and maximum Edge Brightness and Smoothness.

Invert the layer by heading to Image > Adjustments > Invert (or the CMD+I shortcut) to switch the colouring from white on black to black on white.

Change this glowing edges layer’s blending mode to Multiply to render the white background transparent, then reduce the opacity of the layer to around 50-60% to reduce the impact of these additional outlining sketch lines.

Click the New Layer icon at the bottom of the Layers panel, then press CMD+Backspace to fill the layer with white (the default background colour). Head back to the Filter Gallery but this time choose Texturizer. Change the setting to Sandstone.

Change this layer’s blending mode to Multiply so the underlying artwork can be seen, then reduce the opacity of the layer to around 50% to produce a much more subtle paper texture effect.

To achieve more of a coloured pencil drawing, the Black and White adjustment layer can be turned off to remove the desaturation effect.

The final result is a realistic pencil sketch effect with authentic line work and shading. The blurred and inverted color dodge layer does the base work by boosting the contrast, but the additional effects like the glowing edges outline marks and the paper texture make the artwork much more believable. The use of the Smart Object also means you can adjust the amount of Gaussian Blur to fine tune the resu
The effect we’ll be creating in this tutorial mimics the lines and shading of a pencil drawing. Producing this style of artwork for real would take hours of work for even the most talented artist, but the power of Photoshop gives us the ability to replicate it pretty well in just minutes. This makes it much more feasible to use the sketched look within your designs that might require an ‘artsy’ theme. If you don’t fancy creating this effect manually, you might be interested in my free Artistic Paint, Sketch & Ink Photo Effect Actions.
Begin by opening up your chosen source photograph in Adobe Photoshop. The effect works best with images that have a clean background in good lighting and focus, so working with a professional studio shot like this stock image from Shutterstock provides the best results.
Drag the Background layer over the New Layer icon in the Layers panel, or use the shortcut CMD+J to create a duplicate of the layer. Go to Image > Adjustments > Invert (or hit CMD+I) then right click and select Convert to Smart Object.
Under the Filter menu, select Gaussian Blur and alter the radius to around 40 pixels. The use of the Smart Object will apply this filter as a Smart Filter so we can fine tune the settings if necessary, rather than permanently apply the effect.
Change the blending mode of the duplicate background layer to Color Dodge, which dramatically boosts the contrast and brings out the grainy details of the image.
Click the Adjustment Layer icon at the bottom of the Layers panel and choose Levels. Move the shadows and midtones sliders slightly to the right to darken the image a little.
Add another Adjustment Layer, this time select the Black and White option. The default settings will suffice to remove the colour and generate more of a standard pencil appearance.
Use the shortcut CMD+A to Select All, then go to Edit > Copy Merged (or CMD+Shift+C). This will make a clipping of all the visible layers. Press CMD+V to paste this copy at the top of the layer stack.
Go to Filter > Filter Gallery, then navigate to Glowing Edges from under the Stylize menu. Change the settings to 1 Edge Width, and maximum Edge Brightness and Smoothness.
Invert the layer by heading to Image > Adjustments > Invert (or the CMD+I shortcut) to switch the colouring from white on black to black on white.
Change this glowing edges layer’s blending mode to Multiply to render the white background transparent, then reduce the opacity of the layer to around 50-60% to reduce the impact of these additional outlining sketch lines.
Click the New Layer icon at the bottom of the Layers panel, then press CMD+Backspace to fill the layer with white (the default background colour). Head back to the Filter Gallery but this time choose Texturizer. Change the setting to Sandstone.
Change this layer’s blending mode to Multiply so the underlying artwork can be seen, then reduce the opacity of the layer to around 50% to produce a much more subtle paper texture effect.
To achieve more of a coloured pencil drawing, the Black and White adjustment layer can be turned off to remove the desaturation effect.
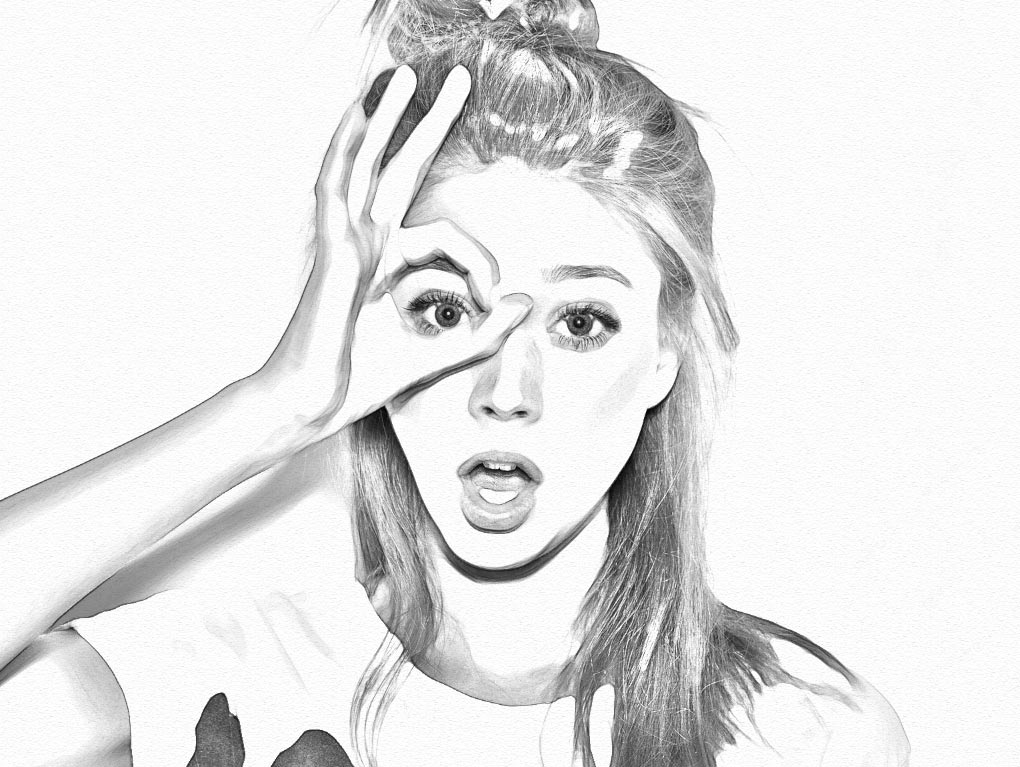
The final result is a realistic pencil sketch effect with authentic line work and shading. The blurred and inverted color dodge layer does the base work by boosting the contrast, but the additional effects like the glowing edges outline marks and the paper texture make the artwork much more believable. The use of the Smart Object also means you can adjust the amount of Gaussian Blur to fine tune the resu
Comments
Post a Comment