This tutorial will explain how to use Photoshop CS6′s new Shape and
3D capabilities to create a polished sleek acrylic/plastic/glass text
effect. Then, the coloring will be modified using two adjustment layers.
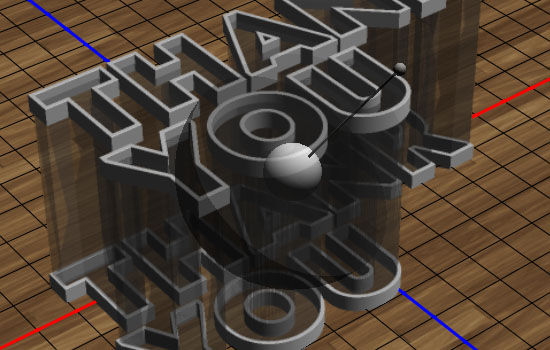
The Final Result:
 Notes:
* the software used in this tutorial is Adobe Photoshop CS5 Extended
* you might want to check the Basix Page to see some useful topics on dealing with Photoshop basics, such as loading palettes and some shortcuts.
Resources:
* INTRO font.
* Patterns 21 by Ransie3.
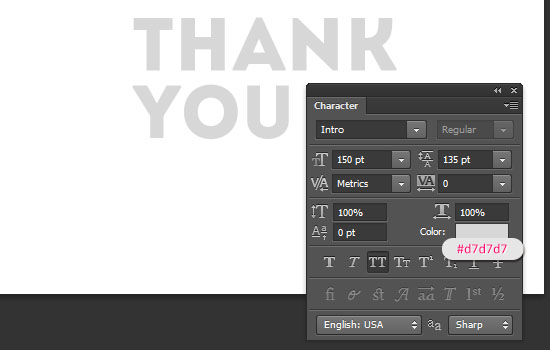
- Create a new 1152 x 864 px document, then create the text using the color #d7d7d7, the font INTRO, the font Size 150 pt, and if you’re using more than one line of text, set the Tracking value to 135 px.
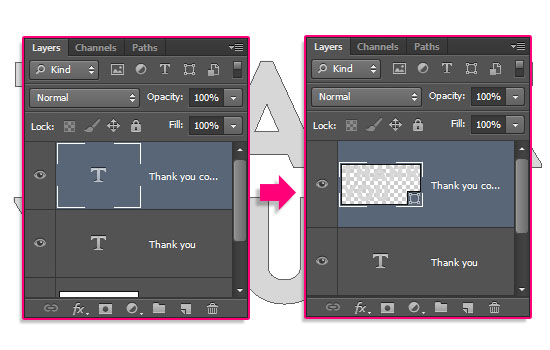
 - Duplicate the text layer, then right click the copy and choose Convert to Shape.
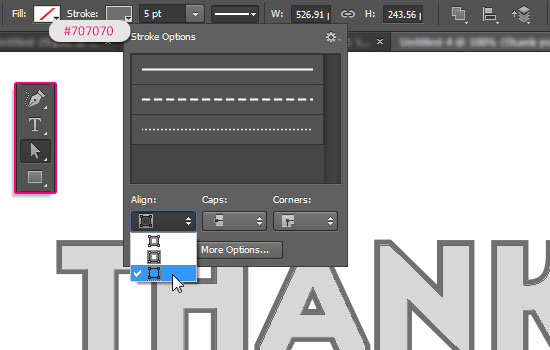
 - Pick the Direct Selection Tool, so that you’ll be able to modify
the Shape attributes in the Options bar. Change the Fill to None, and
change the Stroke color to #707070, the Stroke Size to 5, and the Align
to Outside.
- Pick the Direct Selection Tool, so that you’ll be able to modify
the Shape attributes in the Options bar. Change the Fill to None, and
change the Stroke color to #707070, the Stroke Size to 5, and the Align
to Outside.
 Step 2
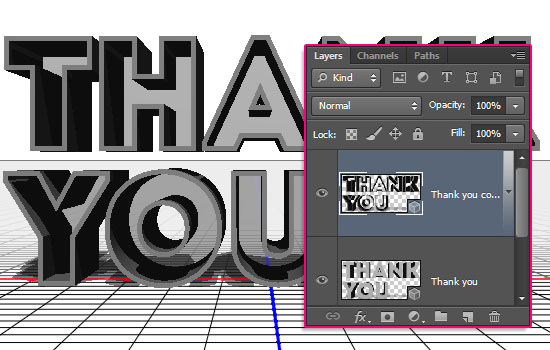
- Select the text layer, go to 3D -> New 3D Extrusion from Selected Layer, then select the shape layer and go to 3D -> New 3D Extrusion from Selected Path. This will convert both layers to 3D layers.
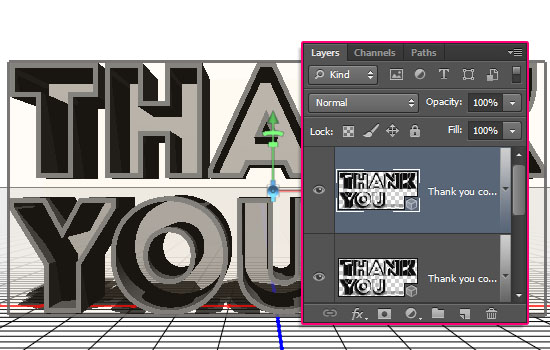
 - Duplicate the shape 3D layer.
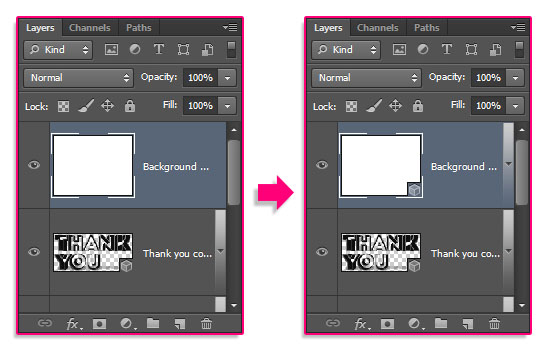
 - Duplicate the Background layer then drag the copy on top of all layers. Go to 3D -> New Mesh from Layer -> Postcard.
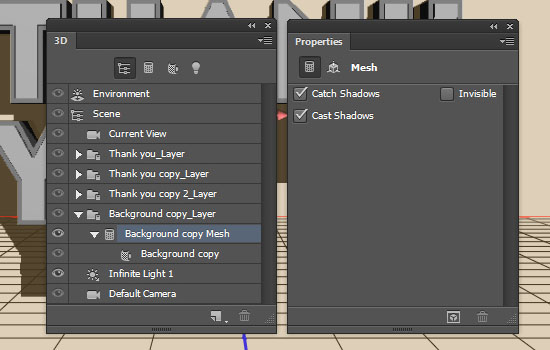
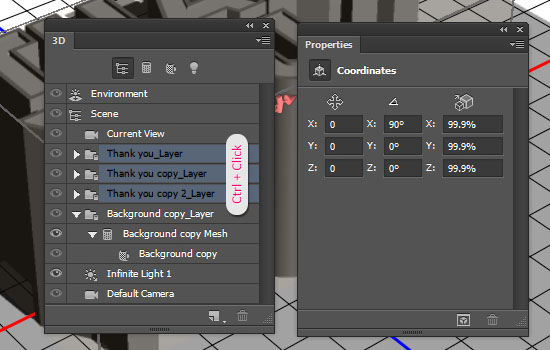
 - Now you have four separate 3D layers, which means they are in
separate scenes. To place all the meshes in one 3D scene, you need to
select all the 3D layers, then go to 3D -> Merge 3D Layers.
- Now you have four separate 3D layers, which means they are in
separate scenes. To place all the meshes in one 3D scene, you need to
select all the 3D layers, then go to 3D -> Merge 3D Layers.
 Step 3
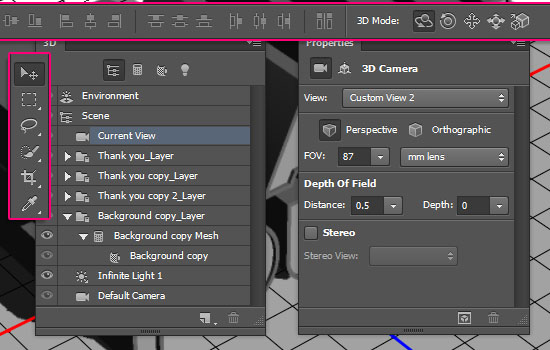
- To access the 3D mesh settings and properties, you’ll need to open two panels: The 3D panel, and the Properties panel (both found under the Window menu).
The 3D panel has all the components of the 3D scene, and when you click the name of any of those, you’ll be able to access its settings in the Properties panel. So make sure to always select the name of the element you want to modify in the 3D panel before you change its settings in the Properties panel.
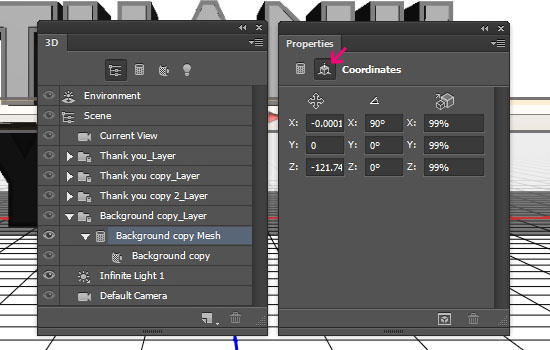
 - Start by clicking the Background mesh name in the 3D panel, then
click the Coordinates icon at the top of the Properties panel, and
change the X Rotation Angle to 90. This will make the plane parallel to
the ground.
- Start by clicking the Background mesh name in the 3D panel, then
click the Coordinates icon at the top of the Properties panel, and
change the X Rotation Angle to 90. This will make the plane parallel to
the ground.
 - Now go to 3D -> Snap Object to Ground Plane. Then, you’ll need
to increase the Y Position a very small value (something around 0.01) to
avoid problems when rendering. (The plane tends to get random scratches
sometimes if it’s not raised a bit above the original Ground Plane.)
- Now go to 3D -> Snap Object to Ground Plane. Then, you’ll need
to increase the Y Position a very small value (something around 0.01) to
avoid problems when rendering. (The plane tends to get random scratches
sometimes if it’s not raised a bit above the original Ground Plane.)
 Step 4
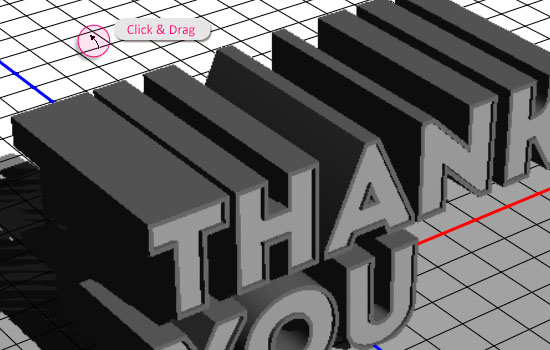
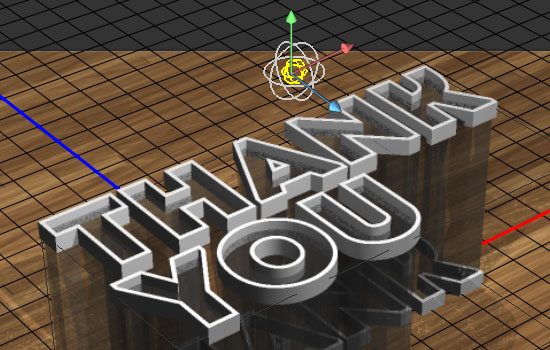
- Select the Move Tool and check its Options bar. You’ll find a set of 3D Modes for the tool to the right of the bar. When you choose one of those, you can then click and drag to perform any changes (on the selected element in the 3D panel).
Click the Current View tab in the 3D panel to change the camera angle.
 - Click and drag to move the scene around until you like the angle.
For this tutorial, the view is slightly from above, so we only need one
plane for the ground, and no walls or side planes.
- Click and drag to move the scene around until you like the angle.
For this tutorial, the view is slightly from above, so we only need one
plane for the ground, and no walls or side planes.
 Step 5
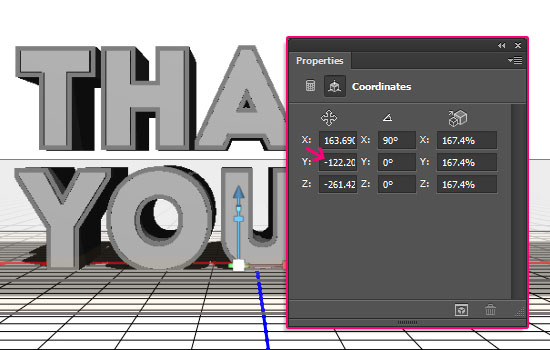
- Ctrl + Click the text mesh groups in the 3D panel, then click the Coordinates icon in the Properties panel, and change the X Rotation Angle to 90. Then go to 3D -> Snap Object to Ground Plane.
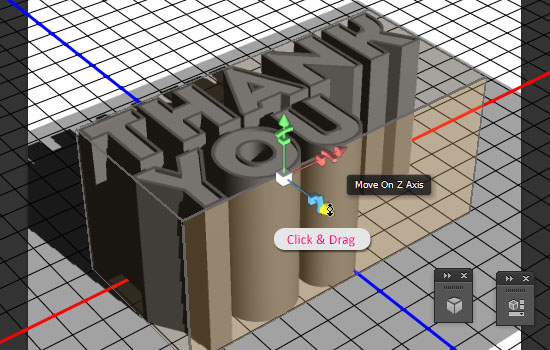
 - If you want to move the mesh, make sure that it is a permanent
change (not only to change the view). Then, you can click the mesh in
the 3D scene (or select its name in the 3D panel), and use the 3D axis
to make any changes.
- If you want to move the mesh, make sure that it is a permanent
change (not only to change the view). Then, you can click the mesh in
the 3D scene (or select its name in the 3D panel), and use the 3D axis
to make any changes.
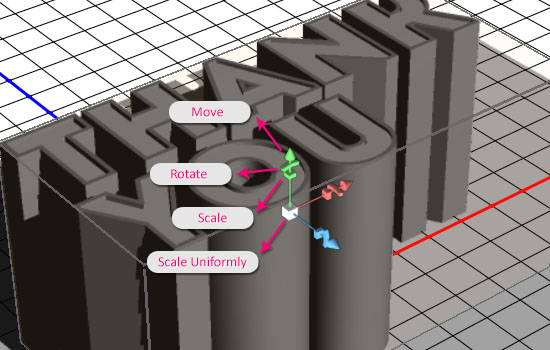
The arrows at the ends of the axis move the mesh, the part below them is used for rotation, and the cubes are used for scaling. The cube in the center is used to scale the object uniformly. All you need to do is click and drag the wanted part.
It might seem a bit hard at first, and things will start flying everywhere, but you’ll get used to working in the 3D space with time and practice.
 - Place the mesh as you want in the scene. This is a good time to
switch between the camera view and the mesh position to get the final
view you like.
- Place the mesh as you want in the scene. This is a good time to
switch between the camera view and the mesh position to get the final
view you like.
 Step 6
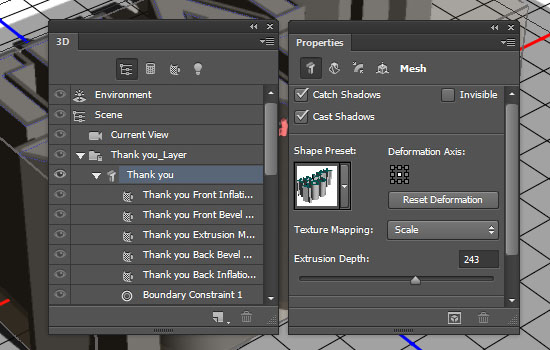
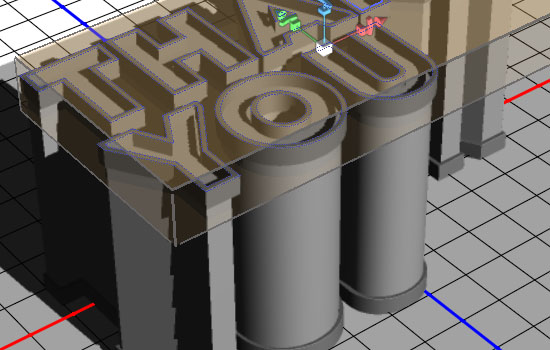
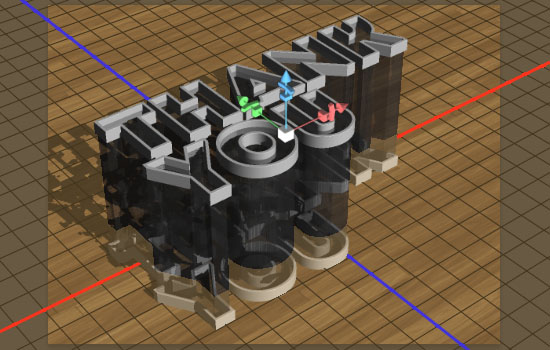
- Click the main 3D text mesh name in the 3D panel (the original text layer). Based on how long or short you want the transparent part of the text be, change the Extrusion Depth to a value you like. Here, it is set to 243.
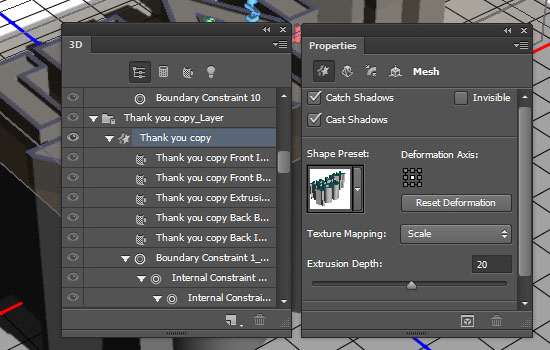
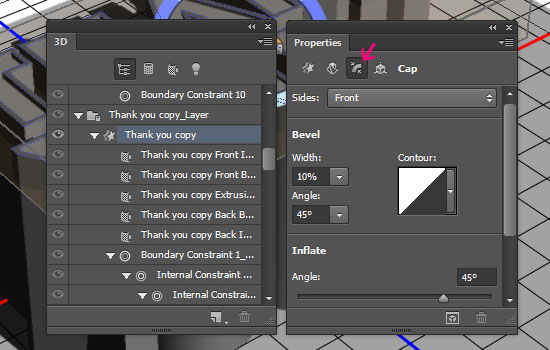
 - Click the first text shape layer mesh name, and change its Extrusion Depth value to 20.
 - Click the Cap icon in the Properties panel, and change the Bevel Width to 10%.
 - Do the same for the other text shape layer (the copy). Then snap
one of the shape layers to the ground plane, and move the other upwards
until it extends higher then the long part of the text.
- Do the same for the other text shape layer (the copy). Then snap
one of the shape layers to the ground plane, and move the other upwards
until it extends higher then the long part of the text.
 Step 7
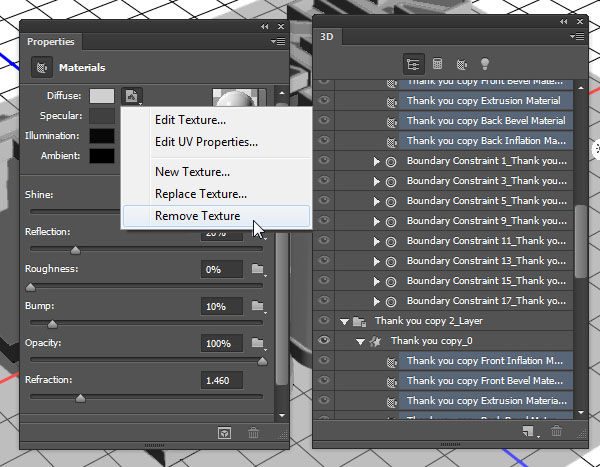
- Select all the Material tabs of the text shape layers (Ctrl + Click each one), then click the texture icon next to Diffuse and choose Remove Texture. You’ll need to do this whenever you see the Diffuse texture icon for any material as well.
 - Change the rest of the values as shown below. this will create an opaque white plastic-like material.
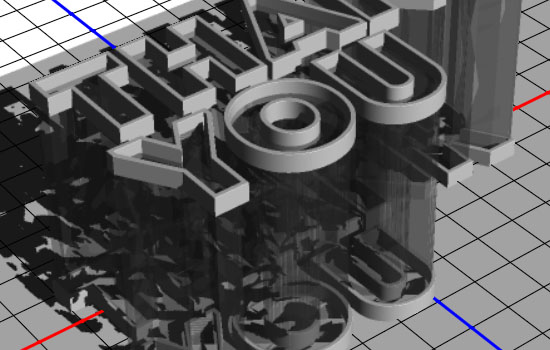
 - Select all the main text mesh materials, and use the values shown below to create the transparent part.
 - Keep in mind that you can use any other Diffuse colors you like for
the materials, so you don’t need to stick to the ones shown here.
- Keep in mind that you can use any other Diffuse colors you like for
the materials, so you don’t need to stick to the ones shown here.
 Step 8
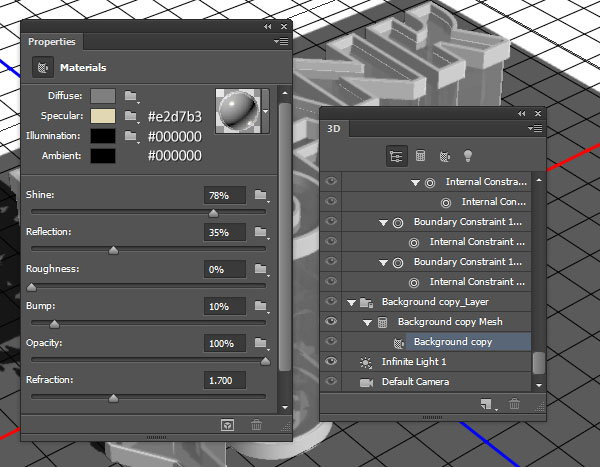
- Select the Background material tab, remove both the Diffuse and Opacity textures, then use the values shown below to create a slightly reflective ground plane material.
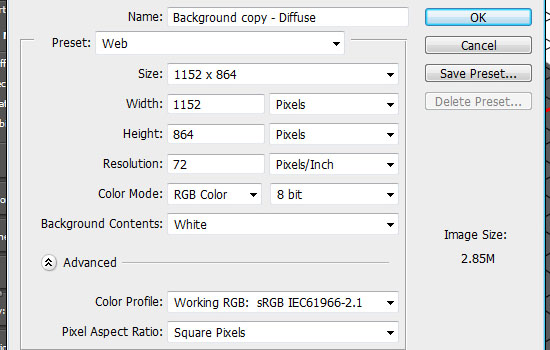
 - Click the Diffuse folder icon and choose New Texture.
 - Set the dimensions to 1152 and 864.
 - Click the Diffuse texture icon and choose Edit Texture.
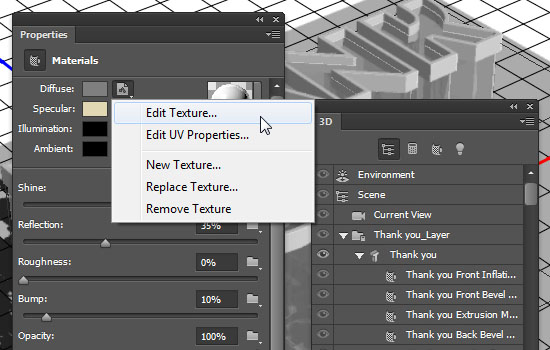 - This will open the texture file. Duplicate the Background layer.
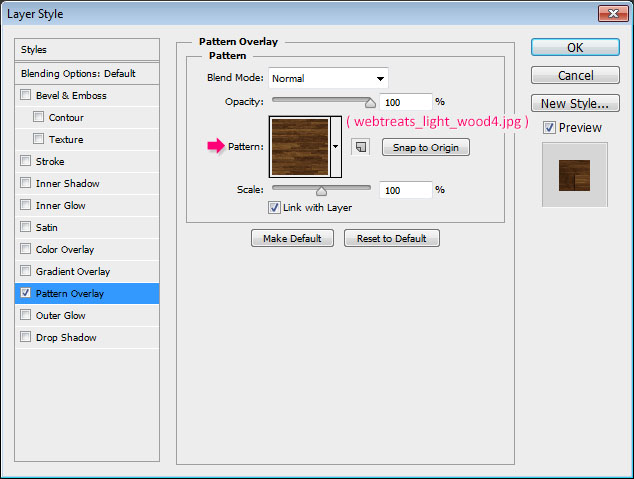
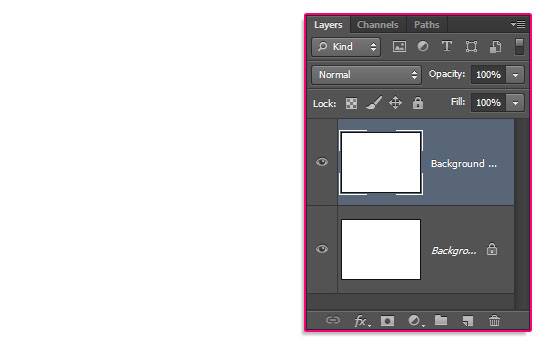 - Double click the copy Background layer to apply a Pattern Overlay
effect, and choose the “webtreats_light_wood4.jpg” pattern from the pack
provided in the Resources section at the beginning of the tutorial.
- Double click the copy Background layer to apply a Pattern Overlay
effect, and choose the “webtreats_light_wood4.jpg” pattern from the pack
provided in the Resources section at the beginning of the tutorial.
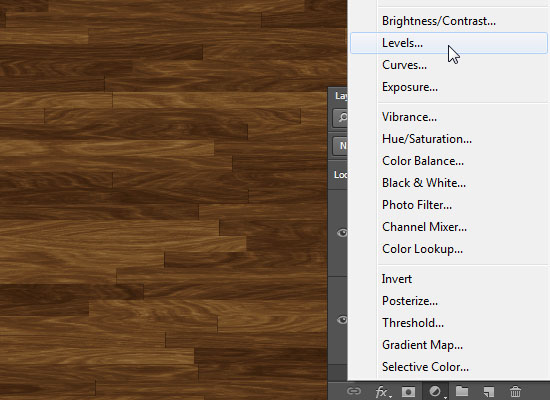
 - Click the ‘Create new fill or adjustment layer’ icon down the Layers panel and choose Levels.
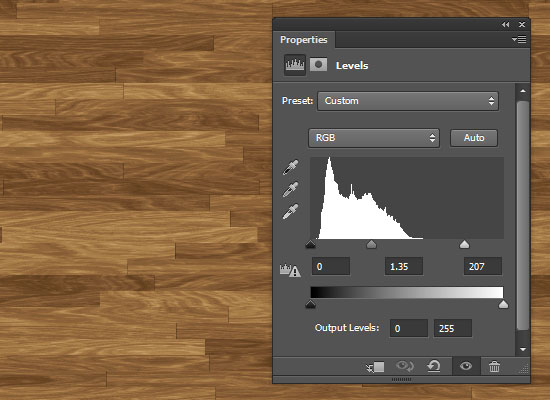
 - Change the Gamma value to 1.35 and the Highlights value to 207.
Save this file (File -> Save), then close it (File -> Close) to go
back to the original document.
- Change the Gamma value to 1.35 and the Highlights value to 207.
Save this file (File -> Save), then close it (File -> Close) to go
back to the original document.
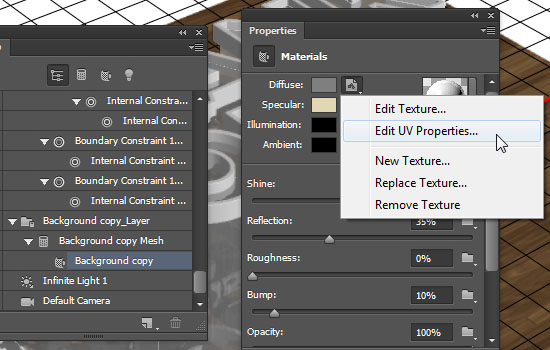
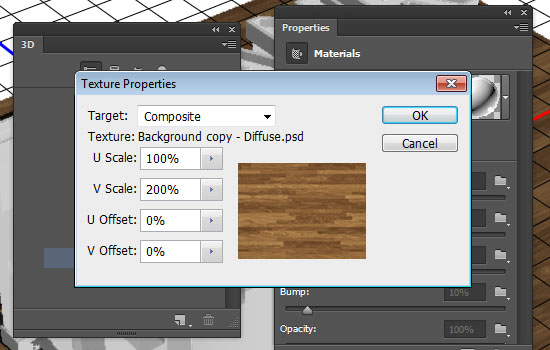
 - Click the Diffuse texture icon again, and choose Edit UV Properties.
 - Set the U Scale to 100%, the V Scale to 200%, and both the U Offset and V Offset values to 0.
 - After applying the material, scale the plane so that it covers the
document and leaves no areas empty. Make sure to snap it to the ground
plane again if needed, then increase the the Y Position once again like
you did previously.
- After applying the material, scale the plane so that it covers the
document and leaves no areas empty. Make sure to snap it to the ground
plane again if needed, then increase the the Y Position once again like
you did previously.
 Step 9
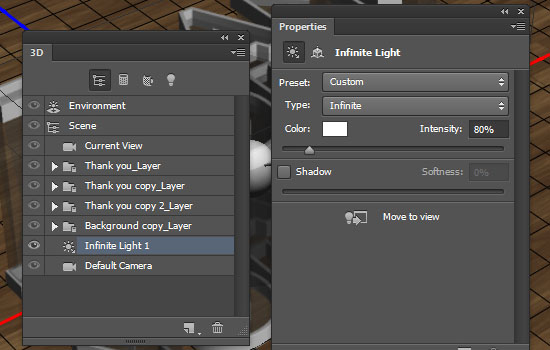
- Click the Infinite Light 1 tab down the 3D panel, then change its Intensity to 80%, and un-check its Shadows box.
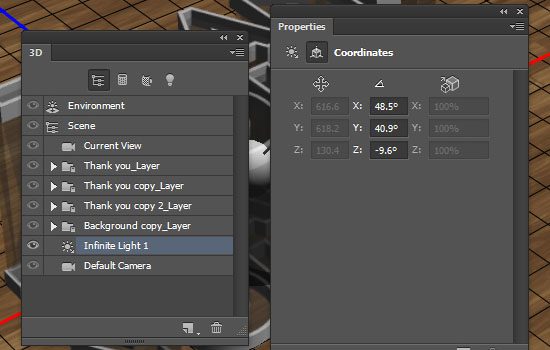
 - Positioning the light depends on your scene. So the mesh size, the
camera view, and the way you want the lighting to look like. But if
you’re following along with this tutorial, here are the values used:
- Positioning the light depends on your scene. So the mesh size, the
camera view, and the way you want the lighting to look like. But if
you’re following along with this tutorial, here are the values used:
 - Also, remember that you can use the Move Tool to click and drag the light around.
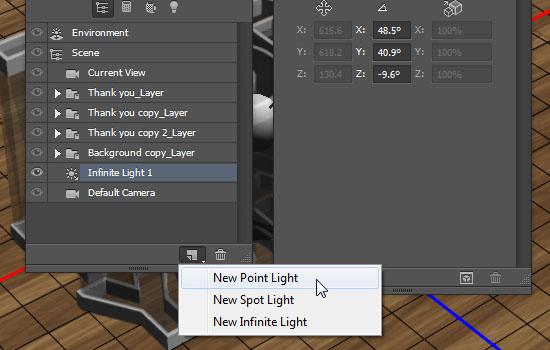
 - Click the Add new Light to Scene icon at the bottom of the 3D panel, and choose New Point Light.
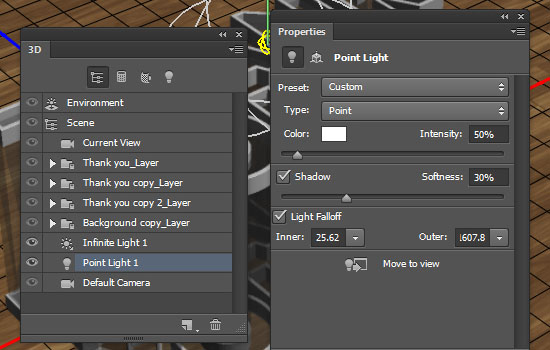
 - Set the Intensity to 50%, and the Shadow Softness to 30%.
To make the light more natural, check the Light Falloff box. This will make the light fade gradually as it gets further away from the light source itself.
The values used for the light falloff are 25.62 for the Inner value, and 1607.83 for the Outer value.
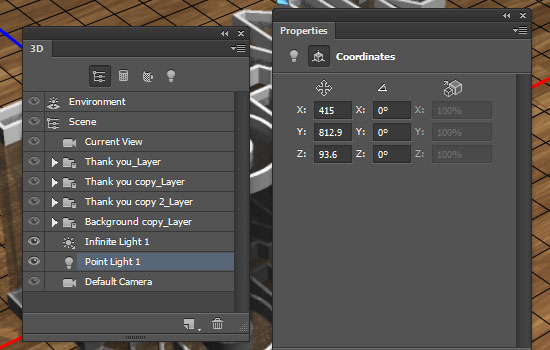
 - Change the light position in a way that brightens up the text, and
casts the shadows behind it. Here are the values used in this tutorial.
- Change the light position in a way that brightens up the text, and
casts the shadows behind it. Here are the values used in this tutorial.
 - That’s about it for the lighting.
 Step 10
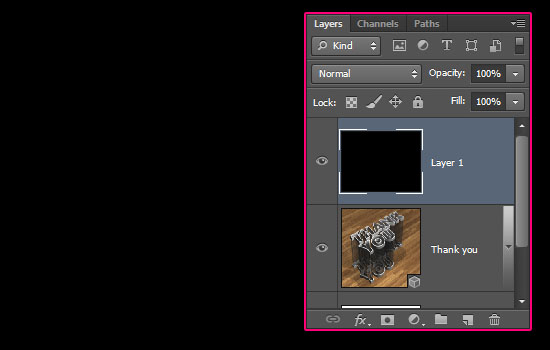
- Create a new layer on top of the 3D layer and fill it with black.
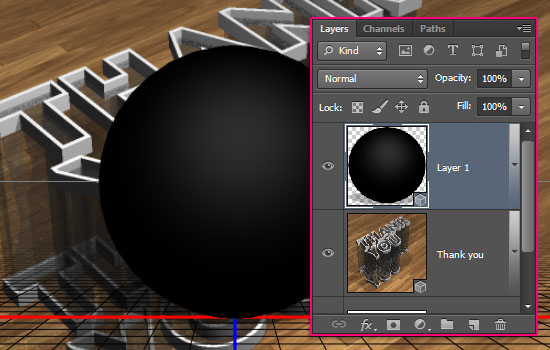
 - Go to 3D -> New Mesh from Layer -> Mesh Preset -> Sphere.
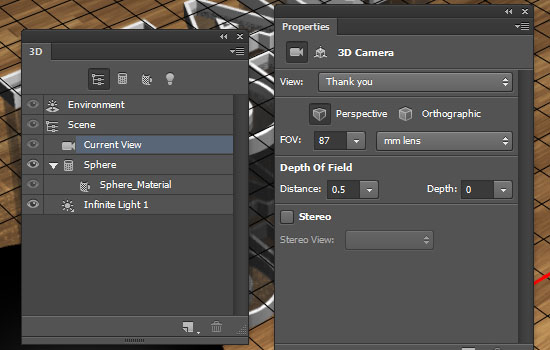
 - Click the Current View tab, and choose the main scene 3d layer’s
name from the View drop down menu in the Properties panel. This will
match the camera angle for both layers.
- Click the Current View tab, and choose the main scene 3d layer’s
name from the View drop down menu in the Properties panel. This will
match the camera angle for both layers.
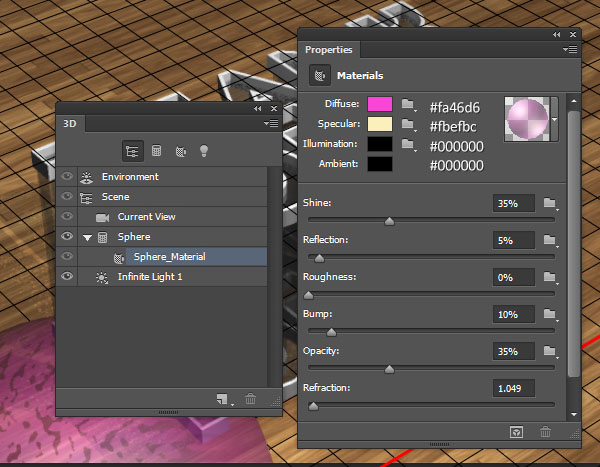
 - Select the Sphere’s material tab, and apply the material values shown below.
The spheres are a simple addition to the scene that will also add a pop of color to make the final result more fun and not so dull with all the neutral colors. So feel free to choose any other color you like.
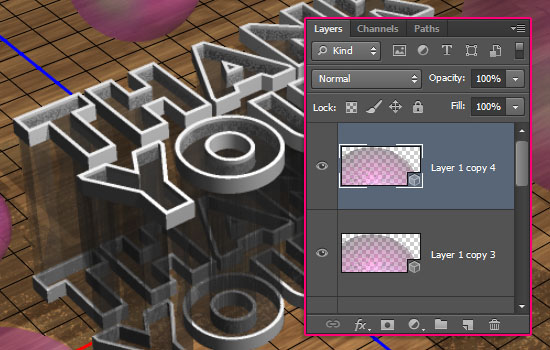
 - Duplicate the sphere’s layer as many times as needed to get the number of spheres you want to add to the scene.
You can change the Diffuse color for each one if you like too.
It should be mentioned that at this point of the tutorial, the 3D objects might get a little heavy on your computer. So try not to create so many spheres. 2 – 5 are enough.
Select all the 3D layers and merger them (3D -> Merge 3D Layers), then start placing the spheres in the scene. You can scale them up or down as needed too.
This step might take some time, depending on the number of spheres you created.
 - When you’re done, go ahead and render the scene (3D -> Render).
The rendering might take a little longer than usual, because there are so many transparent objects and soft shadows. But you can stop the rendering anytime by clicking anywhere inside the document.
 Step 11
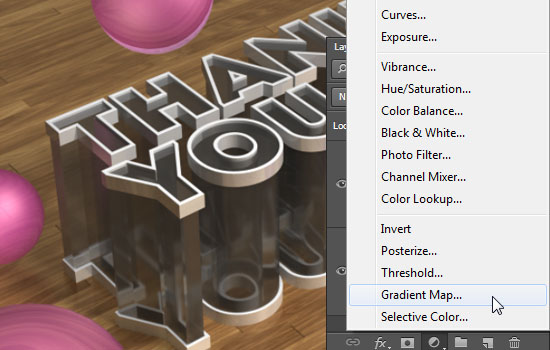
- When you’re done rendering, click the ‘Create new fill or adjustment layer’ icon down the Layers panel and choose Gradient Map.
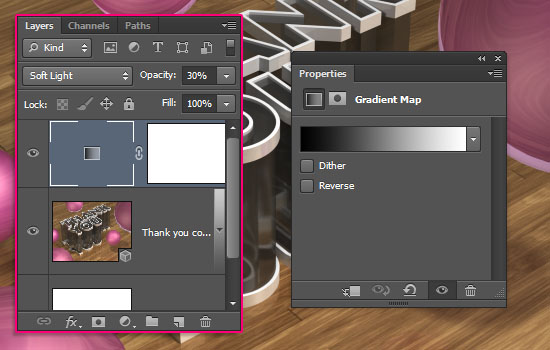
 - Choose a black to white gradient, then change the adjustment
layer’s Blend Mod to Soft Light and its Opacity to 30%. This will make
the colors more vibrant and enhance the contrast a little bit.
- Choose a black to white gradient, then change the adjustment
layer’s Blend Mod to Soft Light and its Opacity to 30%. This will make
the colors more vibrant and enhance the contrast a little bit.
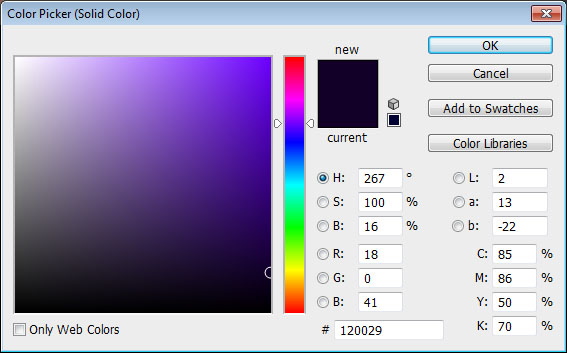
 - Click the ‘Create new fill or adjustment layer’ and choose Solid Color.
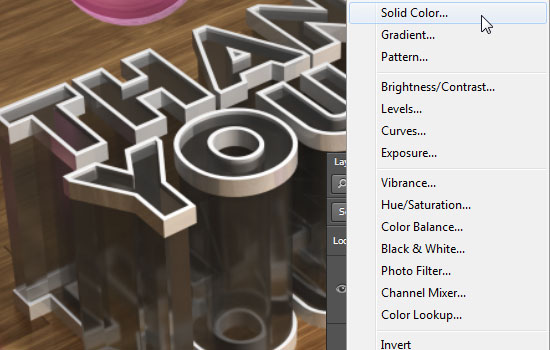 - Set the color in the Color Picker to #120029.
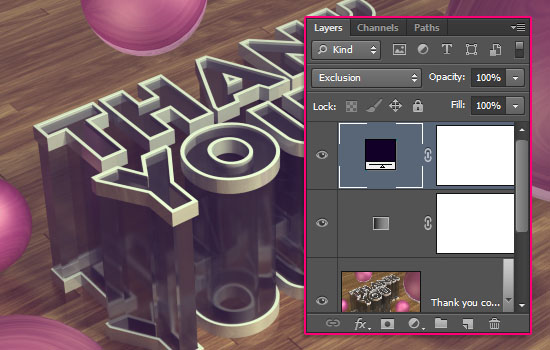
 - Change the Layer’s Blend Mode to Exclusion.
 And that’s all!
Hope you enjoyed the tutorial and found it helpful.
The Final Result:

* the software used in this tutorial is Adobe Photoshop CS5 Extended
* you might want to check the Basix Page to see some useful topics on dealing with Photoshop basics, such as loading palettes and some shortcuts.
Resources:
* INTRO font.
* Patterns 21 by Ransie3.
Big Thank You!
On the 22nd of July 2010, the first ever textuts tutorial was published. Three years later, this is tutorial number 90!
And those three years have been among the best years indeed. So I want to send many big thanks to all textuts’ readers for the amazing support, which means so very much.
This really can’t be put into words, but I truly appreciate you making this journey so special and so splendidly beautiful. So thank you very much once again.
If you’ve got anything you’d like to say or suggest, just go ahead and send me a message through the contact form.
This is my “Thank You” text effect for textuts’ third birthday, I hope you like it
Best regards,
Rose
Step 1 And those three years have been among the best years indeed. So I want to send many big thanks to all textuts’ readers for the amazing support, which means so very much.
This really can’t be put into words, but I truly appreciate you making this journey so special and so splendidly beautiful. So thank you very much once again.
If you’ve got anything you’d like to say or suggest, just go ahead and send me a message through the contact form.
This is my “Thank You” text effect for textuts’ third birthday, I hope you like it
Best regards,
Rose
- Create a new 1152 x 864 px document, then create the text using the color #d7d7d7, the font INTRO, the font Size 150 pt, and if you’re using more than one line of text, set the Tracking value to 135 px.
- Select the text layer, go to 3D -> New 3D Extrusion from Selected Layer, then select the shape layer and go to 3D -> New 3D Extrusion from Selected Path. This will convert both layers to 3D layers.
- To access the 3D mesh settings and properties, you’ll need to open two panels: The 3D panel, and the Properties panel (both found under the Window menu).
The 3D panel has all the components of the 3D scene, and when you click the name of any of those, you’ll be able to access its settings in the Properties panel. So make sure to always select the name of the element you want to modify in the 3D panel before you change its settings in the Properties panel.
- Select the Move Tool and check its Options bar. You’ll find a set of 3D Modes for the tool to the right of the bar. When you choose one of those, you can then click and drag to perform any changes (on the selected element in the 3D panel).
Click the Current View tab in the 3D panel to change the camera angle.
- Ctrl + Click the text mesh groups in the 3D panel, then click the Coordinates icon in the Properties panel, and change the X Rotation Angle to 90. Then go to 3D -> Snap Object to Ground Plane.
The arrows at the ends of the axis move the mesh, the part below them is used for rotation, and the cubes are used for scaling. The cube in the center is used to scale the object uniformly. All you need to do is click and drag the wanted part.
It might seem a bit hard at first, and things will start flying everywhere, but you’ll get used to working in the 3D space with time and practice.
- Click the main 3D text mesh name in the 3D panel (the original text layer). Based on how long or short you want the transparent part of the text be, change the Extrusion Depth to a value you like. Here, it is set to 243.
- Select all the Material tabs of the text shape layers (Ctrl + Click each one), then click the texture icon next to Diffuse and choose Remove Texture. You’ll need to do this whenever you see the Diffuse texture icon for any material as well.
- Select the Background material tab, remove both the Diffuse and Opacity textures, then use the values shown below to create a slightly reflective ground plane material.
- Click the Infinite Light 1 tab down the 3D panel, then change its Intensity to 80%, and un-check its Shadows box.
To make the light more natural, check the Light Falloff box. This will make the light fade gradually as it gets further away from the light source itself.
The values used for the light falloff are 25.62 for the Inner value, and 1607.83 for the Outer value.
- Create a new layer on top of the 3D layer and fill it with black.
The spheres are a simple addition to the scene that will also add a pop of color to make the final result more fun and not so dull with all the neutral colors. So feel free to choose any other color you like.
You can change the Diffuse color for each one if you like too.
It should be mentioned that at this point of the tutorial, the 3D objects might get a little heavy on your computer. So try not to create so many spheres. 2 – 5 are enough.
Select all the 3D layers and merger them (3D -> Merge 3D Layers), then start placing the spheres in the scene. You can scale them up or down as needed too.
This step might take some time, depending on the number of spheres you created.
The rendering might take a little longer than usual, because there are so many transparent objects and soft shadows. But you can stop the rendering anytime by clicking anywhere inside the document.
- When you’re done rendering, click the ‘Create new fill or adjustment layer’ icon down the Layers panel and choose Gradient Map.
Hope you enjoyed the tutorial and found it helpful.
Comments
Post a Comment