
Plastic Jelly Styles


In this tutorial, we’ll be using layer styles to make a plastic gel-type style that you can easily apply to text and shapes. You can download the PSD file from the link at the bottom of the tutorial to just copy+paste the styles.

Step 1:

BACKGROUND LAYER
We start as always with a background gradient. I’ve used a Radial Gradient with two shades of the exact same brown that this site uses. The exact color codes are:
Foreground color – #2f2520
Background color – #1e1916

Step 2:

Now in a nice delectable green, we write a word. I’ve written ‘Jelly’ and used the font "Gill Sans Ultra Bold." Bolder fonts are good for this sort of effect because there is more room to actually do stuff with the styles.

Step 3:

So now we right-click on the layer and choose Blending Options to start adding styles. First we add a drop shadow to lift the letters off the background and then an inner shadow. Later on when we add highlights, this shadow will contrast nicely with them.
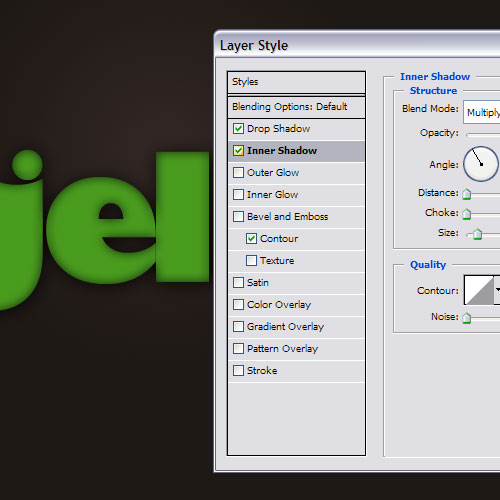
Step 4:

To create the highlights, we use Bevel and Emboss. The default settings for bevel and emboss suck, so don’t use those. I’ve moved some things around and if you download the sample PSD, you’ll see what I mean. The highlights need to be shades of green to make it look like light is bouncing around inside the letters.
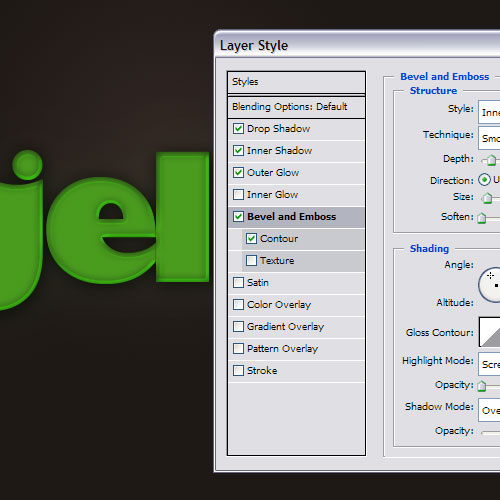
Step 5:

Next we add a Gradient Overlay and a Stroke. The gradient gives a bit of light and dark to the letters and the stroke helps seal it off at the edges.
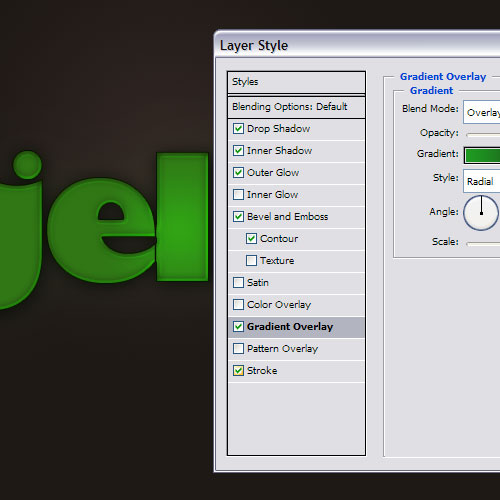
Step 6:

Now the neat thing about this style is you can just change the coloring on each set of blending options and you have a new color for the style. Here I’ve written a second word and applied the style there too but this time with red settings.

Step 7:

To finish it off, create a new layer above and then hold down Ctrl and click on the layer to select it.

Step 8:

Then go to Select > Modify > Contract and use a value of 4 pixels to shrink the selection.
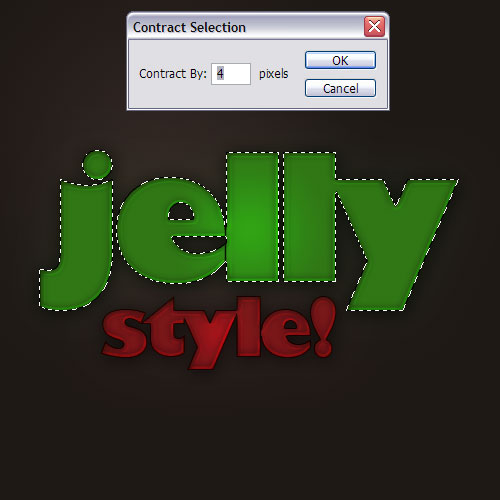
Step 9:

Now we need a gradient that goes from white to transparency which you can choose by switching to the gradient tool and using the little thumbnail thing up at the top left (shown in the image)
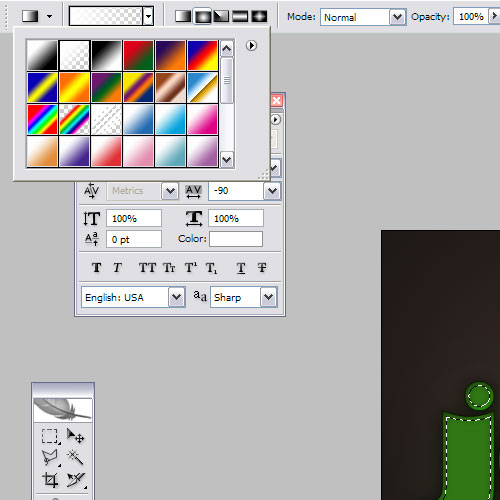
Step 10:

Using that gradient, draw a gradient in the selection from white to transparency.

Step 11:

Then make an elliptical selection using the selection tool and hit delete as shown. This will make the highlight you just drew suddenly stop and consequently look very plasticky.

Step 12:

And that’s it! I’ve repeated the same highlight steps on the word ‘Style’ as well.

Comments

Popular posts from this blog

Use x-ray techniques in Photoshop to show naked skin through clothing

    Do those new naked body scanners have you freaked out at the airports? As far as the TSA is concerned, those x-ray machines are here to stay, but you might as well take comfort in knowing that airport security guards aren't the only ones looking at your private parts. Practically anyone with a computer can manage to see through your clothes, and it's all thanks to a little program called Photoshop. Thanks, Adobe. With a few tweaks using the tools in Photoshop, you can see those boobs in no time, male or female. The video is in German, but it's not hard to figure our what's going on, especially if you're familiar with Photoshop. First, create a few duplicate layers, then get a handle on some of these tools to make the naked body through the clothes: * Auswahl erstellen (Create Selection) * Tonwertspreizung (Input Levels) * Belichtung (Exposure) You can also do this see-through clothing effect in free design programs, such as  GIMP .

Photoshop Photo Effects Tutorials 2024

  Photoshop Photo Effects Tutorials Everyone loves Photoshop effects. Not only are photo effects fun to create, but they’re a great way to learn Photoshop since they often introduce us to tools, commands or other features we might otherwise never know about! All of our Photoshop effects tutorials are written with beginners in mind, with easy-to-follow, step-by-step instructions. See our complete list below, or download our tutorials as  print-ready PDFs ! Fade an Image to Color in Photoshop Faster with Live Gradients Learn how to fade an image to color with Photoshop the new and easy way using live gradients! How to Add Falling Snow to Photos with Photoshop Learn how to add realistic falling snow to your winter photos with Photoshop. Get Better Color Halftone Effects in Photoshop Learn how to create more realistic color halftone patterns using Photoshop’s Color Halftone filter and this simple trick. How to Create a Halftone Dot Pattern in Photoshop Learn how to turn your photo into a h

Ridiculously Cool Photoshop Text Effect Tutorials

  Easy Photoshop Text Tutorials for Beginners If you’re still learning the fundamentals of design or want some quick-and-easy text ideas to jazz up your print designs, these beginner tutorials will be a big asset. In your lessons you’ll learn how to apply texture and 3D effects, create logos, utilize masks and other simple techniques for enhancing your text. 1.  Using Text As A Container For More Text In Photoshop 2.  Glossy Emblem Text Effects 3.  Create a Realistic Emboss/Deboss Effect 4.  Icy Styles in Photoshop 5.  How To Create a Gold Text Effect in Photoshop 6. Moon Shine Text Effect 7. Simple Styled Text with Stars Effect 8.  Elegant Glossy Gold Text Effect 9.  Hipster Text Effect in Photoshop CS6 10.  The Sugar Bag Effect 11.  Easy Chalk Ornament Typography in Photoshop 12.  Abstract Shining Text Effect with Groovy Font 13.  Easy Plastic Text with Layer Styles In Photoshop 14.  Papercraft Text Effect 15.  Making a Clipping Mask With Text In Photoshop 16.  Simple Bokeh Text Effe