Step 1
Create a new 1024 x 768 px document, or any other values depending on the text you’ll be creating. Set the Foreground color to #684f48 and the Background color to #2b1915. Pick the Gradient Tool, choose the Foreground to Background fill and click the Radial Gradient icon in the Options bar, then click and drag from the center of the document to one of the corners to create the gradient.
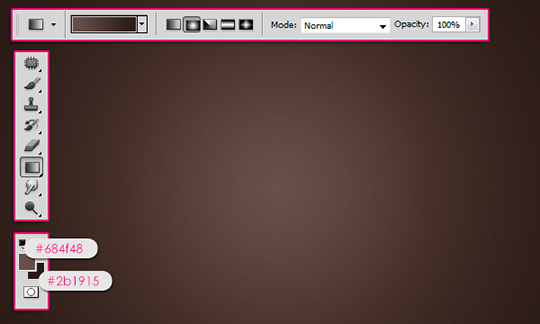
Create the text in All Caps using the color White, and the font Minipop G. The font size is 255 pt, and the Tracking value is set to 200 to avoid overlapping of the 3D letters.

Step 2
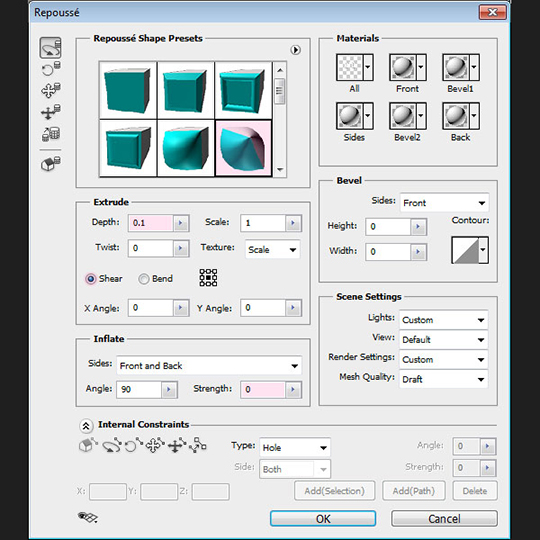
Go to 3D -> Repoussé -> Text Layer. A dialog box will appear telling you that this will rasterize the type layer, and you will no longer be able to modify your text. So if you are sure you don’t need to modify your text, click yes and continue.
Under the Repoussé Shape Presets, choose Inflate Sides. Then, under Extrude change the Depth to 0.1, and click the Shear radio button. Under Inflate change the Strength to 0.
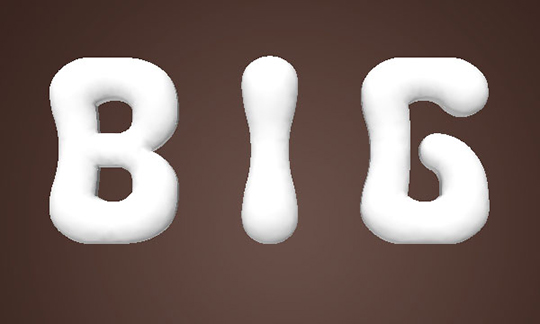
The text is in 3D now. Open the 3D panel (Window -> 3D) to start modifying the 3D object.
Step 3
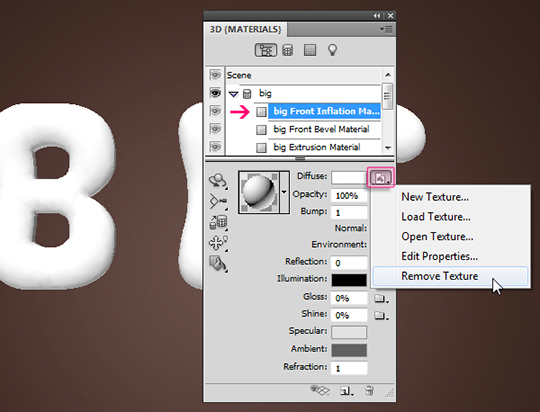
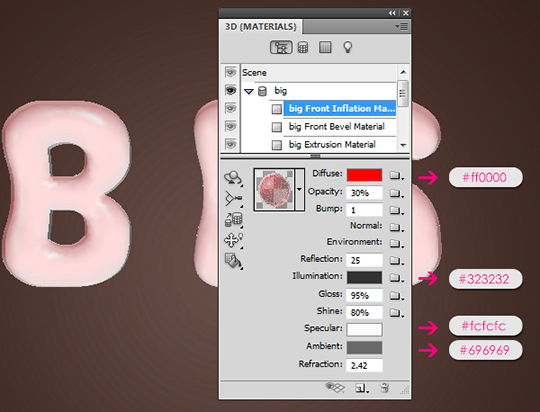
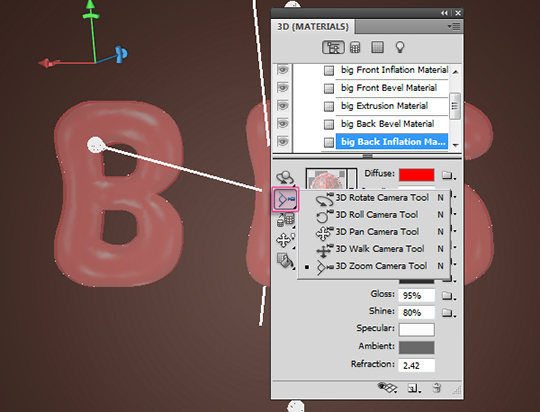
Select the “Front Inflation Material” to modify its values. First thing you need to do with all the materials is to remove the Diffuse texture if there is one, so that you can change the Diffuse color. To do so, click the texture icon next to the Diffuse attribute and choose “Remove Texture”.
Change the Diffuse color to #ff0000, the Opacity to 30% (to make the text transparent), the Reflection to 25, the Illumination color to #323232, the Gloss to 95%, the Shine to 80%, the Specular color to #fcfcfc, the Ambient color to #ca0000, and the Refraction value to 2.42.
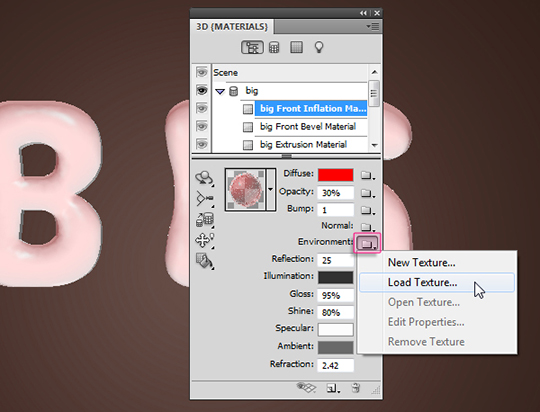
Click the folder icon next to the Environment attribute and choose Load Texture, then open the “EnvironmentTexture.jpg” image (found in the Assets section in the beginning of the tutorial).
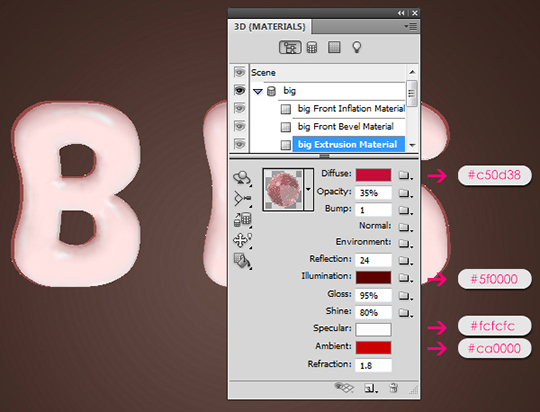
Select the “Extrusion Material” to modify its attributes. Change the Diffuse color to #c50d38, the Opacity to 35%, the Reflection to 25, the Illumination color to #5f0000, the Gloss to 95%, the Shine to 80%, the Specular color to #fcfcfc, the Ambient color to #696969, and the Refraction value to 1.8.
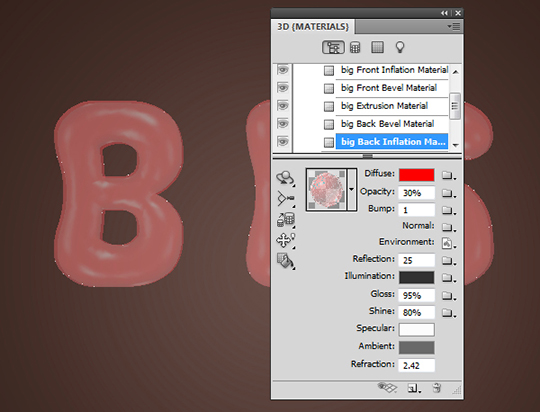
As for the “Back Inflation Material”, just use the same values used for the “Front Inflation Material”.
Step 4
Use the Camera Tools to change the camera view (angle). You can rotate, move, or zoom in and out until you like the view you have.
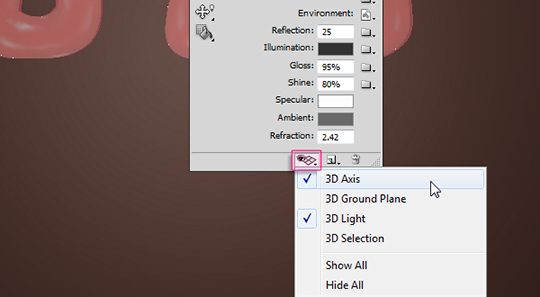
If you don’t see the 3D Axis you can get it by clicking the “Toggle misc 3D extras” icon down the 3D panel, then check the 3D Axis. You might as well check the 3D Light option, as it will be used later on.
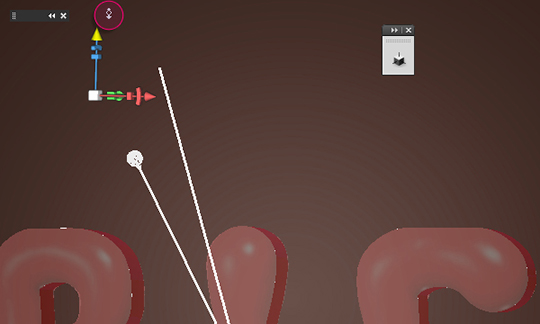
Once the Camera position is set, use the “3D Object Pan Tool” to move the 3D text upwards. Moving the Object itself changes its actual position, while moving the camera changes the view angle only. Moving the object upwards is the only position change needed, any other rotation or zoom values should be changed using the camera tools.
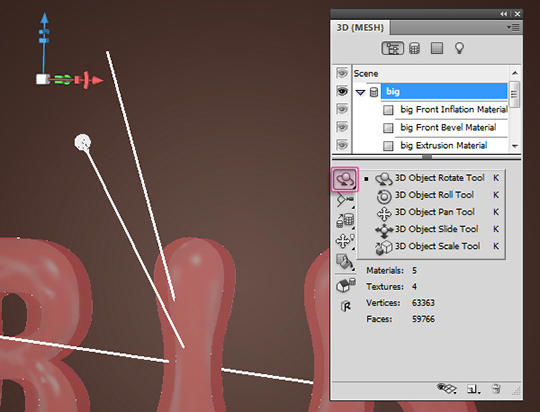
You can click the blue axis and drag upwards to make sure this is the only change you make to the object’s position.
Step 5
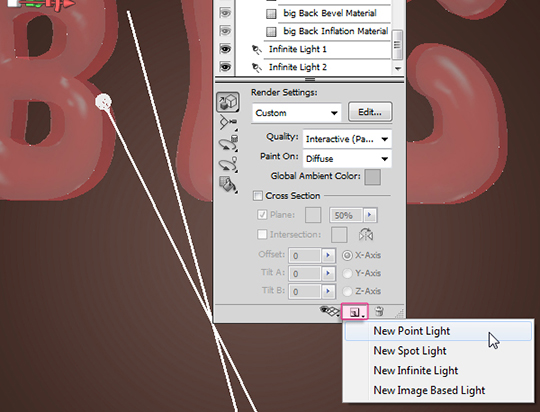
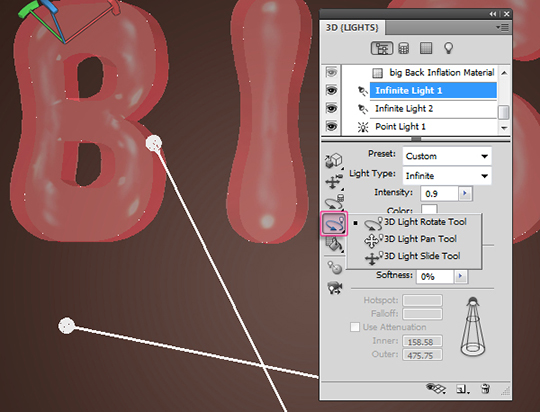
Scroll down the 3D panel and select the “Infinite Light 3″, then click the “Delete Light” icon down the panel to get rid of the light.
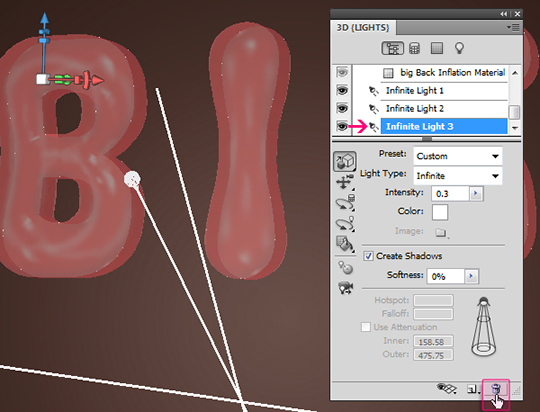
Click the “Create new light” icon and choose New Point Light.
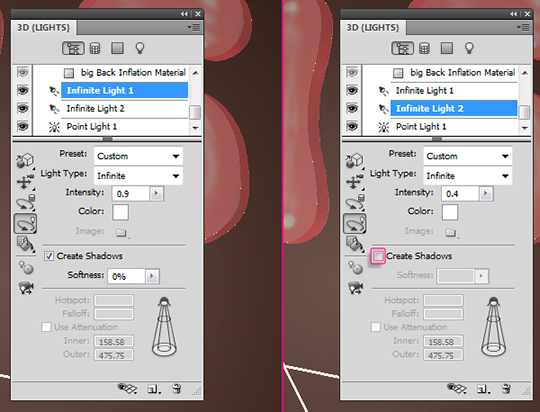
Select “Infinite Light 1″ and make sure the values are as below. Do the same for “Infinite Light 2″, and make sure to un-check the Create shadows box.
As for the “Point Light 1″, change the Intensity to 3.17, and the color to #fff4d5.
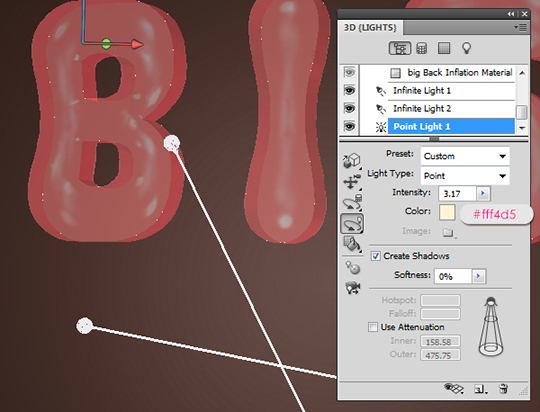
Now, use the 3D Light Tools to move the light around in the scene as you like. Just make sure the lighting is not very bright or very dark.
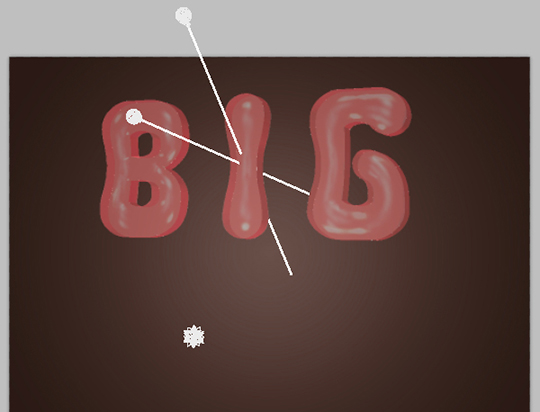
This is how the lights are positioned in this tutorial.
Step 6
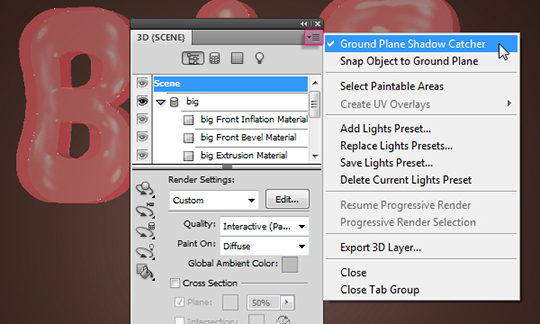
Click the pop-up menu arrow in the top right corner of the 3D Panel, then click the Ground Plane Shadow Catcher option, so that the shadows will be rendered without the need to create a surface to catch them.
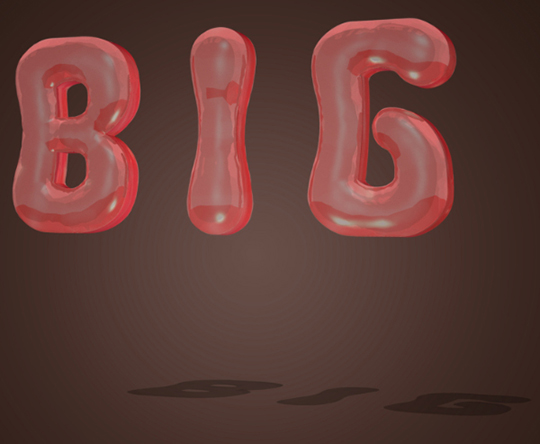
Click Scene at the top of the 3D Panel, then choose Ray Traced Final from the Quality drop down menu. This will start the rendering of the 3D scene. You can stop the rendering any time by clicking anywhere in the document.

The rendering might take a couple of hours, and you should get a result similar to this.
Step 7
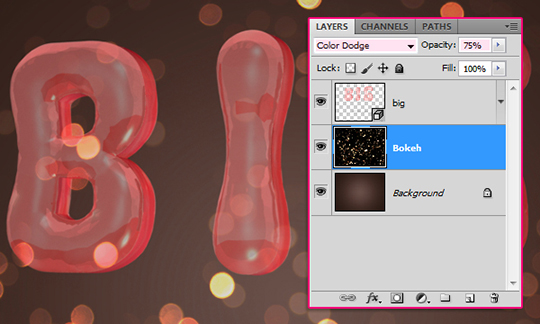
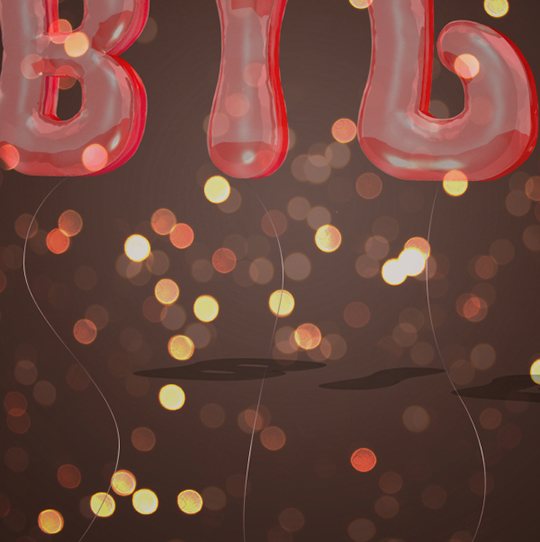
Place the “- Bokeh – Golden Lights 5184 x 3456 Pixels” texture on top of the Background layer, then change its layer’s Blend Mode to Color Dodge, and its Opacity to 75%.
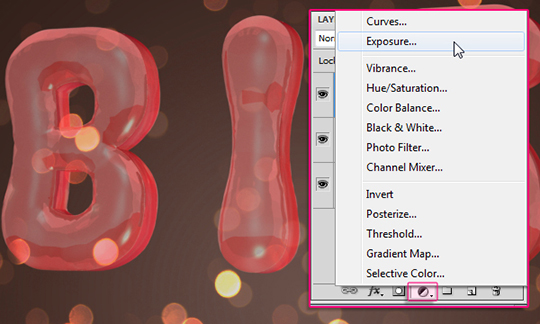
Click the “Create new fill or adjustment layer” icon down the Layers panel and choose Exposure.
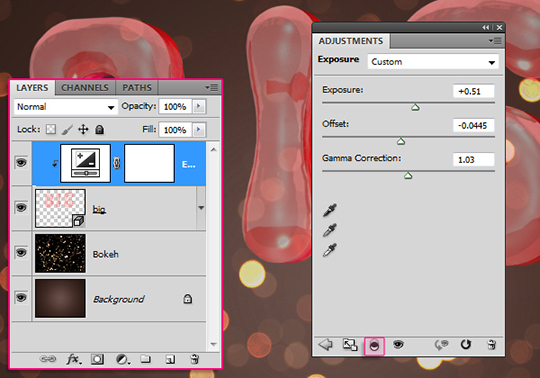
Click the third icon from the left down the Adjustments panel (Window -> Adjustments) to clip the adjustment to the 3D layer only without affecting the other layers. Then, change the Exposure to +0.51, the Offset to -0.0445, and the Gamma Correction to 1.03.
Step 8
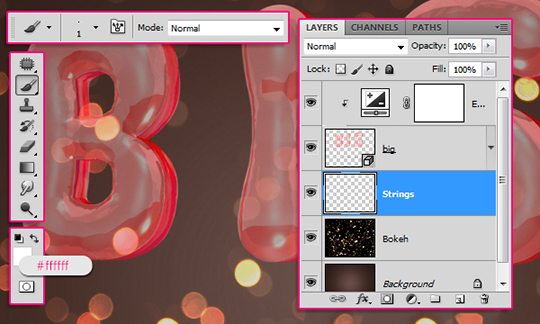
Create a new layer right below the 3D text layer and call it “Strings”. Change the Foreground color to White, and pick a hard round 1px brush.
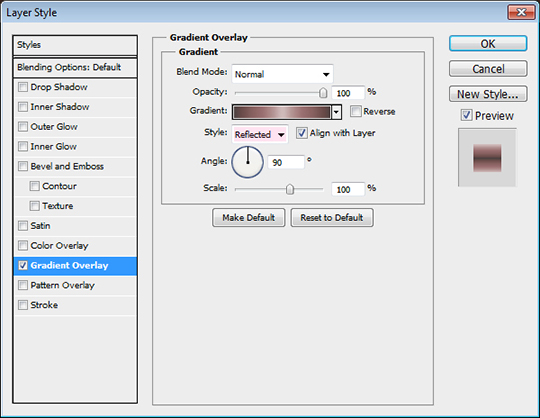
Double click the “Strings” layer and apply a Gradient Overlay effect. Set the Style to Reflected, and use the “SN_RusticGlow” gradient from the “1000+ Gradient Pack” (the “big pack 2.grd” file).
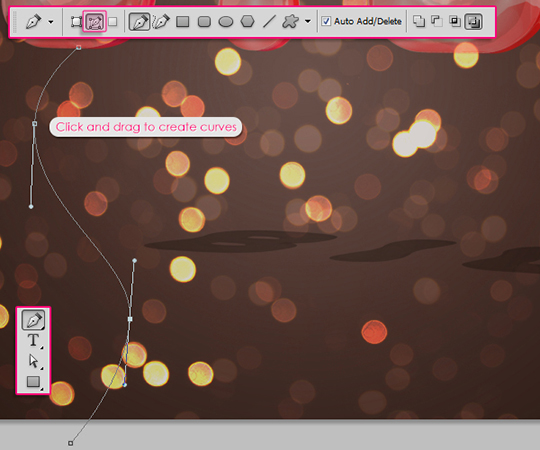
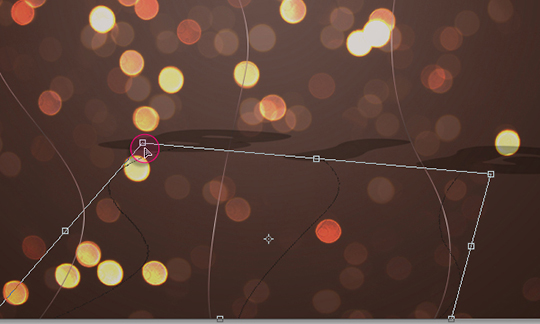
Pick the Pen Tool, and click the Paths icon in the Options bar. Start drawing the first string by clicking to add the points. If you want to add curves, you’ll need to click and drag to add the point.
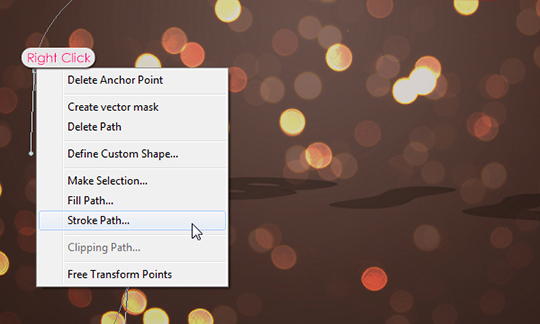
When you’re done drawing the path right click it then choose Stroke Path.
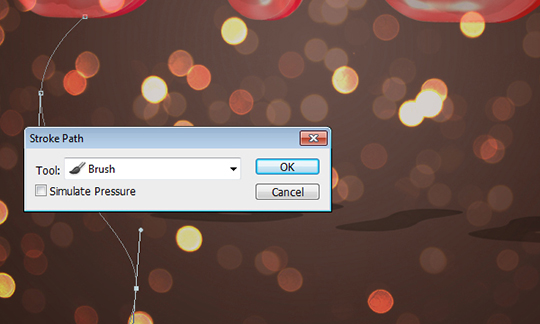
Choose Brush from the Tool drop down menu and un-check the Simulate Pressure box.
The path will be stroked, and the Gradient Overlay effect will add a nice 3D shine to the strings. Hit Enter/Return to get rid of the path.

Do the same for the other letters too.
Step 8
Duplicate the “Strings” layer then double click it to open the Layer Style dialog box.

Un-check the Gradient Overlay effect, and add a Color Overlay effect instead, using the color #1d1a19 .
Go to Edit -> Transform -> Skew, and move the top two corners to connect the strings with the 3D text shadow. Hit Enter/Return to accept the changes and get out of the Skew mode.
Step 9
Click the “Create new fill or adjustment layer” icon once again, but this time choose Gradient Map.
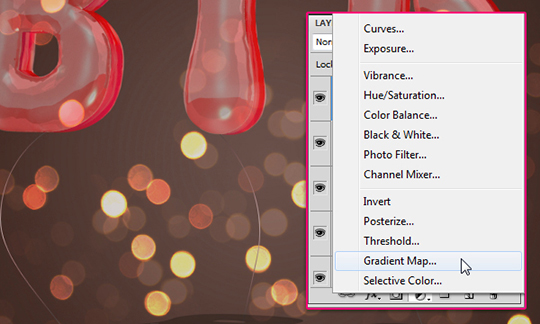
Make sure the Gradient Map adjustment layer is on top of all layers, then change its Blend Mode to Overlay and its Opacity to 70%.

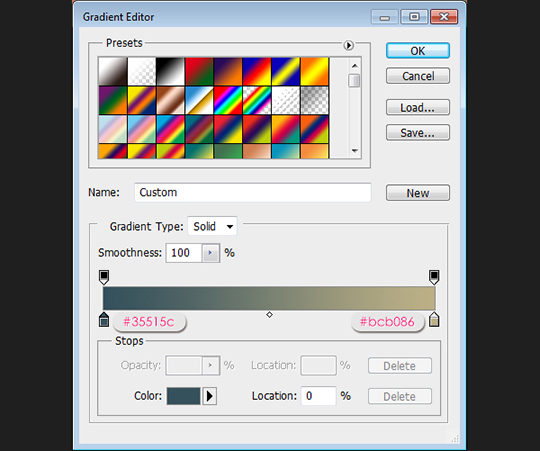
Click the Gradient box to create the gradient. The two colors used are #35515c to the left and #bcb086 to the right.
The Gradient Map will intensify the colors and add more contrast to the final result.

Conclusion
All that was needed to create this text effect is modifying some 3D materials’ attributes and adding some adjustment layers. This is what makes creating 3D text inside Photoshop easy and fun. Hope you enjoyed this tutorial and found it useful. Please feel free to leave any comments or suggestions below.
Create a new 1024 x 768 px document, or any other values depending on the text you’ll be creating. Set the Foreground color to #684f48 and the Background color to #2b1915. Pick the Gradient Tool, choose the Foreground to Background fill and click the Radial Gradient icon in the Options bar, then click and drag from the center of the document to one of the corners to create the gradient.
Create the text in All Caps using the color White, and the font Minipop G. The font size is 255 pt, and the Tracking value is set to 200 to avoid overlapping of the 3D letters.
Step 2
Go to 3D -> Repoussé -> Text Layer. A dialog box will appear telling you that this will rasterize the type layer, and you will no longer be able to modify your text. So if you are sure you don’t need to modify your text, click yes and continue.
Under the Repoussé Shape Presets, choose Inflate Sides. Then, under Extrude change the Depth to 0.1, and click the Shear radio button. Under Inflate change the Strength to 0.
The text is in 3D now. Open the 3D panel (Window -> 3D) to start modifying the 3D object.
Step 3
Select the “Front Inflation Material” to modify its values. First thing you need to do with all the materials is to remove the Diffuse texture if there is one, so that you can change the Diffuse color. To do so, click the texture icon next to the Diffuse attribute and choose “Remove Texture”.
Change the Diffuse color to #ff0000, the Opacity to 30% (to make the text transparent), the Reflection to 25, the Illumination color to #323232, the Gloss to 95%, the Shine to 80%, the Specular color to #fcfcfc, the Ambient color to #ca0000, and the Refraction value to 2.42.
Click the folder icon next to the Environment attribute and choose Load Texture, then open the “EnvironmentTexture.jpg” image (found in the Assets section in the beginning of the tutorial).
Select the “Extrusion Material” to modify its attributes. Change the Diffuse color to #c50d38, the Opacity to 35%, the Reflection to 25, the Illumination color to #5f0000, the Gloss to 95%, the Shine to 80%, the Specular color to #fcfcfc, the Ambient color to #696969, and the Refraction value to 1.8.
As for the “Back Inflation Material”, just use the same values used for the “Front Inflation Material”.
Step 4
Use the Camera Tools to change the camera view (angle). You can rotate, move, or zoom in and out until you like the view you have.
If you don’t see the 3D Axis you can get it by clicking the “Toggle misc 3D extras” icon down the 3D panel, then check the 3D Axis. You might as well check the 3D Light option, as it will be used later on.
Once the Camera position is set, use the “3D Object Pan Tool” to move the 3D text upwards. Moving the Object itself changes its actual position, while moving the camera changes the view angle only. Moving the object upwards is the only position change needed, any other rotation or zoom values should be changed using the camera tools.
You can click the blue axis and drag upwards to make sure this is the only change you make to the object’s position.
Step 5
Scroll down the 3D panel and select the “Infinite Light 3″, then click the “Delete Light” icon down the panel to get rid of the light.
Click the “Create new light” icon and choose New Point Light.
Select “Infinite Light 1″ and make sure the values are as below. Do the same for “Infinite Light 2″, and make sure to un-check the Create shadows box.
As for the “Point Light 1″, change the Intensity to 3.17, and the color to #fff4d5.
Now, use the 3D Light Tools to move the light around in the scene as you like. Just make sure the lighting is not very bright or very dark.
This is how the lights are positioned in this tutorial.
Step 6
Click the pop-up menu arrow in the top right corner of the 3D Panel, then click the Ground Plane Shadow Catcher option, so that the shadows will be rendered without the need to create a surface to catch them.
Click Scene at the top of the 3D Panel, then choose Ray Traced Final from the Quality drop down menu. This will start the rendering of the 3D scene. You can stop the rendering any time by clicking anywhere in the document.
The rendering might take a couple of hours, and you should get a result similar to this.
Step 7
Place the “- Bokeh – Golden Lights 5184 x 3456 Pixels” texture on top of the Background layer, then change its layer’s Blend Mode to Color Dodge, and its Opacity to 75%.
Click the “Create new fill or adjustment layer” icon down the Layers panel and choose Exposure.
Click the third icon from the left down the Adjustments panel (Window -> Adjustments) to clip the adjustment to the 3D layer only without affecting the other layers. Then, change the Exposure to +0.51, the Offset to -0.0445, and the Gamma Correction to 1.03.
Step 8
Create a new layer right below the 3D text layer and call it “Strings”. Change the Foreground color to White, and pick a hard round 1px brush.
Double click the “Strings” layer and apply a Gradient Overlay effect. Set the Style to Reflected, and use the “SN_RusticGlow” gradient from the “1000+ Gradient Pack” (the “big pack 2.grd” file).
Pick the Pen Tool, and click the Paths icon in the Options bar. Start drawing the first string by clicking to add the points. If you want to add curves, you’ll need to click and drag to add the point.
When you’re done drawing the path right click it then choose Stroke Path.
Choose Brush from the Tool drop down menu and un-check the Simulate Pressure box.
The path will be stroked, and the Gradient Overlay effect will add a nice 3D shine to the strings. Hit Enter/Return to get rid of the path.
Do the same for the other letters too.
Step 8
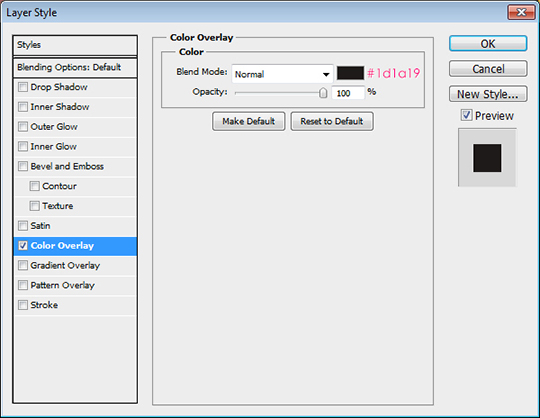
Duplicate the “Strings” layer then double click it to open the Layer Style dialog box.
Un-check the Gradient Overlay effect, and add a Color Overlay effect instead, using the color #1d1a19 .
Go to Edit -> Transform -> Skew, and move the top two corners to connect the strings with the 3D text shadow. Hit Enter/Return to accept the changes and get out of the Skew mode.
Step 9
Click the “Create new fill or adjustment layer” icon once again, but this time choose Gradient Map.
Make sure the Gradient Map adjustment layer is on top of all layers, then change its Blend Mode to Overlay and its Opacity to 70%.
Click the Gradient box to create the gradient. The two colors used are #35515c to the left and #bcb086 to the right.
The Gradient Map will intensify the colors and add more contrast to the final result.
Conclusion
All that was needed to create this text effect is modifying some 3D materials’ attributes and adding some adjustment layers. This is what makes creating 3D text inside Photoshop easy and fun. Hope you enjoyed this tutorial and found it useful. Please feel free to leave any comments or suggestions below.
Comments
Post a Comment