Create an Animated Banner Ad in Photoshop CS5

Final Product What You'll Be Creating

Animated Gif files have been the butt of many jokes within the design community. That is because animated gifs are famous for being a bit cheesy and notorious for cluttering up a page. Used properly however, animation can draw interest to an otherwise overlooked area of a page. Today, we will demonstrate how to use Photoshop to create an animated gif in Photoshop CS5. Let’s get started!


Step 1

Create a new document 250 x 250 px and set the resolution to 70 px with the background color set to #f2f2f2.

Step 2

Place a logo in the top center of the canvas.

Step 3

Write a tag line under the logo.

Step 4

Draw a rectangle box and set the color to #90909.
Open the layer styles dialog box and check Drop shadow. Reduce the distance and size to 2px.
Now add a gradient overlay and set the blending mode to Multiply with an opacity of 28%.
Add a stroke and reduce the size to 1 px. Set the color to #a31b1b.

Step 5

Add some bullet points. In our case we added the text: Tutorials, Articles, Tips, Freebies, Basix, Videos, Premuim, as shown.
.
Rasterize the text layers and create a clipping mask.

Step 6

Now place an eye-catching image. In our case we used the premium program icon for Psdtuts but feel free to use whatever suits your purpose.

Step 7

Draft some more supporting text as shown below the image you placed in Step 6.

Step 8

Create an oval Box and set the color to #fdfcfc.
Open the layer styles dialog bix and apply a drop shadow. Reduce the distance and size to 1 px.
Check Inner glow and leave it as it is.
Add a Gradient Overlay with the Opacity set to 6%.

Step 9

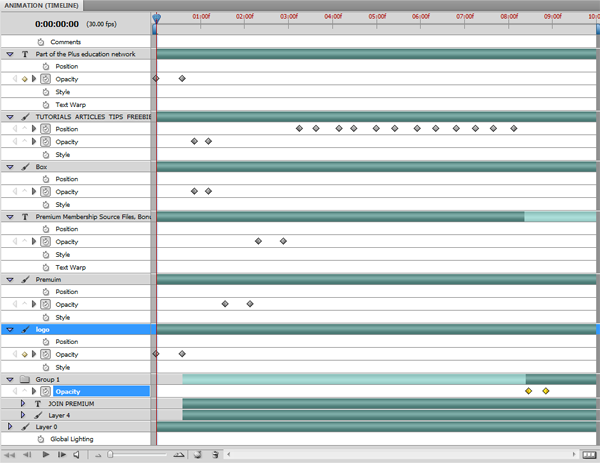
Now that we have finished creating all our layers, we are now ready to start work on the animation. First, open the Animation panel (Window > Animation). I will use the Timeline Animation panel (and not the frame animation). Note: This feature is only in Photoshop Extended.  Now set all your layers to visible but reduce their opacity to 0%.

Step 10

Refer to the image below for instructions on how to insert keyframes and where to increase opacity.

Step 11

Your timeline should look similar to the example below.

Step 12

We have now completed our animation. Press play to see the result. Feel free to tweak it where necessary. To save your banner, go to File > Save for Web & Devices. Then use the settings from the following image and click Save.

Final Image

That’s it! You’re finished!

Comments

Popular posts from this blog

Use x-ray techniques in Photoshop to show naked skin through clothing

    Do those new naked body scanners have you freaked out at the airports? As far as the TSA is concerned, those x-ray machines are here to stay, but you might as well take comfort in knowing that airport security guards aren't the only ones looking at your private parts. Practically anyone with a computer can manage to see through your clothes, and it's all thanks to a little program called Photoshop. Thanks, Adobe. With a few tweaks using the tools in Photoshop, you can see those boobs in no time, male or female. The video is in German, but it's not hard to figure our what's going on, especially if you're familiar with Photoshop. First, create a few duplicate layers, then get a handle on some of these tools to make the naked body through the clothes: * Auswahl erstellen (Create Selection) * Tonwertspreizung (Input Levels) * Belichtung (Exposure) You can also do this see-through clothing effect in free design programs, such as  GIMP .

40 latest creative photoshop text effects

Create a Glowing Liquid Text with Water Splash Effect in Photoshop In this tutorial, we will show you the steps we took to create a Glowing Liquid Text Effect in Photoshop. We will be practising the use of liquify filter, layer blending options, as well as some image adjustments. Create a Realistic Wooden 3D Text Image In this tutorial we are going to take a few 2D textures as well as a few Photoshop techniques to create a realistic 3D text image. Easy X-Ray Typography In Photoshop In this tutorial we will show you how to create a simple x-ray effect of a letter, in this case the Abduzeedo logo A. The whole process is quite simple but it will require a couple of hours to pull it off. Easy Furry Text In Photoshop In this tutorial we will show you how to create a really cool and super simple furry text in Photoshop CS6. We will use basic filters and tools but it’s nice to say that we took advantage of the a new feature in Photoshop CS6 that is to apply layer...

Royal 3D Text Effect in Photoshop CS6

  Just make sure to check the 3D settings under Edit -> Preferences -> Performance, and Edit -> Preferences -> 3D. Default values should work fine, but if anything seems to be not working properly you can always check those settings. Step 1 - Create a new 1600 x 1200 px document and Fill the Background with black. Create the text in white using the font Dunkin Sans. The font size is 400 pt and the text is better written in All Caps (if you’re not using only numbers). Step 2 - With the text layer selected, go to 3D -> New Extrusion from Selected Layer. This will instantly convert the text layer into a 3D layer. All the 3D scene elements can be found in the 3D panel (Window -> 3D). Click the main mesh name to edit its settings. - The 3D Mesh settings and attributes can be accessed and modified through the Properties panel (Window -> Properties). If you scroll down the Properties panel you’ll find the Character Panel button, which ...