Meant for first timers, this basic tutorial will walk you through all the necessary steps to create an animated GIF. I'll be working in Photoshop CC, and I'll be animating a simple blink.
1) SET UP YOUR FILE
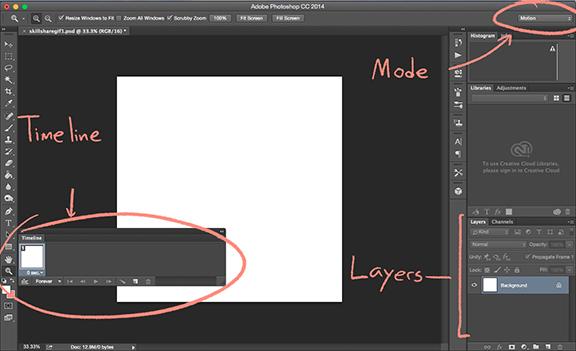
We’re going to start by setting up our file correctly. I'm creating a new document at 5x5 (you can pick whatever size) and 300 DPI. First, I’m going to make sure that I am in “motion mode.” You can change Photoshop's mode in the top right hand corner.
You should see your Timeline appear, which we’re going to use later to put our animation in order. You can also access your Timeline by going to Window > Timeline. On older versions on Photoshop it will be Window > Animation. When your timeline appears, go to it and hit “create frame animation.” This is where you will be organizing your key frames in order of animation.
You will also need to make sure your layers are visible. If you can't see them, hit F7 to bring them back.
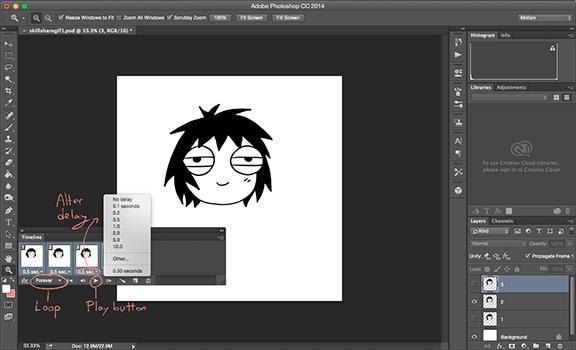
This screenshot shows everything labelled and set up properly:
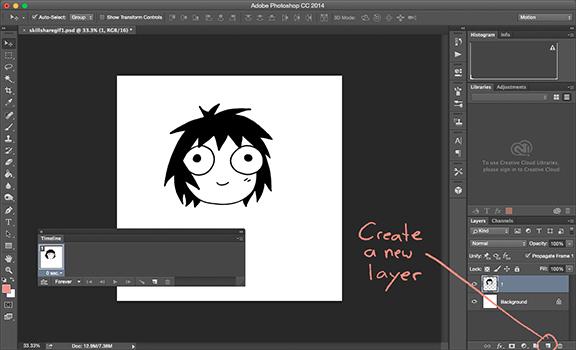
2) CREATE YOUR DRAWINGS
Ignore the Timeline for now. Go to your layers panel, hit the "create a new layer" button, and draw what you want to be the first frame of your animation. To stay organized, you should label each layer as you create it.
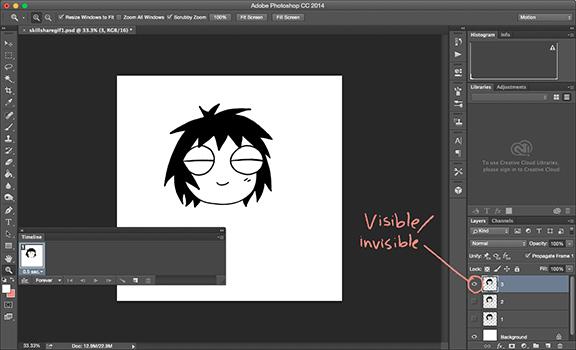
Once you've got the first drawing, you can hit the eye button beside it to turn it off. If you're making minor edits to one static drawing like I am, you can duplicate your original layer by clicking on it and hitting CTRL> duplicate layer. Regardless, create another layer and draw your next image. Repeat for as many layers until you've got your animation down.
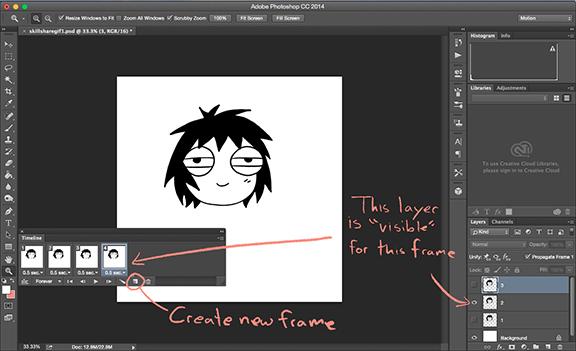
3) SET UP YOUR TIMELINE
Now, go over to your Timeline. In the first frame, go over to the layers panel and turn the eye on so that the first layer you draw is visible. Make sure everything else besides the background is off. Now, create another frame in the Timeline by hitting the "create a new frame" button, which looks identical to the "create a new layer" button. Turn on the next layer for your animation here. Again, everything else should be shut off.
Continue this process until your animation is fully laid out. In my case, I created frames for open eyes, mid blink eyes, shut eyes, and then I reversed it to make her eyes open again.
If you plan on looping, remember that your animation will go back to the first frame. So in my case, there was no need to have the last frame be eyes open, because it will return to the first frame regardless.
4) TWEAK
Test your animation by hitting the "play" button on the Timeline. You can decide how many times you want your animation to play by going to where it says "once" on the Timeline, and changing that to your desired amount of repeats. Hitting "forever" means your animation will loop, which is what most people usually want when they upload.
You can also alter the delay time between the frames where it says "sec" under your frames. Changing this will make your animation run slower or faster, depending on what you change it to.
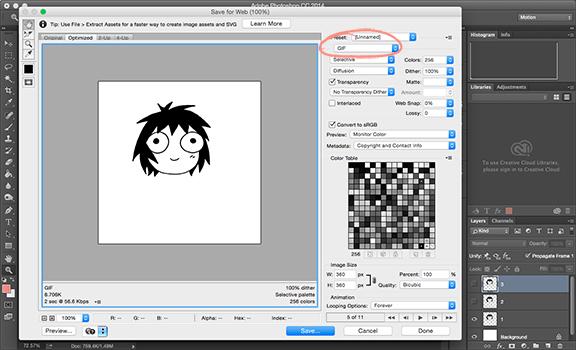
4) SAVE FOR WEB
GIFs have to be saved a certain way to function online.
First, you need to make sure you bring down your resolution to 72 DPI to make sure it’s compatable for web viewing. You can do this by going to IMAGE > IMAGE SIZE. Next, go to FILE > SAVE FOR WEB and make sure your upper right corner is set to GIF. Now you can go ahead and save and upload!

Tada! There you have it! (pst: I went in added a few frames of her eyes open so there would be a slight pause between her blinks)
Comments
Post a Comment