If you’ve spent any time browsing the internet over the past few years, then you’ve undoubtedly come across a GIF. These tiny moving images can convey a lot more information than an image, or text.
Once a mainstay of the old-school web they’ve made a massive resurgence in recent years.
GIFs provide you with a great way to spice up your existing content, make your tutorials more useful, and create media your visitors can’t help but watch and share.
Best of all, GIFs are pretty easy to make. All you need is a subscription to Adobe Photoshop CC, and a handful of images, or a video, and a dash of creativity.
Below you’ll learn why GIFs have become so popular, the benefits to using GIFs in your marketing, and show you how to make an animated GIF in Photoshop with two different methods.
What is a GIF?
A GIF is a type of image format. GIF is short for Graphic Interchange Format, but you’ll probably only see it referred to as GIF. It was introduced to the world back in 1987 by Steve Wilhite of CompuServe as a way to present an image that moves.
This image format has been in use for over 30 years, showing you how valuable, and how much the internet loves this style of image.
If you’re a regular reader of sites like Buzzfeed, then you’re probably already familiar with GIFs and how they’re commonly used throughout content. Put simply, a GIF is a low resolution animated image that continuously loops. It looks like a small video clip. The low res and small file size make them ideal for the web.
GIFs are more popular than ever. As a result, they’re a great tool you can use to connect with and delight your visitors.
The Biggest Benefits to Using GIFs in Your Marketing Strategy
Sure, we’d all love to create a funny GIF to send around to our friends and family. But, there is a myriad of reasons that you’ll want to create a GIF that goes well beyond making people laugh.
Here are the biggest benefits to using animated GIFs throughout your content:
1. GIFs are Sharable
GIFs can make your content more fun. They can pack an emotional punch that you can’t get from images or video. Whether you’re trying to make a point or give your readers a laugh break, they can be a great addition to your content.
You can use GIFs throughout your content, or across your social media channels. A lot of people won’t watch an entire video, but a short few second GIF is near impossible to pass up.
Plus, if you start creating your own unique GIFs people might start sharing them or using them in their own content, which means more reach and even more backlinks for your site.
2. GIFs Will Instantly Grab Your Visitor’s Attention
We live in an attention economy, but it is becoming more and more challenging to capture the attention of people online. That’s why longer form mediums like online video and podcasting are very challenging to master.
You’re trying to capture someone’s attention for minutes at a time.
But, GIFs provide you with a great middle ground. You still have the moving element of video, and the ability to tell a story. But, there’s a much smaller time commitment on behalf of your visitor.
With a GIF you’re giving your visitors a quick way to engage with your media (as you would a photograph) while creating a deeper connection (with the video element). Short, easy to create, and a lasting impression on your audience. Talk about a win!
If you have a video that you’re trying to direct more traffic to you can create a small GIF version of the video to entice visitors to click-through to your full-length video.
3. GIFs Have a Smaller File Size
Speed rules the web. You need a fast loading site if you want to compete. If your website loads too slowly, you’re going to create a poor user experience for your visitors, and even ran lower in the search engines.
There are a lot of things that’ll influence the speed of your site, like your hosting provider, your onsite SEO optimization, and more. But, one thing you can control is the size of the pages that your visitors have to load.
If you have a lot of embedded video content, then your site is going to load much slower. While video can be a great addition to your content, it might not always be necessary.
In some cases, a GIF can be even more effective than a video. Plus, GIFs have the benefit of being lower resolution and smaller in size, which equals faster loading speeds.
4. GIFs Are Useful and Practical
If you’re creating a tutorial or a piece of content that explains how to achieve a particular result, then you can use a GIF to walk people through parts of this process. You can use this to enhance and reinforce what you just wrote, or to walk people through what you’re doing step-by-step.
This is common practice if you’re running a recipe site, or a technology blog, where you can show the physical act of clicking or where certain buttons are located.
5. GIFs Can Enhance Most Content
GIFs can say a lot in a very short period of time. I bet you have a few GIFs that you’ve saved to your phone or computer that you watch from time to time. Whether they’re GIFs from your favorite TV show or one you created yourself, there’s one thing that they do incredibly well–incite emotion.
As a website owner or marketer, you should be looking for ways you can connect with people on a deeper emotional level.
Whether you’re looking to make someone laugh or feel inspired, you’re one little GIF away from making it happen. Even if you’re creating GIFs to embed in your content, by making a visitor feel a certain way, they’re going to associate these positive feelings with your brand or website.
6. GIFs Can Highlight Product Features
If you’re launching a new app, or piece of software, you probably want to show how it works. Instead of recording a long video you can use GIFs to highlight features that might entice your visitors to download the app, or sign up for a free trial.
This gives you the ability to quickly draw in your visitors, and entice them will cool features you’re offering. Instead, of having to explain what your product offers with words or a lengthy video.
7. GIFs are Mobile-Friendly
The future is becoming increasingly mobile. The integration of GIFs into mobile devices has happened incredibly naturally. Most mobile apps and even phones have GIF keyboards integrated into its functionality.
The small size of GIFs also makes them load almost instantly on mobile devices.
Plus, with almost every big social media network integrating GIFs into the native functionality, you can bet they’re going to be a mainstay in our popular culture for years to come.
How to Create an Animated GIF in Photoshop
After learning about all the benefits of using GIFs in your marketing, you’re probably ready to start creating a few of your own. Luckily, it’s not as difficult as you think.
You can create a GIF in as little as 10 minutes. If you have your images or video files ready to go it’ll take you no time at all.
Before you start creating a GIF, you’re going to need two things:
The first is a series of still images that you want to convert into a GIF. We’re going to be merging these images into a GIF below. Or, you can have a video that you’re going to clip and turn into a GIF. Or, you can create a text-based GIF where we’re going to animate text into a loop.
The second is a subscription to Photoshop. Photoshop is the number one video editing software in the world. It’s the industry standard that professionals use, but it’s still accessible to complete beginners.
Photoshop is also more accessible to beginners due to the new subscription model. Instead of paying hundreds of dollars to use the software it’s only $9.99 per month for the base subscription. The software works on both Windows and Mac.
Plus, there’s a 7-day free trial you can take advantage of to see if the software if right for you.
With your raw media material ready and an Adobe Photoshop subscription, you’re ready to become a GIF-making machine.
Here are two different ways you can create a GIF using Photoshop:
1. Create an Animated GIF Using Still Images
If you don’t have a video that you want to create a GIF out of you can use a series of images, and blend them together to create a GIF. The process is a little more depth than cutting down and converting an existing video, but it can work great, and the result will be truly unique.
First, you’ll need to have a series of images that you want to blend together into a GIF. The amount of images you have doesn’t matter, but generally, you’ll want more than two. The more images you have, the more complex the process will be. But, you’ll follow the same general process.
Each image you import will be its own layer, and each layer will be a frame in the animation.
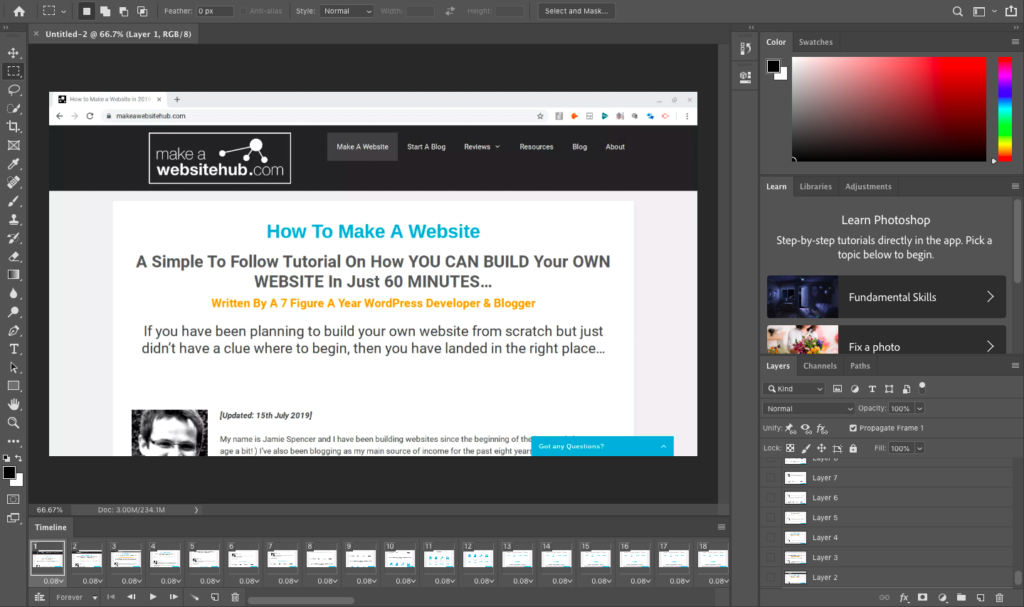
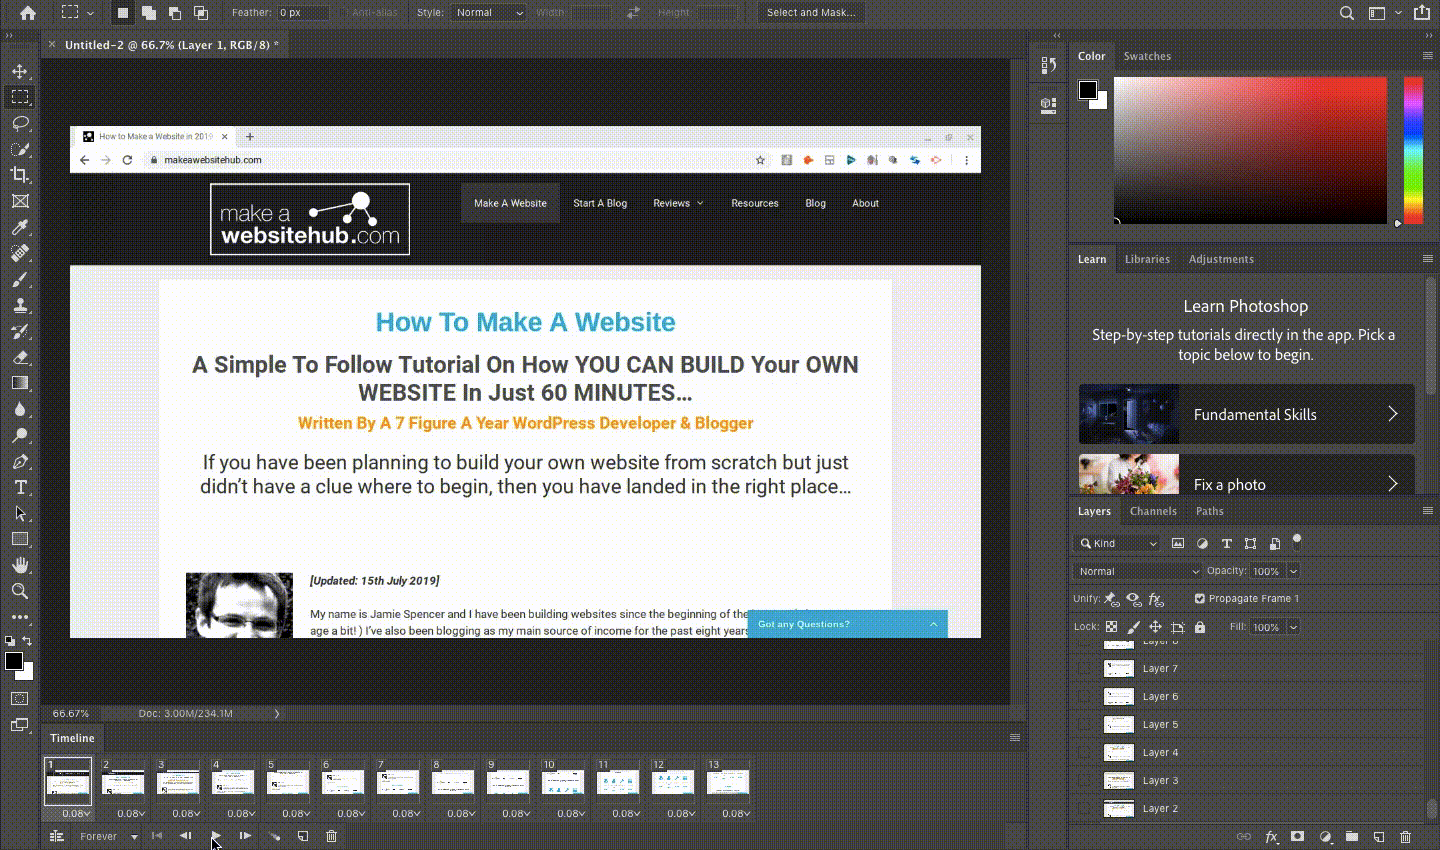
1. Import Your Images
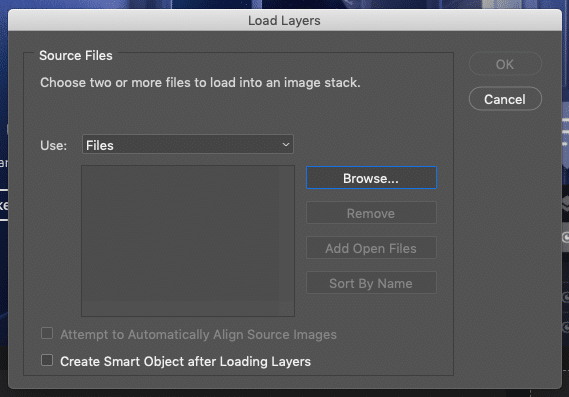
Once you have your images ready you’ll want to open Photoshop and click on File>Scripts>Load Files into Stack from the drop-down menu.

Then, select the files you want to import and click ‘OK.’ This will import all of the images and each image will be placed as a new layer.
2. Animate the Images
Now it’s time to animate these individual images together. When you create an animation frame every layer that’s marked ‘Visible’ will be shown in the frame. The animation in the GIF will come from hiding certain layers and leaving other ones visible.
Once you start creating your own frames below this process will make more sense.
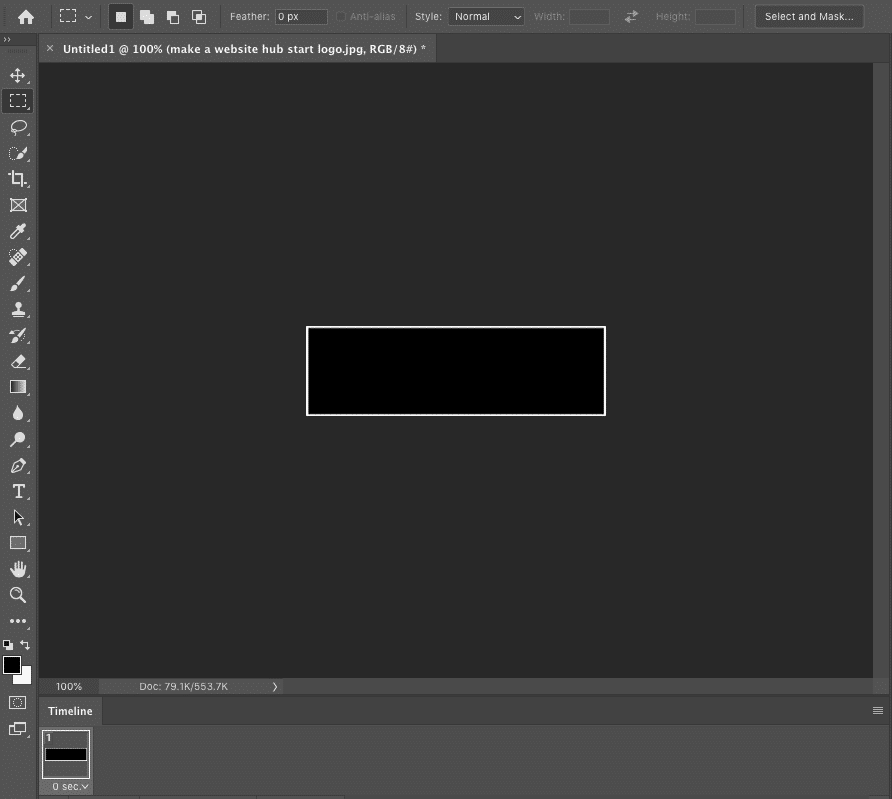
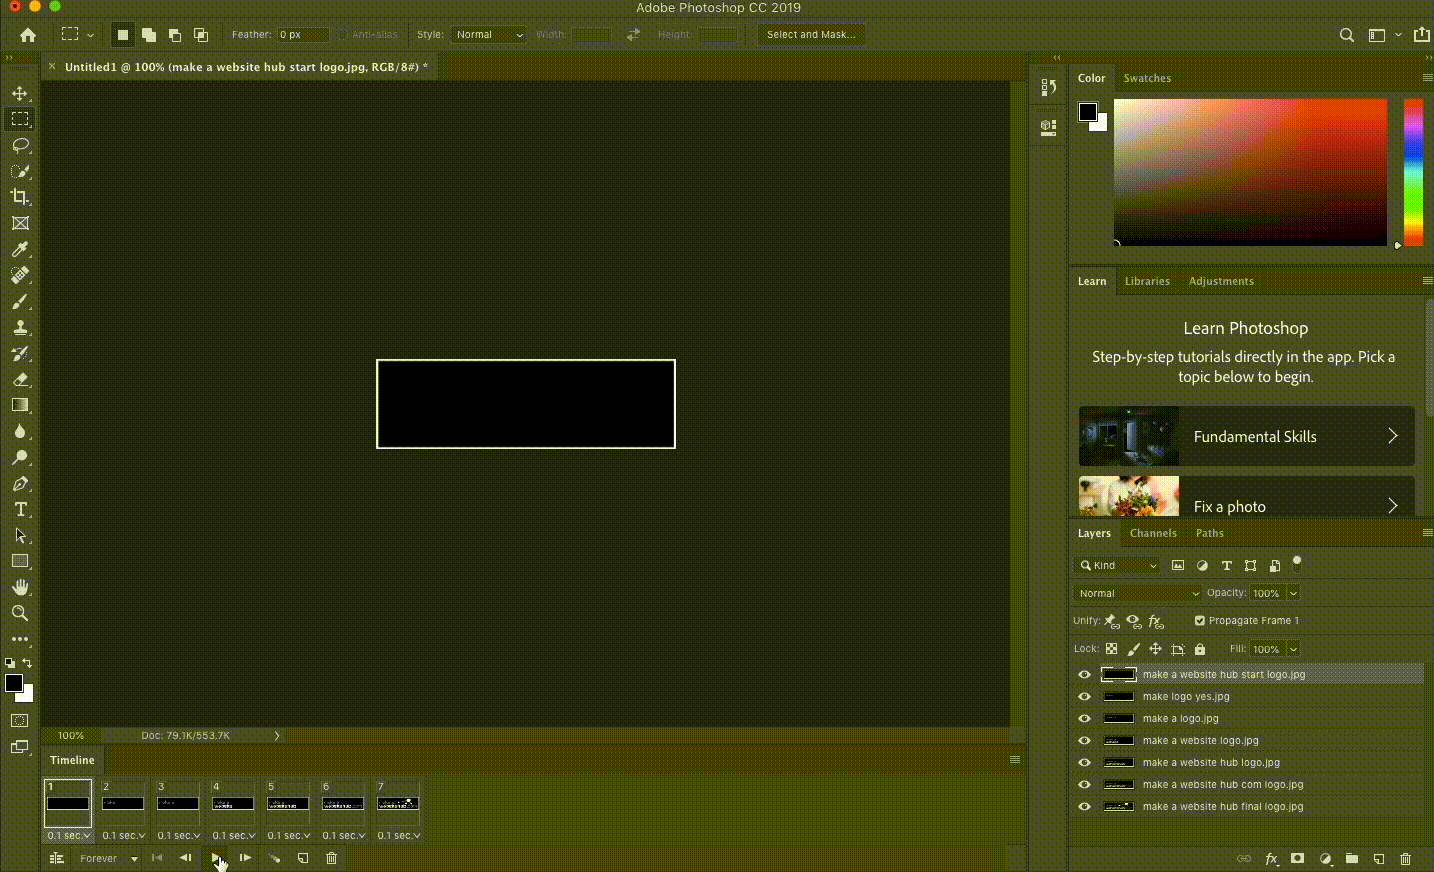
In order to animate individual frames navigate to Window>Timeline. Then, on the screen that opens click on ‘Create Frame Animation’.

This will create the first frame where your animation starts.
On the right-hand side of the screen, you’ll notice the ‘Layers’ column, here you can hide layers that you don’t want to show up in a specific frame. Just check or uncheck the eye icon.
At the bottom left corner of the screen, click the ‘New Frame’ button. This will duplicate the frame you just created. Then, do the same as above and turn on the layers you want to show via the ‘Layers’ column.

You can add as many frames as you’d like within the timeline panel. The edits that you make to each frame will give the GIF an animated effect.
3. Polish up Your GIF
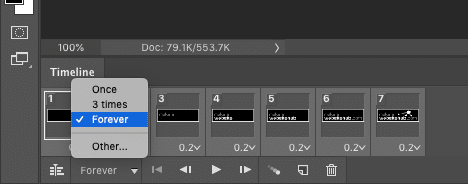
Now it’s time to loop all of your frames together. To do this, we’re going to set the ‘Frame Delay.’ Highlight all of the current frames and right-click.
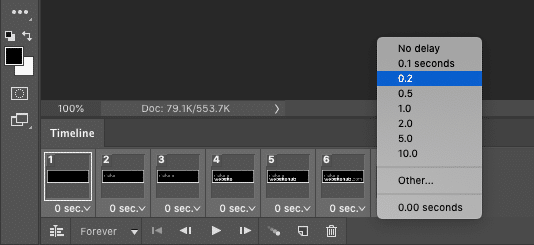
Now, select the delay rate. By selecting ‘No Delay’ the images will run together rapidly, the higher the delay you choose, the longer that frame will stay on the screen. For most GIFs you’ll want to have a very small delay, or zero delay.
Finally, at the bottom of the panel, click the tab labeled ‘Forever.’ This is where you’ll select how long you want your GIF to loop for. Most GIFs will loop endlessly, so in this case, select ‘Forever.’
Now, hit the Play button at the bottom of the screen and you can see how your GIF looks. If you’re satisfied, then it’s time to export your GIF.
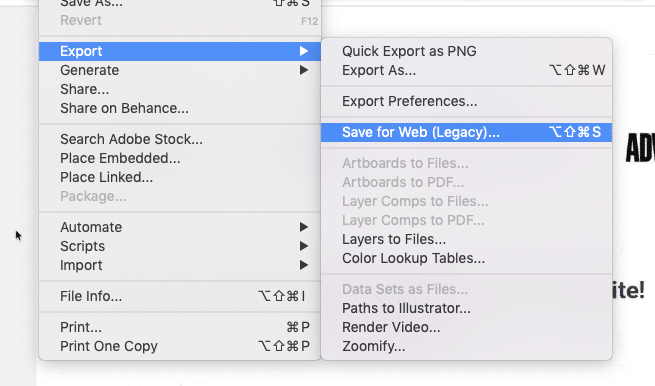
4. Save and Export Your GIF
To export your GIF go to File>Export>Save for Web.

In the box that pops up set the format to GIF and the color option to 256. You can also tweak the ‘Image Size’ and the ‘Looping Options’ if you want to reduce the size of the GIF, or have it loop more or less.

When you’re done, click Save,’ and you have your very own GIF!
2. Create an Animated GIF From an Existing Video
One of the most common and straightforward ways to create a GIF is using an existing video file you have. Maybe you only want to use a section of a video, or you want to create a series of GIFs that you’re using in a tutorial or a recipe.
Whatever your reason, it’s pretty simple to create a GIF using an existing video file.
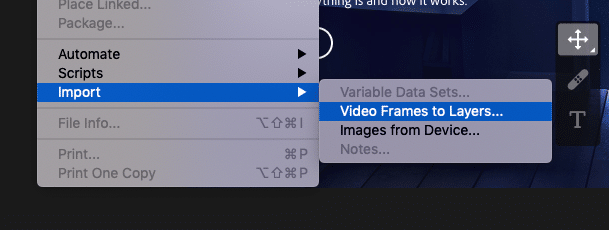
1. Import Your Video
First, fire up Photoshop and make sure you have your video file handy.
Then navigate to File>Import>Video Frames to Layers. This will open your existing file and get it ready for GIF format.
This will open up a dialogue box where you can choose to import the entire video, or you can select a portion of the video you want to upload. If you know you want to turn a portion of the video into a GIF, then it makes sense to trim the video down at this stage.
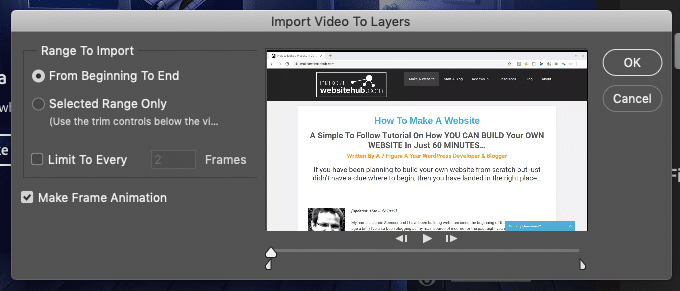
Drag the arrows down to set the beginning and end of the video you want to trim. The preview window on the left will show you the frames as you move the sliders. The left-hand slider will be where the video starts and the right-hand where the video ends.
Next, you’ll see a checkbox that says ‘Limit to Every 4 Frames’. You can change this number depending on the length of your video. Basically, this will create a frame for every 4th frame in the video. It’s a great way to reduce file size without bringing down your quality too much.
Then make sure the ‘Make Frame Animation’ box is checked and then click ‘OK.’
The video will now start importing. It’ll automatically make frames from layers of the video. It may take a while, depending on how long the video file is. But, once it’s finished uploading you’ll now have a series of image files you can edit and compress into GIF format.
2. Save the File in GIF Format
With your video file finished importing you’ll have a series of frames that you can edit. Each video frame is placed on its own layer, which you can see at the bottom of the screen, or on the right-hand side of your editor.
The bottom of your screen shows the timeline window of the GIF. You can add or remove frames, or even rearrange the frames, but this might make your GIF look choppy or weird.
If you’re satisfied with your GIF then hit the ‘Play’ button at the bottom of the screen to see how your final GIF is going to look. If you like how your GIF looks, then all you have to do now is export and save into the proper format.
To do this navigate to File>Export>Save for Web.
This will open up a pop-up box. Set the format to GIF, and the Colors box to 256. You can even reduce the image size if you want to make the total size of your GIF even smaller.
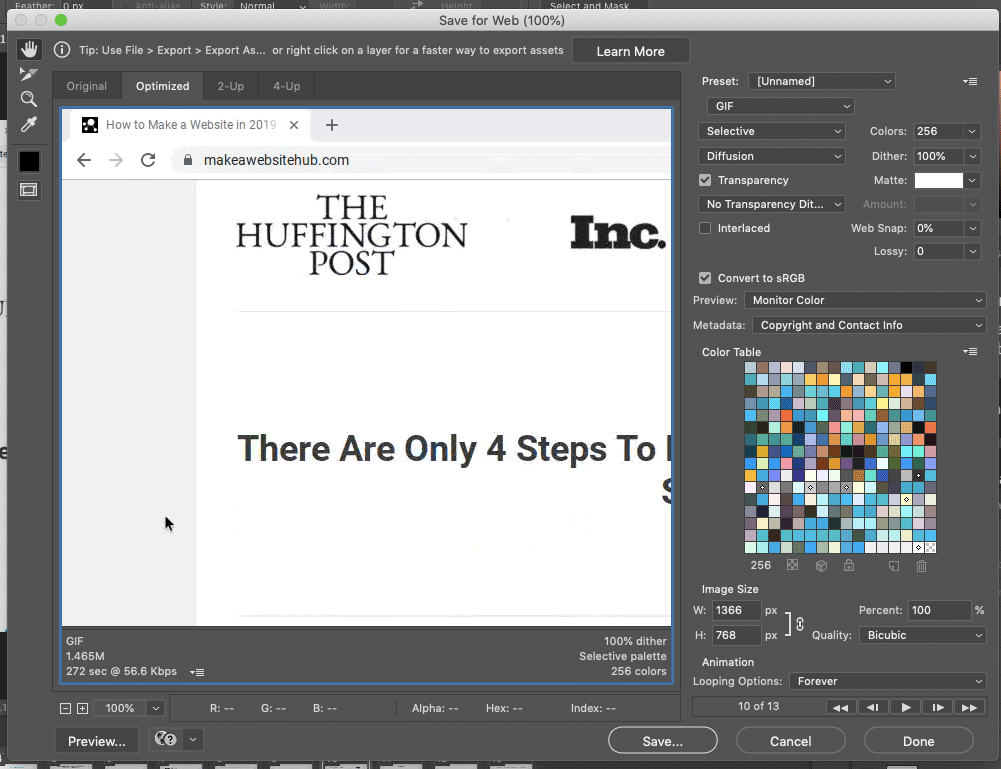
If you notice that your GIF file is too large, then drag the slider labeled ‘Lossy’ to the right. This will reduce the quality of the GIF, but it’ll also decrease the file size. Adjust this until you’ve found a happy medium between quality and size.
Then, click ‘Save’ and you’ve created a GIF!
Now it’s time to embed this into your content or start sharing it across social media.
In Closing
The two methods above should be more than enough to help you create as many GIFs as you desire. After you create your first GIF using the tutorial above the process will only get easier and easier, so you can create even more creative GIFs in record time.
There’s no shortage to the types of GIFs you can create, whether you’re creating shareable social media GIFs, enhancing your tutorial-based content with GIFs, or just making fun GIFs to spice up your content, you’re well on your way.
Although unique GIFs can be unique and a great way to stand out online, you don’t always have a create GIFs from scratch. There are a variety of GIF libraries online where you can source fun, inspiring, and funny GIFs to embed in your content. Some of the most popular GIF libraries include:
Comments
Post a Comment