How to Create an Animated .GIF in Photoshop CS5, CS6 & CC

Let’s say you have a folder full of images that you want to sequence together as frames in an animated GIF. You can find special programs online to do this, but with some of the new features of Adobe Photoshop, it’s quite fast and simple.
  1. Gather the images you want to animate into one folder.
  2. Click File > Scripts > Load Files into Stack. When the “Load Layers” window pops up, click Browse to select & open your image files, and then click OK. This should import the files you selected as individual layers in your document. Rearrange the layers into the correct order, if necessary.
  3. This next step differs depending on what version of Photoshop you have:
    • For Photoshop CS5: Open the Animation palette (Window > Animation).
    • For Photoshop CS6: Open the Timeline palette (Window > Timeline ).
    • For Photoshop CC (Creative Cloud): Open the Timeline palette (Window > Timeline ). In the middle of the palette, you will see a button with a drop-down allowing you to choose either “Create Video Timeline” or “Create Frame Animation.” You want to choose & then click the Create Frame Animation button.
  4. In the Animation/Timeline palette menu (found under this button at the top right corner of the palette: PsPaletteMenu), clickMake Frames From Layers. You can also click Reverse Frames if needed. This will take each layer in your document and set it as an individual frame in the animation.
  5. Now we will change the duration of each frame. Make sure you are in frame view, not timeline view. If you do not see thumbnail icons of all your layers in the Animation/Timeline palette, click the icon in the lower right corner (the hover text will say “Convert to Frame Animation”). Now, back in the Animation/Timeline palette menu, click Select All Frames.
  6. Click the drop down button just underneath each frame image (circled in red in the image below). This will bring up a menu where you can set a duration. Since all frames are selected, all frames will be set to the same time. Each frame can be changed individually, if desired.
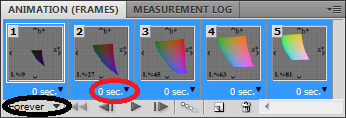
  7. The drop down button circled in black in the image above will change how many times the animation will loop; either a fixed number of times, or forever.
  8. Once the frame order and timing as been set up, it is time to save the image! Click File > Save for Web & Devices, make sure the file format is set to GIF, change any other options if needed, and save the image!
You will now have an animated GIF taken from a folder full of the individual frames. In fact, as long as each frame exists as a separate layer in Photoshop, the Animation/Timeline palette can be used to create the GIF. But, with CS5, CS6, or Creative Cloud (CC) it is easy to make separate layers from a folder of the individual frames as descri

Comments

Popular posts from this blog

Use x-ray techniques in Photoshop to show naked skin through clothing

    Do those new naked body scanners have you freaked out at the airports? As far as the TSA is concerned, those x-ray machines are here to stay, but you might as well take comfort in knowing that airport security guards aren't the only ones looking at your private parts. Practically anyone with a computer can manage to see through your clothes, and it's all thanks to a little program called Photoshop. Thanks, Adobe. With a few tweaks using the tools in Photoshop, you can see those boobs in no time, male or female. The video is in German, but it's not hard to figure our what's going on, especially if you're familiar with Photoshop. First, create a few duplicate layers, then get a handle on some of these tools to make the naked body through the clothes: * Auswahl erstellen (Create Selection) * Tonwertspreizung (Input Levels) * Belichtung (Exposure) You can also do this see-through clothing effect in free design programs, such as  GIMP .

40 latest creative photoshop text effects

Create a Glowing Liquid Text with Water Splash Effect in Photoshop In this tutorial, we will show you the steps we took to create a Glowing Liquid Text Effect in Photoshop. We will be practising the use of liquify filter, layer blending options, as well as some image adjustments. Create a Realistic Wooden 3D Text Image In this tutorial we are going to take a few 2D textures as well as a few Photoshop techniques to create a realistic 3D text image. Easy X-Ray Typography In Photoshop In this tutorial we will show you how to create a simple x-ray effect of a letter, in this case the Abduzeedo logo A. The whole process is quite simple but it will require a couple of hours to pull it off. Easy Furry Text In Photoshop In this tutorial we will show you how to create a really cool and super simple furry text in Photoshop CS6. We will use basic filters and tools but it’s nice to say that we took advantage of the a new feature in Photoshop CS6 that is to apply layer...

Royal 3D Text Effect in Photoshop CS6

  Just make sure to check the 3D settings under Edit -> Preferences -> Performance, and Edit -> Preferences -> 3D. Default values should work fine, but if anything seems to be not working properly you can always check those settings. Step 1 - Create a new 1600 x 1200 px document and Fill the Background with black. Create the text in white using the font Dunkin Sans. The font size is 400 pt and the text is better written in All Caps (if you’re not using only numbers). Step 2 - With the text layer selected, go to 3D -> New Extrusion from Selected Layer. This will instantly convert the text layer into a 3D layer. All the 3D scene elements can be found in the 3D panel (Window -> 3D). Click the main mesh name to edit its settings. - The 3D Mesh settings and attributes can be accessed and modified through the Properties panel (Window -> Properties). If you scroll down the Properties panel you’ll find the Character Panel button, which ...