Final Image Preview
Before we get started, let’s take a look at the video we’ll be creating. Click the screenshot below to view the final video. As always, the layered Photoshop file is available via our Psdtuts+ Plus membership.
Step 1
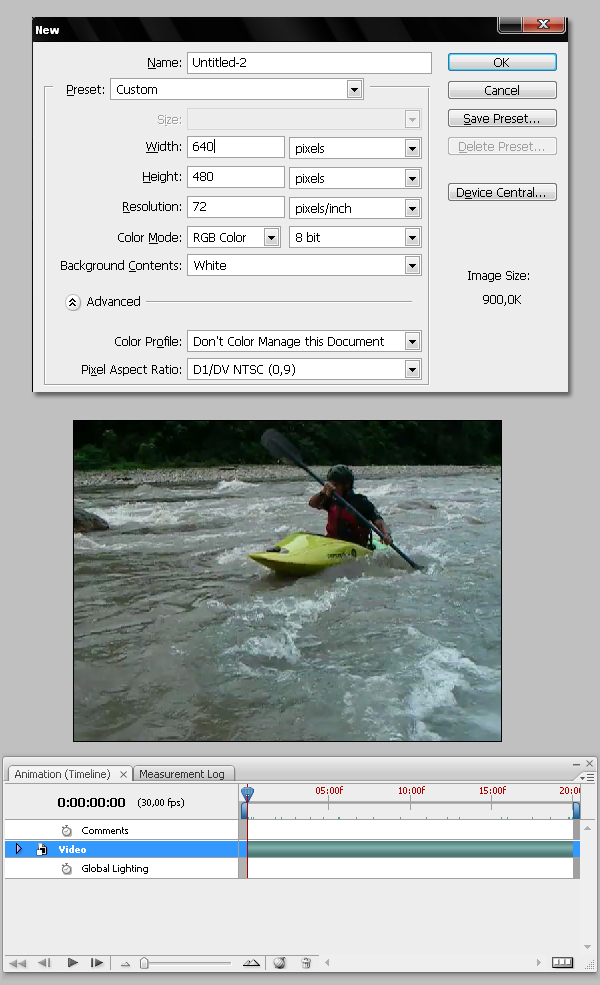
Photoshop CS3 Extended has the useful feature of editing videos and animations directly inside of it. This time I’ll show you some of the basics of video editing in Photoshop. Before getting started, you must know that Photoshop can edit any video as a Smart Object. This opens endless possibilities to create amazing outcomes to our videos by adding effects, filters, and more.Let’s begin, for this tutorial we’ll start by creating a new blank document 640 pixels by 480 pixels. You can choose the Preset Film and Video and change the Width value. Go to Layers > Video Layers > New Video Layer From File, and search for any video in your computer.
I used this video, which was filmed about a year ago. It’s of my friend Ariel rafting the Espíiritu Santo river here in Bolivia. As you can see, the video layer is on your Layers Palette right now. Convert it into a Smart Object (Right click on the layer miniature’s name and click on Convert to Smart Object). Then name it "Video." Now, to set up your workspace, go to Window > Animation to show the Animation tools.
Step 2
First, we’ll edit the Levels of the "Video" layer. Click on Create a New Fill or Adjustment Layer > Levels in the Layers Palette. This will create a new Levels Adjustment Layer for the entire video. Use the following values.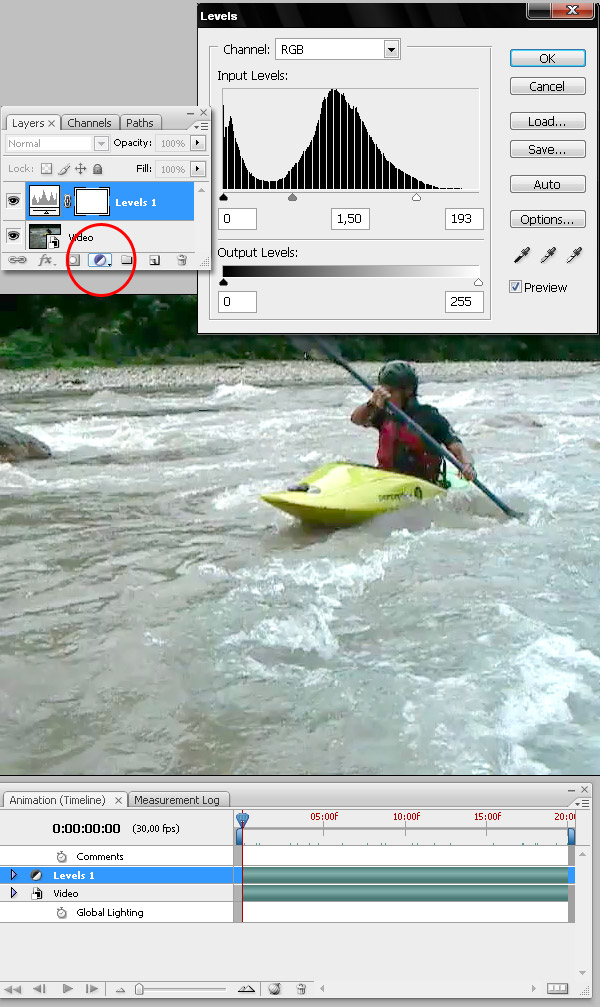
Step 3
Then add another Adjustment layer by clicking Create a New Fill or Adjustment Layer > Photo Filter. Set the color to #704302 and the Density to 100%. This way the "Video" layer turns into a nice sepia tone. Also, as you can see, each layer added turns into a new layer in the Animation window.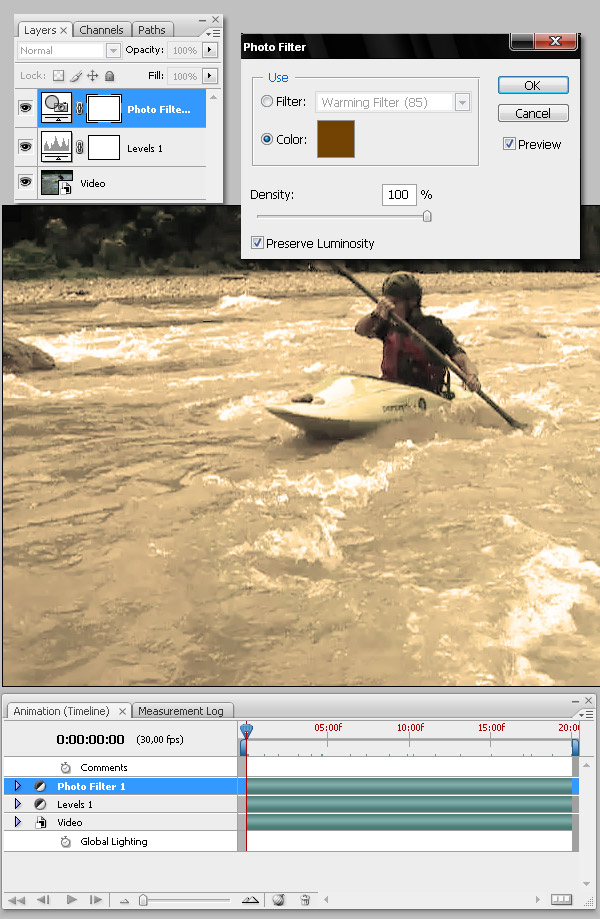
Step 4
Here comes the fun! We’re going to animate some objects in Photoshop. We’re trying to get a vintage style video. First, we’re going to create some random lines moving across the screen. Draw some vertical lines, three or four, using a 2px soft Brush, then delete some parts of the lines using a soft Eraser with the Opacity and Flow each set at 50%. Also, add all the layers into a new group named "New Video."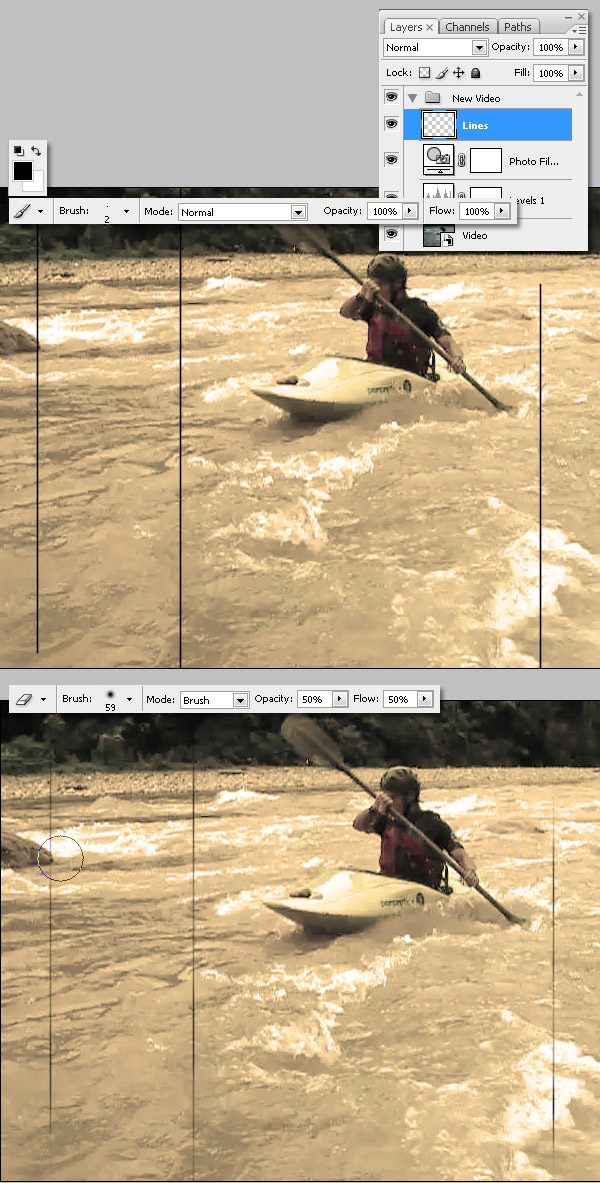
Step 5
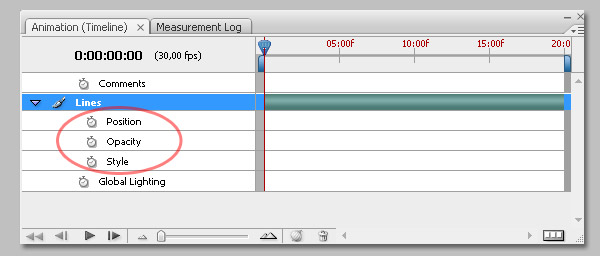
Go to the Animation (Timeline) window. Click on the arrow to explode the "Lines" layer. You’ll see three rows: Position, Opacity, and Style. Each row can contain any number of Keyframes. When you create a keyframe you’re setting a modify point for your layer.Photoshop will create the motion between two keyframes. You can modify these three values on each of your layers as many times as you want. You can create a combination of several positions, opacity values, and layer styles over the timeline.
The movie has 20 seconds in length, the frame rate is 30 frames per second, so that means the movie has 600 frames. By default the timeline measure is in seconds. Below there’s the control tools, there’s a Play button, a Next button and Prev frame button. Also there’s a slide to enlarge the size of your timeline viewing.
One of the most important tools in this window is the Current Time Indicator slider. It’s the blue triangle over the timeline. By moving this slider you’re selecting a unique frame-second to add a keyframe in. Armed with this knowledge, let’s add some effects!
Step 6
Drag the Current Time Indicator to 00:00f. Click the Time-vary stop watch (The tiny clock) of Position row. This will create a yellow rhombus over the Time line where the slider is located; This is a Keyframe. Now using the Move Tool (V) drag the "Lines" layer just a little to the right. This will be the first position of the motion.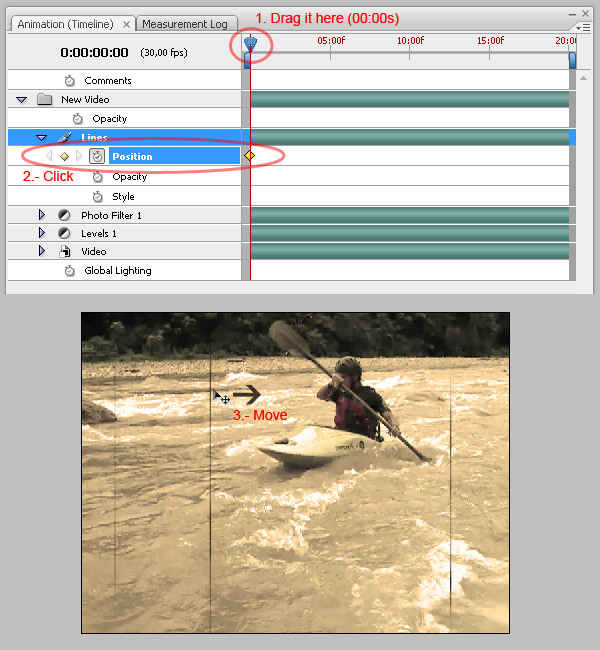
Step 7
Now we’ll animate the Opacity of the "Lines" layer. Click on the Time-vary stop watch (The tiny clock) of the "Opacity" row. You’ll see a gray rhombus appear. Then go to the Layers Palette and set "Lines" Opacity to 0%. By changing the opacity the gray rhombus will become yellow.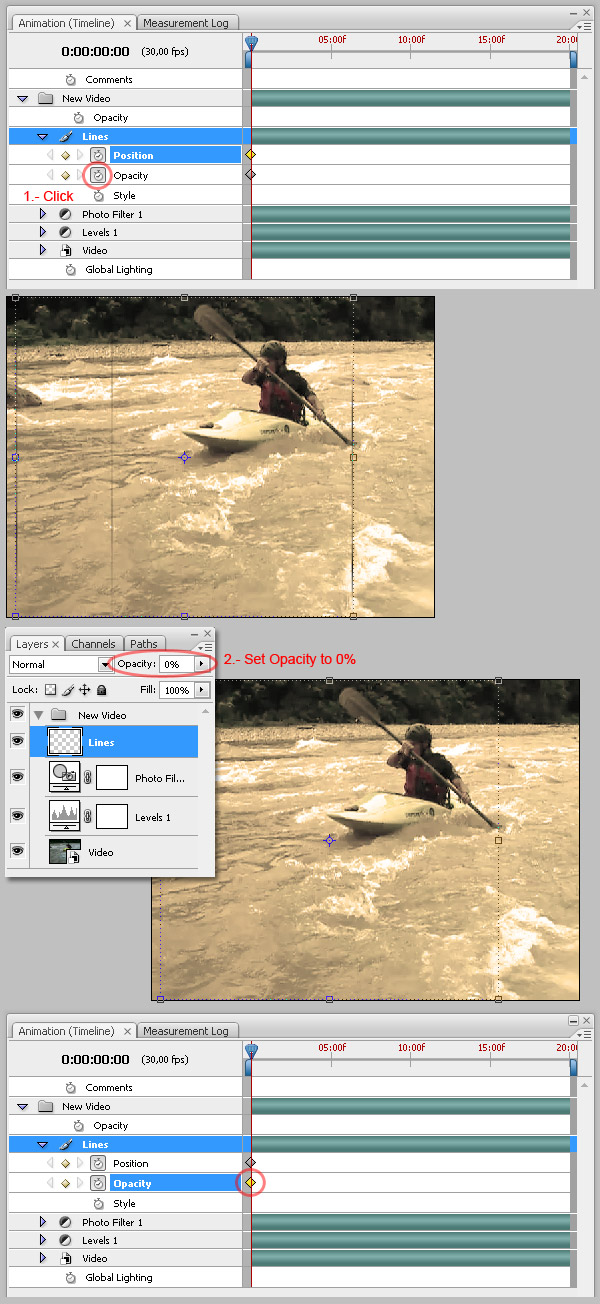
Step 8
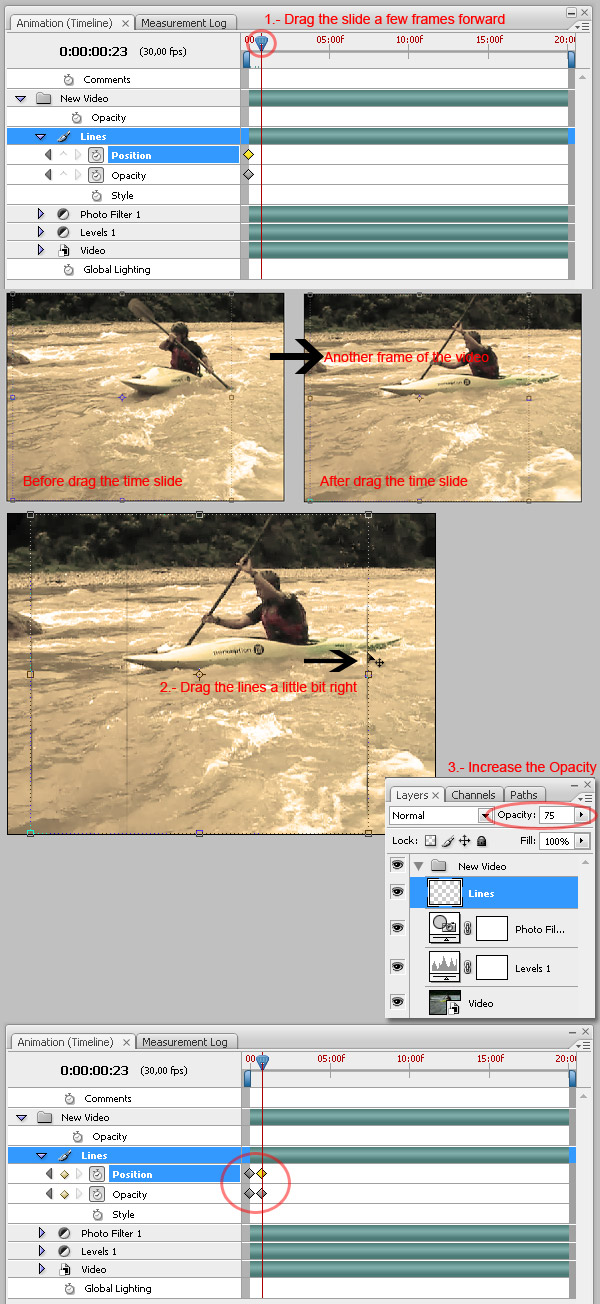
To create the second keyframe of animation drag the Current Time Indicator slider a few frames forward in the timeline. Then using the Move Tool (V), drag the invisible "Lines" a little bit to the right.In the Layers Palette change the "Lines" Opacity to 75%. As you can see at the bottom of the image below, there’s two more keyframes in both the "Position" and "Opacity" rows.
This is the hardest step of the entire process. If you miss this your first try, don’t give up; just repeat the steps in order. By now you can use the Play button of the Animation window to start viewing the result: a motion fade in effect for the lines.
Step 9
To complete the "Lines" sequence. Drag the Current Time Indicator slider just like in the previous step, a little bit forward. Then using the Move tool (V), drag the lines to the right, not to much, but no to few. Finally, set the "Lines" Opacity to 0% once again. If you click Play, you’ll see a fade in + motion + fade out animation.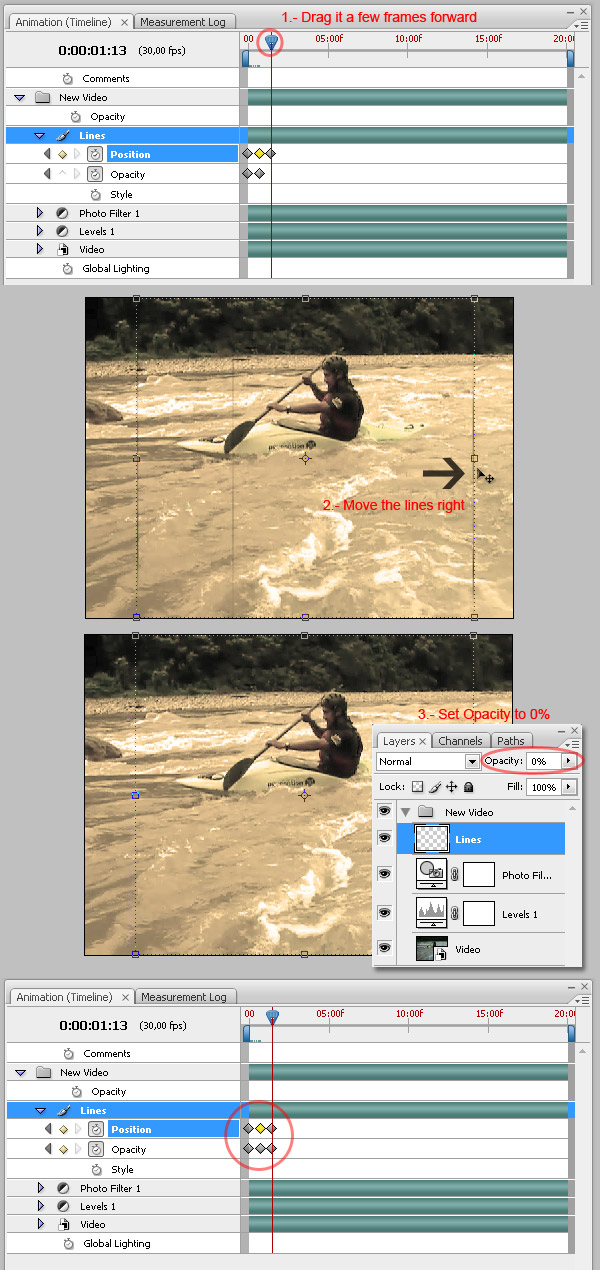
Step 10
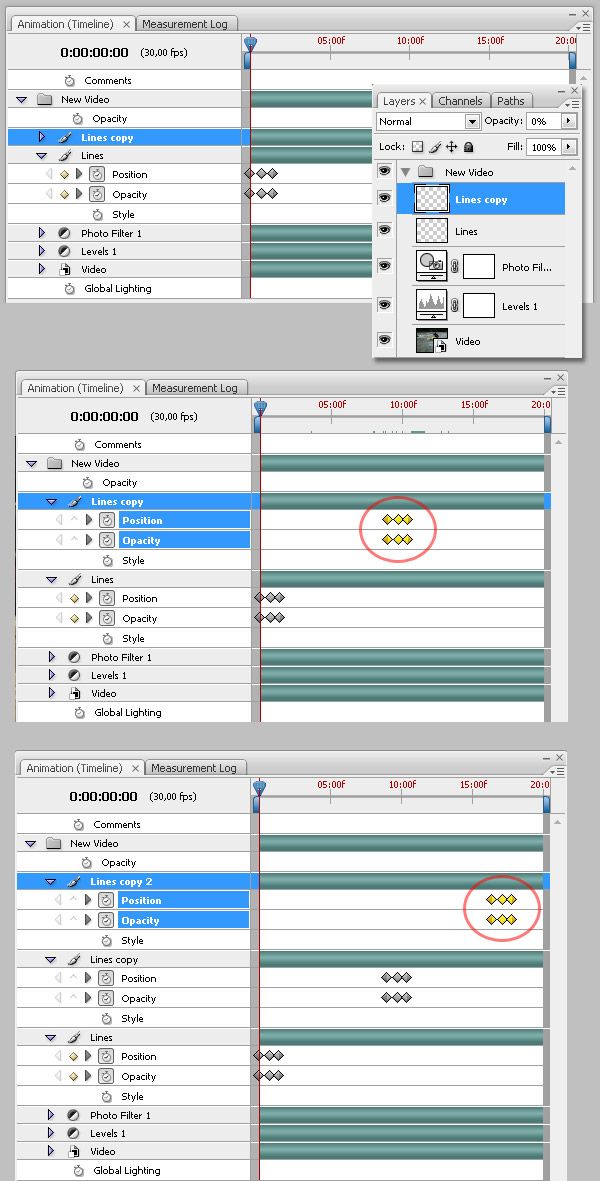
Now we have a three keyframes animation for one layer, and it’s less than three seconds. So we need to repeat the lines animation across the time line. For this, go to Layers pallete and duplicate the "Lines" layer. Then go to Animation window and Shift + click all the keyframes of "Lines copy" layer. Once you have select them all, drag those frames forward, maybe near 10:00f.Repeat the process, duplicate the "Lines copy" layer, select all the keyframes of "Lines copy 2" layer, and drag them forward. I did this just three times, though you could do it as many times you want. Try to not have two or more keyframes at the same time on your timeline, because the lines will look bold on the final video. Again, see the result by clicking the Play button.
Step 11
To make the lines effect softer, convert each one of the "Lines" layers into a Smart Object. Then change their Opacities to 50%, 70%, and 50% respectively.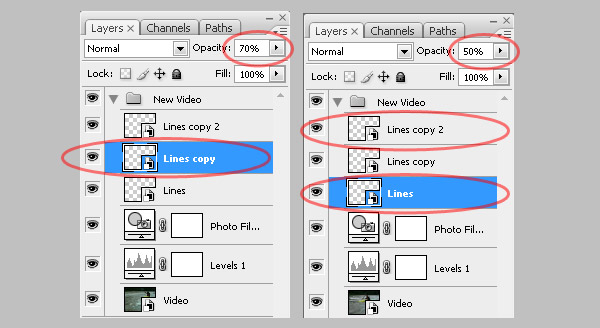
Step 12
Create a new layer above the "Lines" layer and name it "Noise." Then press D to load the default colors. Go to Filter > Render > Clouds. Once you have your favorite clouds, go to Filter > Noise > Add Noise, and set the Amount to 30%. Also, set the Distribution as Uniform and select Monochromatic.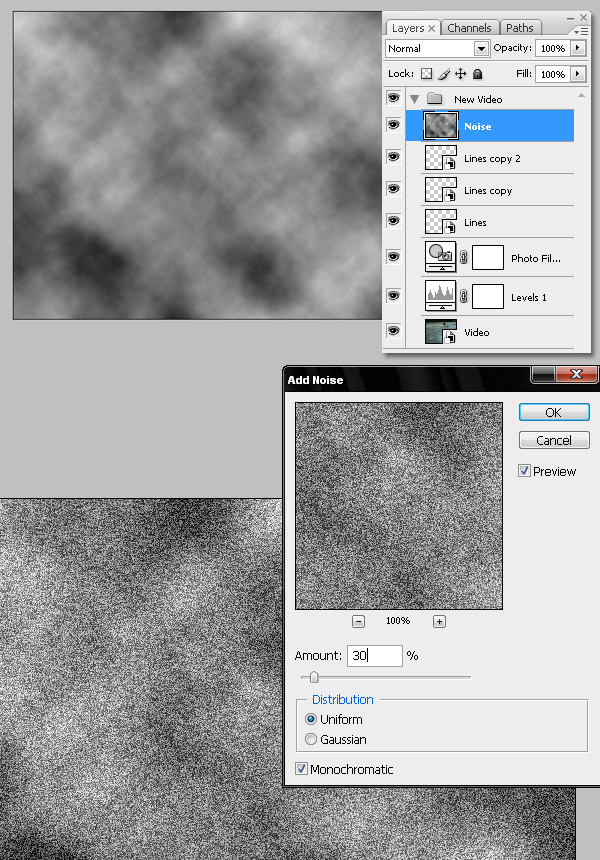
Step 13
Set the "Noise" layer’s Opacity to 25% and its Blending mode to Color Burn.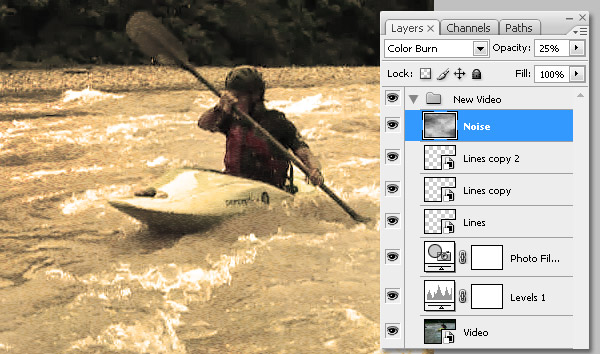
Step 14
In the Animation window, drag the Current Time Indicator slider to 00:00f. Then click on the Clock Position row and free transform the "Noise" layer increasing the width as in the image below. Then drag the Current Time Indicator slider to 20:00f (the last frame) and move the "Noise" layer to the right. This way you’ll get an animation for the noise.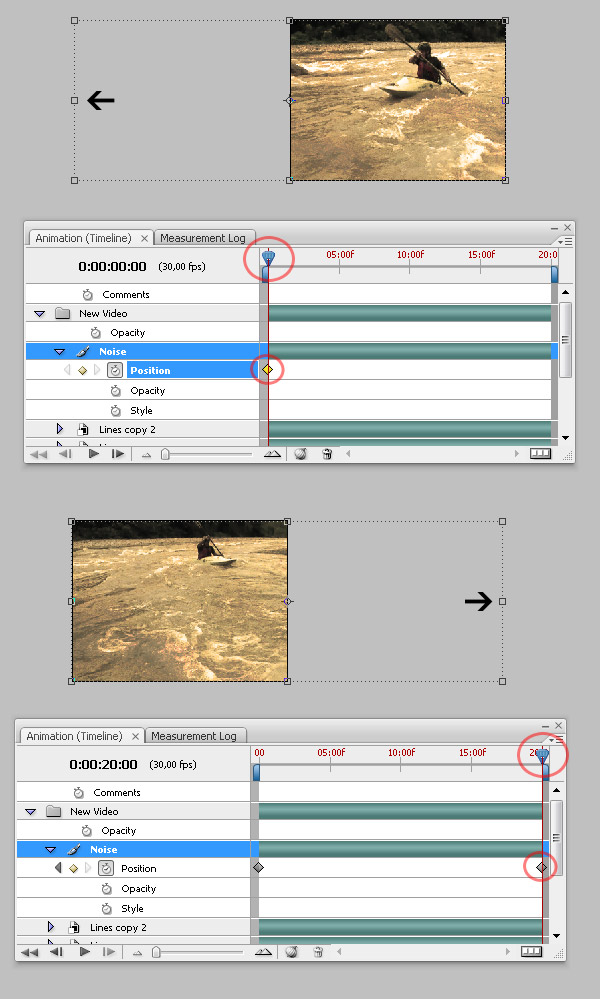
Step 15
Now if you want to add more grunge details to your video, add another layer of lines below the "Noise" layer, but this time make them more bold (Brush 3px). Follow the same steps for the basic lines (Steps 6 through 9). The differences are the following: Set a larger space between the keyframes and the first keyframe isn’t in the 00:00f. If you want to get a better result, repeat this adding lines process three or four times.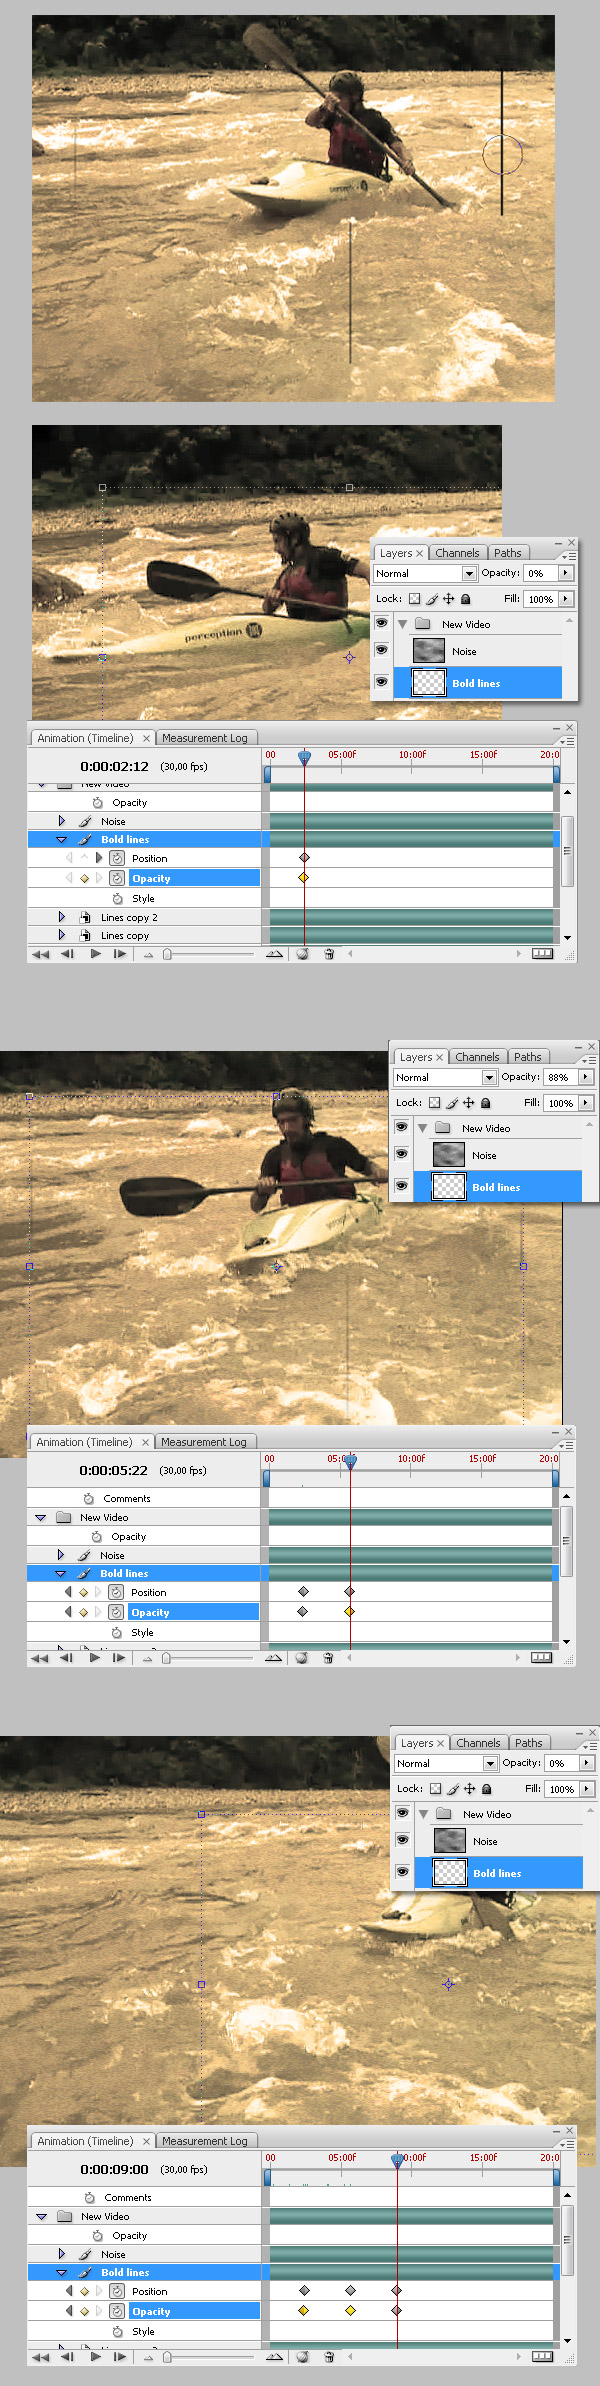
Step 16
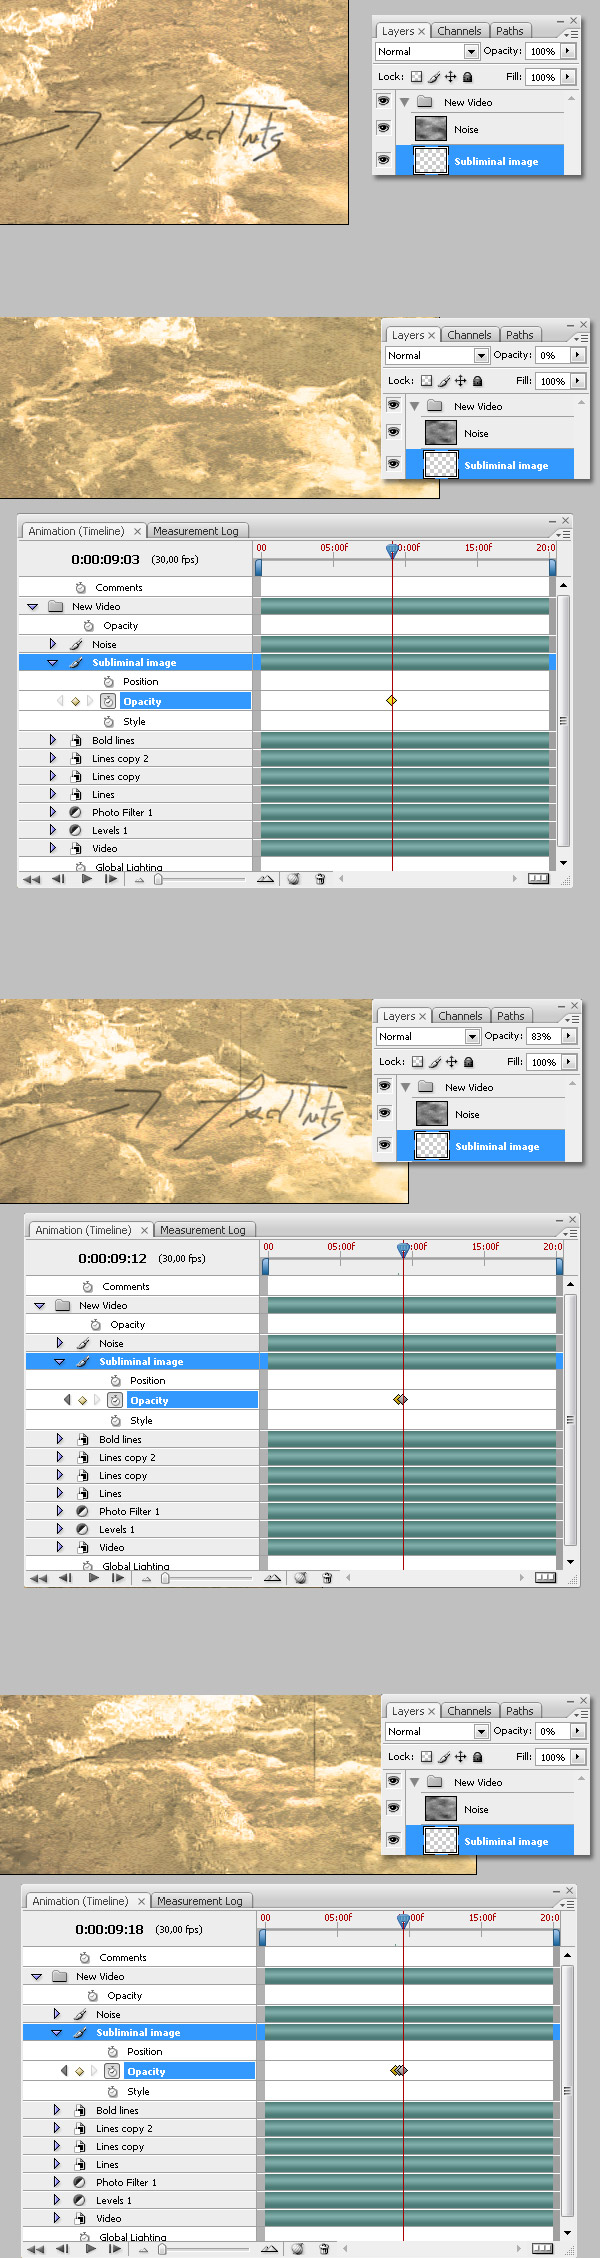
Now just because we can we’ll add some Subliminal text to our video. You can use it to add a signature to your work too. The steps are the same. First, create keyframes and change their layer’s properties.Draw any text into a new layer named "Subliminal image." Place this below the "Noise" layer. This time we’ll animate only the Opacity, and for a very short time to make a subliminal image. Create a 0% opacity keyframe, then another 88%, and finally another at 0%.
Step 17
Now we’ll add a dark border to our video. Create a new layer above the "New Video" group, Ctrl + A to select all, Ctrl + Alt + D to Feather the Selection. Then set a 50px radius. Ctrl + Shift + I to inverse the selection. Then using the Fill tool and a black foreground, fill the selection.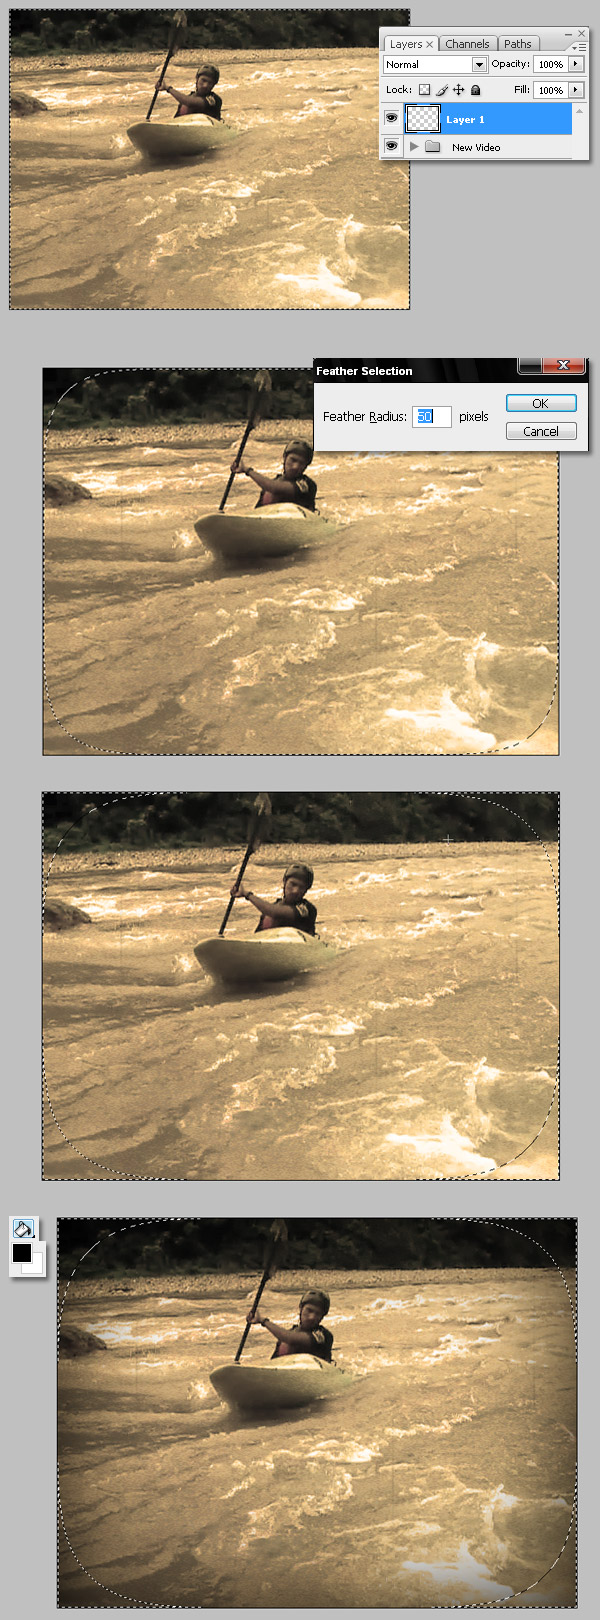
Step 18
Put everything into a new Group and name it "Full video" (I’m bad with the names).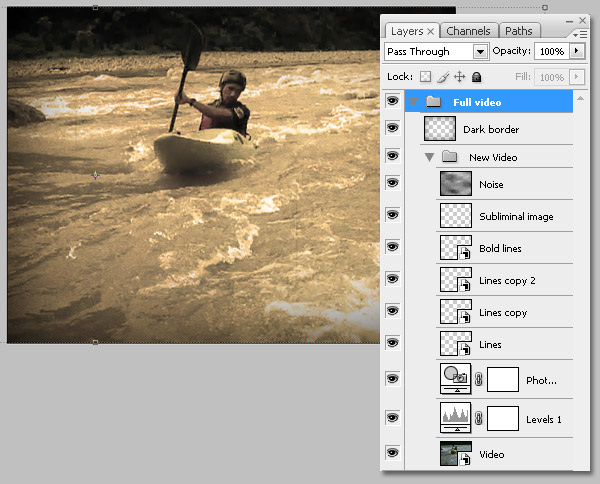
Step 19
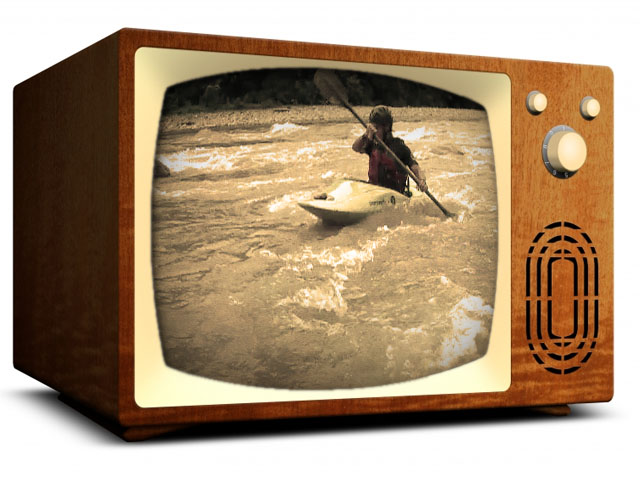
Paste this image into a new layer above everything, and delete the screen. I used the Magic Wand Tool with a Tolerance of 50 for this.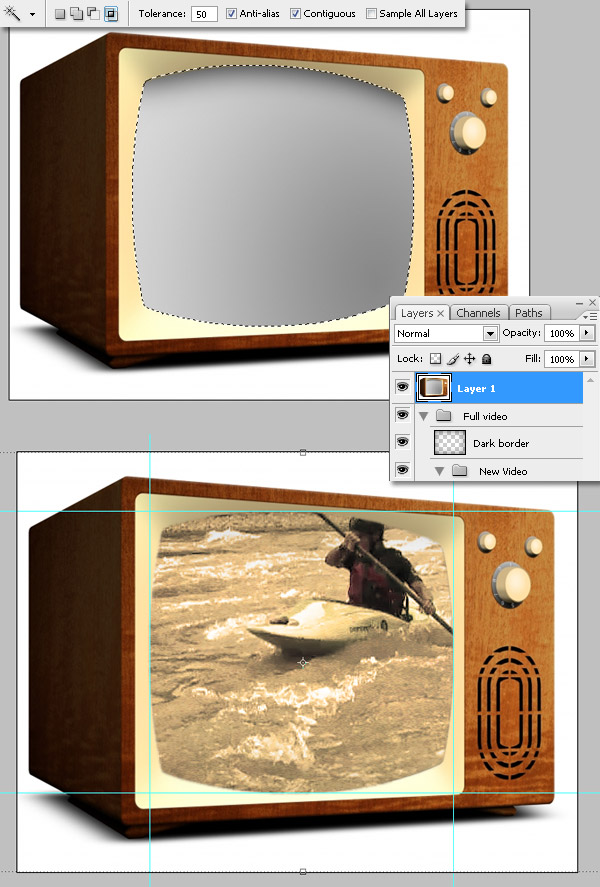
Step 20
Now convert all the "Full video" group into a Smart Object. If you want to edit the video later, Double-click on this layer. Now using the Warp tools distort the image to match the screen shape. I used some guides to make the work easier. Also, add a Drop Shadow to the TV layer. You can add more effects and layer styles if you want. I kept it simple this time.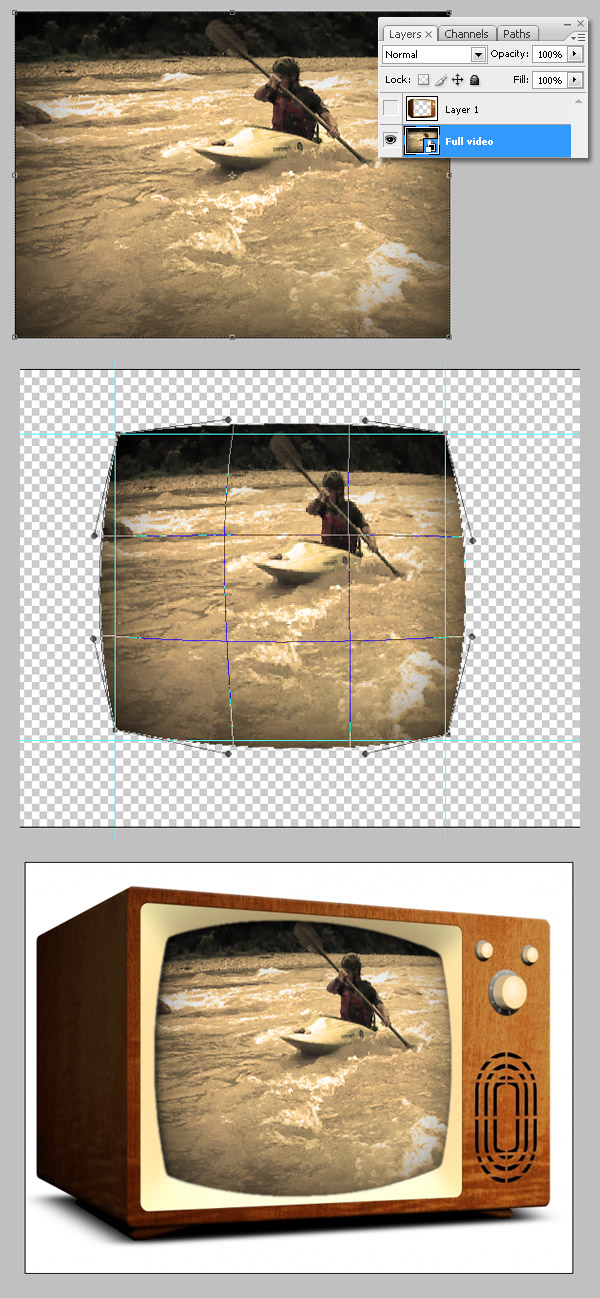
Step 21
To render your video go to File > Export > Render video. Select the folder and name the file. Choose Quick time Export (If this option is disabled you need to get Quick Time 7.4.X or higher). By clicking on Settings and then Adjustments you can select a lot of options for render quality. This time I’ll use the default settings. Finally, click on Render.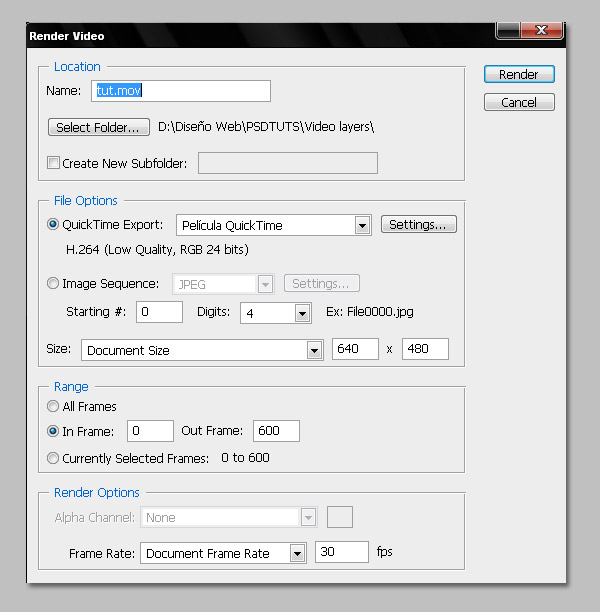
Conclusion
Our final movie file can be viewed here. Editing video using Photoshop is not always easy work, but you can get excellent results with a little bit of patience. Try this tutorial to add a signature to your videos or to add vintage effects to your next video blog post.
.
Comments
Post a Comment