Final Image
This is the final image that we’ll be creating:
Intro:
This tutorial isn’t overly complex, but should show you some interesting ways to fit 3d elements into your Photoshop designs. This tutorial will cover the steps involved in creating a fun wallpaper.Step 1
Open up a new document (1024X768) and fill your canvas with a cream color (D4CAAC).
Step 2
Now paste a paper texture (I used a texture from our ‘Free Paper Texture Set‘) onto a new layer. Set the layer’s blend mode to ‘hard light’ and reduce it’s opacity to 20%.
Step 3
Now paste in a photo of a bunny (http://www.sxc.hu/photo/786449) into the bottom center of your canvas. Cut it out from it’s background using the lasso tool.
Step 4
Now create a new layer beneath your bunny layer and use your circular marquee tool to create an oval beneath your bunny. Fill it with dark brown and set the layer’s opacity to 15%. To keep your circle central hold alt and drag your marquee tool out from the center of the bunny. Then duplicate your oval layer and go to edit>transform>scale. In the top options menu reduce the height and width to 80% (this technique keeps the resized oval central). Keep repeating this technique until you have many ovals, all getting darker as they get closer to the bunny. You should get a nice vector-looking surface for the bunny to sit on.
Step 5
Now find an image of a bird of prey, and paste it into your document, positioning it above your bunny. You can cut out the bird from it’s background however you want, but I simply used the magic wand tool. Then go to layer’s blending options and apply a black color overlay. Finally to retain the detail of the eyes, hide the color overlay, create a new layer and use the lasso selection tool and paintbucket to fill in the bird’s eyes – then make the color overlay visible again.
Step 6
Now paste in your 3d render. Credit for this amazing design goes to Joe from ‘VelvetMoth’. Make sure to duplicate this layer and hide the original and we’ll need it layer.
Step 7
Now cut off the bottom of your duplicate using the lasso tool and fit it over the top of the bird’s wing. Then duplicate this layer, go to edit>transform>flip horizontal and position this duplicate over the other wing.
Step 8
Now apply a gradient overlay to each of the 3d layers. The settings for this are shown below: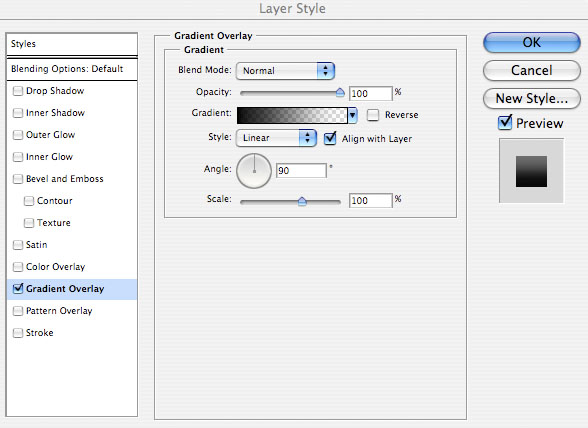

Step 9
Now duplicate your original 3d render onto a layer beneath your first two 3d renders. Go to image>adjustments>brightness/contrast and reduce the brightness and up the contrast.
Step 10
Now duplicate the 3d render a LOT of times, trying to span out from the bird’s wings. Try to get smaller the further you get away from the wings. Another tip is to resize, rotate and flip the renders so that they don’t appear too uniform.
Step 11
Now select one of the 3d render layers and apply a pink color overlay, blend mode: overlay, opacity: 31.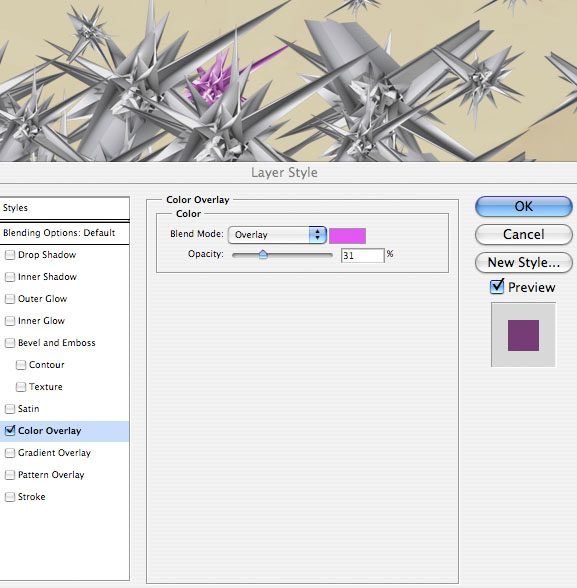
Step 12
Now right click on your pink 3d render layer and click ‘copy layer style’. Then right click on various other layers and click ‘paste layer style’ to paste the pink overlay effect.
Step 13
Now select one of your larger shapes and apply a gradient overlay, blend mode: ‘multiply’.
Step 14
Now copy and paste this layer style onto various other layers near to it.
Step 15
Now apply color/gradient overlays to most of the shapes, leaving just a few black/white.
Step 16
Now create a new top layer called ‘oval’. Create an oval shaped selection using your marquee tool and fill it with a black-dark gray gradient. Then create a smaller selection inside the oval and hit delete. Then rotate your final shape to fit one of the bird’s wings. Finally duplicate this layer, flip it horizontal and move it to fit the other wing.
Step 17
Now reduce the oval layer’s opacities to 40% and use your lasso tool to select/delete the areas of oval that overlap some of the 3d shapes. Once you’re done deleting bring the layer opacity back to 100%.
Step 18
Now create a new layer called ‘paint lines’ and select a 1px, hard black paintbrush. Make rough sweeping strokes out from the base of your bird shape to the top of your canvas. Do this until you have multiple lines overlapping your 3d shapes and wingspan. Finally, reduce this layer’s opacity to around 50%.
Step 19
For a final background touch make your original ’3d render’ layer visible again, up the contrast to +60 and then set the layer’s blend mode to ‘multiply’. Finally, reduce this layer’s opacity to 25%.
And We’re Done!
To finish up I added some simple text in the bottom-right of my wallpaper. You can click the image below to view the full sized piece.
Comments
Post a Comment