Retro 3D Movie Effect With Photoshop
Of course, since the images we work with in Photoshop are usually flat and two dimensional, we’re a bit limited in what we can do with them, but with a little help from selections, we can still pull off something that at least looks like it was taken straight from a cheesy 3D movie. And yes, if you happen to have a pair of those cardboard glasses with the red and blue lenses, prepare to amaze your friends because this 3D effect really does work!
Download our tutorials as print-ready PDFs! Learning Photoshop has never been easier!
Here’s the image I’ll be using for this tutorial:
The original image.
For this image, I want the alien to appear as if he’d be popping off
the screen in a 50′s movie theater, so I’ll be applying the red and blue
3D effect only to the alien himself, not the martian landscape behind
him. Of course, we could, if we wanted to, apply the effect to the
entire image, but since the image is flat, we really wouldn’t be
accomplishing anything. We’ll get better results by limiting the effect
to a specific person, object, alien, or anything else that should be
leaping out at you. Here’s how it will look when we’re done: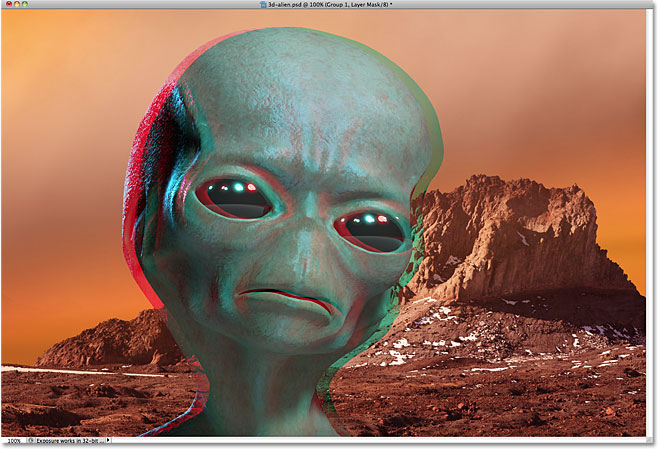
The final retro 3D result.
Let’s get started!Step 1: Select The Object You’ll Apply The 3D Effect To
As I mentioned, the images we work with in Photoshop are two dimensional, so there’s no easy way to completely transform them into 3D. But what we can do is select something in the image that should be jumping out at the audience, like my space alien friend for example, and apply the 3D effect only to that object. To begin then, use the selection tool of your choice (Lasso Tool, Pen Tool, etc) to draw a selection around the object you’ll want in 3D. Since the alien’s head is made up entirely of smooth curves, I’ll use the Pen Tool. When you’re done, you should see a selection outline around the object: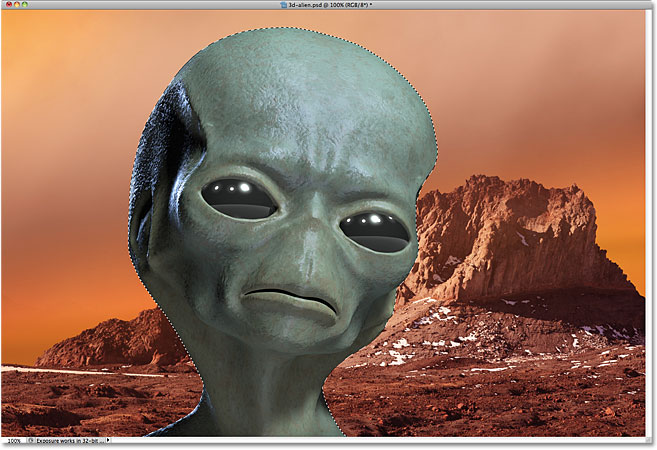
Select the object that will have the 3D effect applied to it.
Step 2: Save The Selection
We’re not going to do anything with the selection just yet but we’ll need it later, so let’s save it by going up to the Select menu in the Menu Bar at the top of the screen and choosing Save Selection way down at the bottom of the list: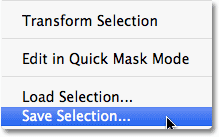
Go to Select > Save Selection.
Photoshop will pop open the Save Selection dialog box. There’s no
need to name the selection or anything, so just click OK to exit out of
it: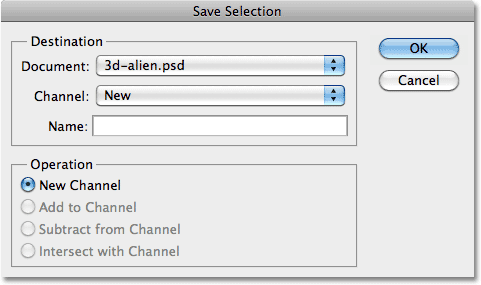
Click OK to exit out of the Save Selection dialog box when it appears.
With the selection now saved for later, press Ctrl+D (Win) / Command+D (Mac) to deselect the object. The selection outline will disappear.Step 3: Make Two Copies Of The Background Layer
If we look in the Layers panel, we see that we currently have one layer, the Background layer, which is the layer that contains our image. We need to make two copies of the image, one for the red lens effect and the other for the blue lens, so press Ctrl+J (Win) / Command+J (Mac) twice on your keyboard. Each time, you’ll create a new copy of the image (make sure you’ve deselected the object first at the end of Step 2). You should now see three layers in your Layers panel, each one containing a copy of the image:
Press Ctrl+J (Win) / Command+J (Mac) twice to make two copies of the image.
To make it easier to follow along, let’s rename the layers.
Double-click directly on the top layer’s name in the Layers panel and
change it to red. Press Enter (Win) / Return (Mac) to accept the name change. Then do the same thing for the middle layer and change its name to green blue:
Rename the top layer “red” and the middle layer “green blue”.
Step 4: Use Levels To Remove Red From The "Green Blue" Layer
With the “green blue” layer selected in the Layers panel (selected layers are highlighted in blue), go up to the Image menu at the top of the screen, choose Adjustments, and then choose Levels: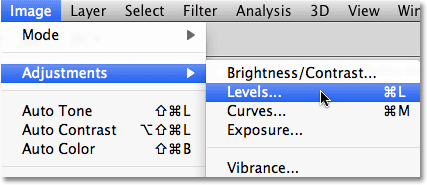
Go to Image > Adjustments > Levels
You can also just press Ctrl+L (Win) / Command+L (Mac) on your keyboard for the shortcut. Either way opens the Levels dialog box. We’re going to use Levels to remove the red channel from the image on our “green blue” layer. To do that, first select Red from the Channel option in the dialog box so we’re affecting only the red color channel: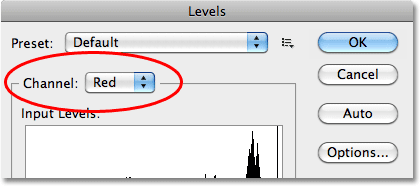
Select Red from the Channel option.
In the center of the Levels dialog box is a histogram
(the area that looks like a black mountain range), and directly below
the histogram are three sliders – a black one on the far left, a white
one on the right, and a gray one in the middle. Click on the middle gray slider and drag it all the way over to the right to where the white slider is: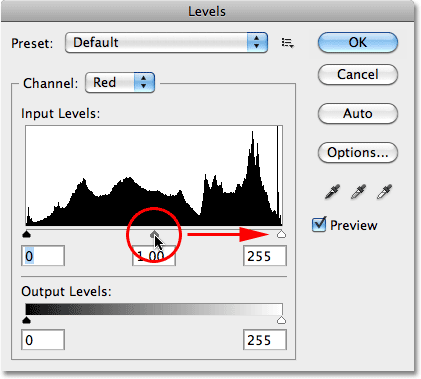
Click on the middle gray slider and drag it all the way to the right.
Click OK when you’re done to close out of the dialog box. Nothing
will seem to have happened to the image in the document window, but if
we look at the preview thumbnail for the "green blue" layer, we see that
the image on that layer now appears only in green and blue: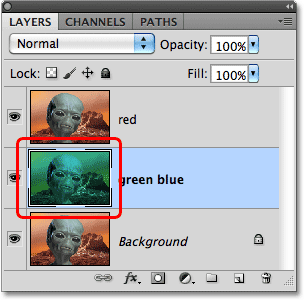
The preview thumbnails show us what the image looks like on each layer.
Step 5: Use Levels To Remove Green And Blue From The "Red" Layer
Click on the top “red” layer in the Layers panel to select it, then once again bring up the Levels dialog box either by going up to the Image menu, selecting Adjustments and then selecting Levels or by pressing the keyboard shortcut Ctrl+L (Win) / Command+L (Mac). This time, we’re going to remove both the green and blue color channels from the "red" layer.When the Levels dialog box appears, select Green from the Channel option. Then, just as we did with the red channel a moment ago, click on the middle gray slider below the histogram and drag it all the way to the right:
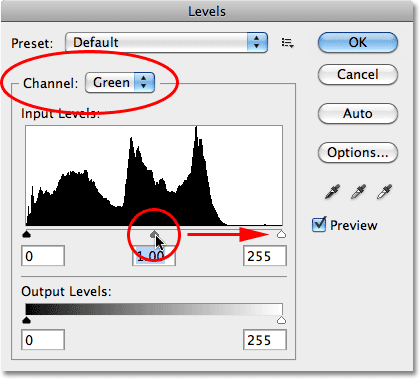
Select Green from the Channel option, then drag the middle gray slider to the right.
Don’t close out of the dialog box yet. We still need to do the same thing for the blue channel. Select Blue from the Channel option, then drag the middle gray slider below the histogram all the way to the right: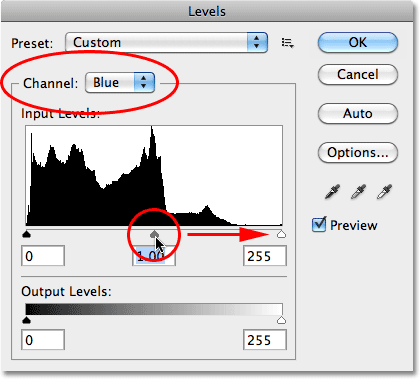
Select Blue from the Channel option, then drag the middle gray slider to the right.
When you’re done, click OK to exit out of the Levels dialog box.
Since the “red” layer is above the other two layers in the Layers panel
and we’ve removed green and blue from the layer, the image in the
document window will appear entirely in red: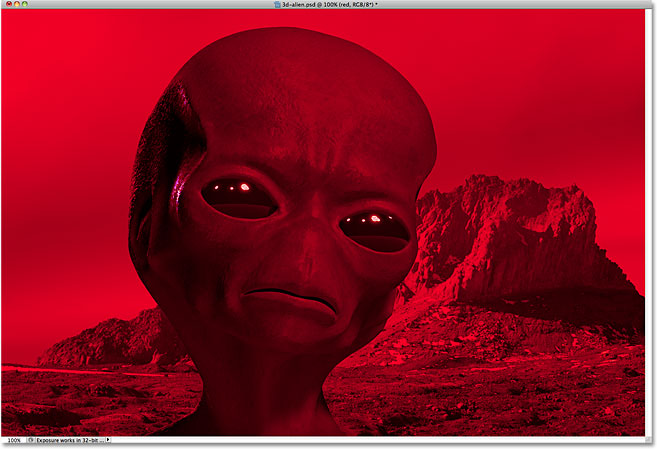
With the green and blue channels removed, all that remains is red.
Step 6: Change The Blend Mode Of The “Red” Layer To Screen
We need to blend our red layer in with the layers below it, so with the “red” layer still selected, change its blend mode at the top of the Layers panel from “Normal” (the default setting) to Screen: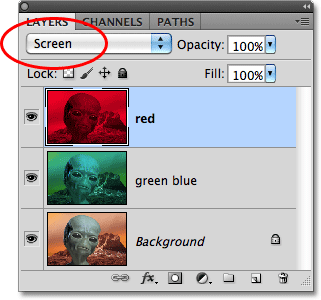
Change the blend mode for the “red” layer to Screen.
With the blend mode set to Screen, the image will appear back in its
original state in the document window. We’re ready to turn the image
into retro 3D, which we’ll do next!Step 7: Nudge The “Red” Layer To The Right
With the “red” layer still selected in the Layers panel, press the letter V on your keyboard to quickly select Photoshop’s Move Tool, then nudge the layer towards the right by pressing the right arrow key on your keyboard several times. As you nudge the layer, you’ll see the red and blue 3D effect begin to appear. The exact distance you move the layer will depend on the size of your image and on how extreme you want your 3D effect to be, but you’ll want to keep track of how many times you press the right arrow key since we’ll be doing the exact same thing with the "green blue" layer next (although in the opposite direction). I’m going to press my right arrow key a total of 15 times. Your image should now look something like this:
Remember how far you nudged the “red” layer so you can move the “green blue” layer the same distance.
Step 8: Nudge The “Green Blue” Layer To The Left
Click on the “green blue” layer in the Layers panel to select it, then use the left arrow key on your keyboard to nudge the layer the same distance as the “red” layer but in the opposite direction. Since I pressed my right arrow key 15 times with the “red” layer, I’ll press the left arrow key 15 times to move the “green blue” layer. Don’t worry that we’re affecting the entire image for now. We’ll fix that in a moment. Here’s what your image should look like:
Nudge the “green blue” layer the same distance but to the left.
Step 9: Group The Top Two Layers
With the “green blue” layer currently selected in the Layers panel, hold down your Ctrl (Win) / Command (Mac) key and click on the “red” layer. This will select both layers at once. You’ll see them both highlighted in blue: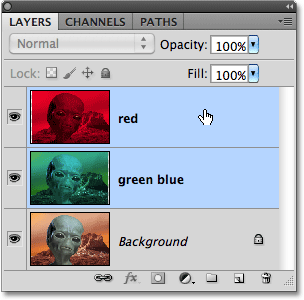
Select both the “red” and “green blue” layers.
Then, with both layers selected, go up to the Layer menu at the top of the screen and choose Group Layers: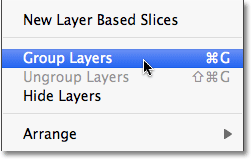
Go to Layer > Group Layers.
This places both layers inside a layer group which
acts very much like a folder in the Layers panel (which explains the
folder icon). Photoshop names the layer group “Group 1″: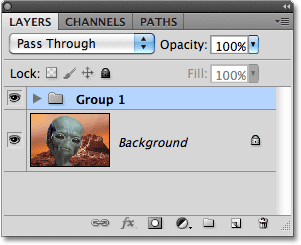
You can twirl layer groups open and closed by clicking the triangle to the left of the folder icon.
Step 10: Load The Saved Selection
Back in the first couple of steps, we selected the object we want to apply the 3D effect to and saved the selection. Now we need to load it. Go up to the Select menu at the top of the screen and choose Load Selection: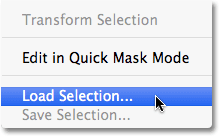
Go to Select > Load Selection.
This opens the Load Selection dialog box. Select Alpha 1 for the Channel option: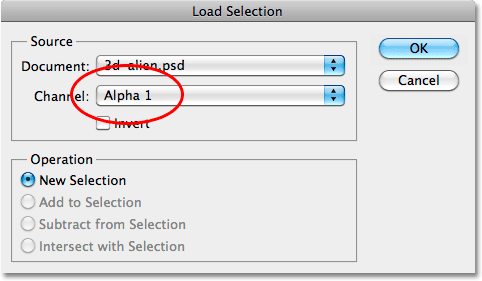
Since we didn’t name the selection when we saved it, Photoshop gave it the generic name “Alpha 1″.
Click OK to close out of the dialog box. The selection outline reappears in its original location in the document window: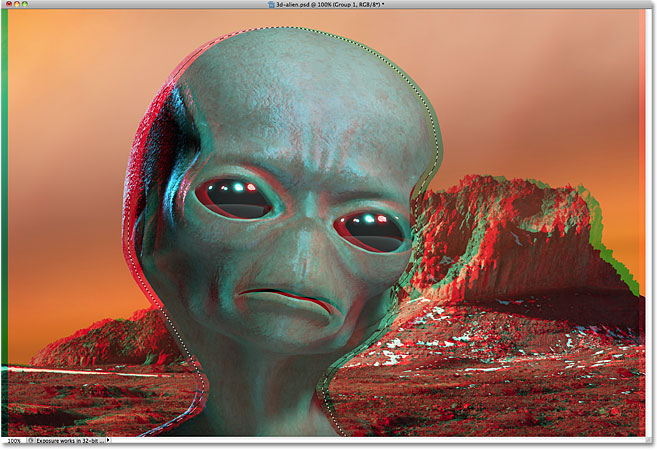
The selection from Step 1 reappears.
Step 11: Nudge The Selection Outline To The Right
At the moment, the selection outline appears around the original location of the object, but what we need is for it to appear around the object on the "red" layer. Remember how we moved the "red" layer over to the right by nudging it with the right arrow key on the keyboard? We need to do the same thing with the selection outline. To do that, go back up to the Select menu and this time, choose Transform Selection: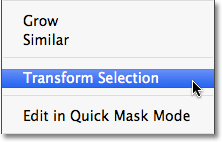
Go to Select > Transform Selection.
The Transform Selection command lets us move selection outlines
without moving the pixels inside them. A transformation box will appear
around the selection outline, similar to the box we see when using
Photoshop’s Free Transform command. Use the right arrow key
on your keyboard to nudge the selection outline to the right the same
distance you nudged the "red" layer earlier. Since I pressed the right
arrow key 15 times when moving the “red” layer, I’ll press it 15 times
to move the selection outline into the same location. When you’re done,
press Enter (Win) / Return (Mac) to accept it:
Nudge the selection outline the same distance to the right as you nudged the "red" layer earlier.
Step 12: Add A Layer Mask To The Group
With the selection outline now in place and the layer group selected, click the Layer Mask icon at the bottom of the Layers panel:
Click on the Layer Mask icon.
This adds a layer mask to the group, with a mask preview thumbnail
appearing in the Layers panel. Photoshop used our selection outline to
define the layer mask, filling the area inside the selection outline
with white and everything outside of it with black: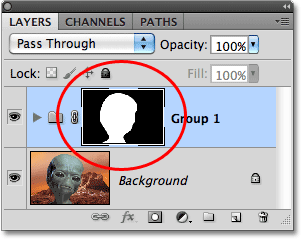
We can add layer masks to groups just as easily as adding them to normal layers.
The way layer masks work is that areas filled with white are visible
inside the document window, while areas filled with black are hidden.
Since our 3D effect is entirely contained within the layer group, the
mask we just applied to the group is now controlling which parts of the
image are affected by it and which are not. If we look at my image, we
see that the 3D effect remains only around the alien himself. The rest
of the image has reverted back to its original non-3D state:
Areas where the layer mask is filled with black no longer have the 3D effect applied to them.
Step 13: Load The Selection Again And Nudge It To The Left
We still need to do the same thing for the “green blue” layer. Load the saved selection once again by going up to the Select menu and choosing Load Selection. When the Load Selection dialog box appears, make sure the Channel option is set to Alpha 1, just as before, then click OK. The selection outline will reappear back in its original location in the document.We need to move the selection outline the same distance to the left that we moved the “green blue” layer, so go up to the Select menu and choose Transform Selection, which places the same transformation box around the selection outline that we saw a moment ago. Use the left arrow key on your keyboard to nudge the selection outline to the left. Since I pressed the left arrow key 15 times when moving the “green blue” layer, I’ll press it 15 times to move the selection to the same location. When you’re done, press Enter (Win) / Return (Mac) to accept it:

Move the selection outline the same distance to the left as the “green blue” layer.
Step 14: Fill The Selection With White
With the selection outline in place, go up to the Edit menu at the top of the screen and choose Fill: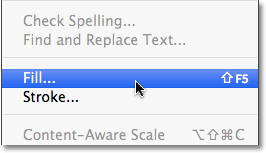
Go to Edit > Fill.
When the Fill dialog box appears, set the Use option at the top of the dialog box to White: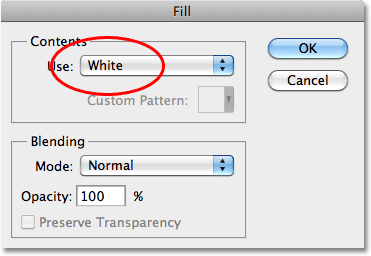
Set the Use option to White.
Click OK to exit out of the dialog box. Since we have the layer
group’s mask selected, Photoshop fills the selection with white on the
layer mask, which allows us to see the 3D effect from the “green blue”
layer around the object in the document window. We don’t need the
selection outline anymore, so press Ctrl+D (Win) / Command+D (Mac) to deselect it.And with that, we’re done! Here’s my final “retro movie theater 3D” effect. As I mentioned at the beginning of the tutorial, if you have a pair of those cardboard 3D glasses with the red and blue lenses, you should see your object popping out of the image:
The final retro 3D result.
And there we have it!
Comments
Post a Comment