
Photoshop Tutorial: “Cutting Out” Images

Photoshop Tutorial: “Cutting Out” Images

I’ve been lucky enough to have been a guest teacher at a 6th to 8th grade computer multimedia class every now and then at a local school over the past year. We spend most of our time in movie editing programs, Photoshop and Flash. When we are covering Photoshop, the most requested technique I am asked to show is how to “cut someone out” from one picture, then place them in another. I suppose the kids that ask me for it want to incriminate somebody, and as long as I don’t know exactly what they are doing I’m clear of any liability, so I’m happy to help.
(Photoshop veterans, this is old news to you. This is mainly for the kids I teach in class.)
For this tutorial, we’ll be using a picture of one of my favorite baseball players, Chipper Jones from the Atlanta Braves.
Chipper
If you want to follow along, you’ll probably need the high resolution of this picture that you can find if you click here. There are a couple of different ways that we can cut Chipper out of this picture. The first thing that you want to look at is the picture itself. Do you think it would be easy to draw a line around him? Or are there some weird edges that might make that tough to do? For each picture you try to do this with, it might be a little different. I’ll show you two ways that you can do it that you can pick from each time you do it.
Lasso
The first is the “Magnetic Lasso Tool”. You’ll find it here in Photoshop. You might have to right click on the Lasso icon to bring it up. Also, I am using Photoshop CS2, a newer version than you may have. Ask your teacher if you can’t find the Magnetic Lasso Tool.
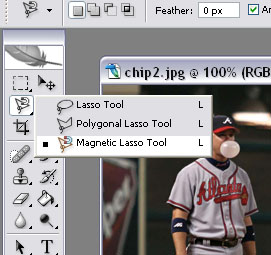
This tool will let you draw a line around what you want to cut out. It will make it easier for you as well because it will sort of stick to what you are drawing around. This is why it’s “magnetic”. It will be easier, but it will still take a little time to do if you want to do it right.
Just take your time and be careful. Make sure that you draw a line all the way around Chipper and close the sort of a circle that you will make.
Once you are done, it will look a lot like the picture right below.
outline
Make sure that you go all the way around him, even below his feet. Fully outlining him is important if you want him to look right. After you do this, pick the move button. It’s on the top right. Click and drag Chipper around. If you have another image window open, you can drag him into it as well. If you want to have even more fun, click the selection tool and right click Chipper. Make sure you duplicate his layer before you do anything. After you do, select the “Free Transform” option. You can make him bigger, smaller, and even fatter or skinnier.
Remember, there’s another way to do this that might work better for different types of pictures. Start over with the original picture of Chipper. Don’t select anything with any tools just yet. In Photoshop CS2, click “Filter” at the top menu bar, then click “Extract”. In older versions of Photoshop, this may be under “Image”. Once you get there, you’ll see the picture brought up in a new window. You’ll want to use the marker tool in this window to draw a green line around Chipper’s outline. Then fill in this area with the paint bucket. Once you are done, it will look a lot like Chipper is ready to beam up like in Star Trek.
extract

Hit “OK” and you’re finished. This will look a little weird at first. You can probably tell that the Magnetic Lasso was best for now. We actually can get the Extract method to work very good, but I’ll save that for another lesson. You can use another tool called the “Art History Brush” to bring back little details that have been deleted.
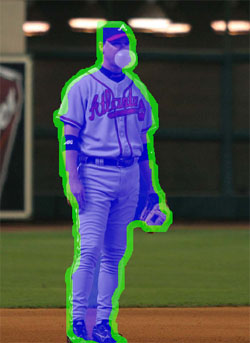
Don’t worry if your results aren’t perfect. Just keep playing with it and I promise it will look even better each time you try this. Using Photoshop really is an art like painting or drawing. It takes a good bit of practice to make things look really great.

Comments

Popular posts from this blog

Use x-ray techniques in Photoshop to show naked skin through clothing

    Do those new naked body scanners have you freaked out at the airports? As far as the TSA is concerned, those x-ray machines are here to stay, but you might as well take comfort in knowing that airport security guards aren't the only ones looking at your private parts. Practically anyone with a computer can manage to see through your clothes, and it's all thanks to a little program called Photoshop. Thanks, Adobe. With a few tweaks using the tools in Photoshop, you can see those boobs in no time, male or female. The video is in German, but it's not hard to figure our what's going on, especially if you're familiar with Photoshop. First, create a few duplicate layers, then get a handle on some of these tools to make the naked body through the clothes: * Auswahl erstellen (Create Selection) * Tonwertspreizung (Input Levels) * Belichtung (Exposure) You can also do this see-through clothing effect in free design programs, such as  GIMP .

Photoshop Photo Effects Tutorials 2024

  Photoshop Photo Effects Tutorials Everyone loves Photoshop effects. Not only are photo effects fun to create, but they’re a great way to learn Photoshop since they often introduce us to tools, commands or other features we might otherwise never know about! All of our Photoshop effects tutorials are written with beginners in mind, with easy-to-follow, step-by-step instructions. See our complete list below, or download our tutorials as  print-ready PDFs ! Fade an Image to Color in Photoshop Faster with Live Gradients Learn how to fade an image to color with Photoshop the new and easy way using live gradients! How to Add Falling Snow to Photos with Photoshop Learn how to add realistic falling snow to your winter photos with Photoshop. Get Better Color Halftone Effects in Photoshop Learn how to create more realistic color halftone patterns using Photoshop’s Color Halftone filter and this simple trick. How to Create a Halftone Dot Pattern in Photoshop Learn how to turn your photo into a h

Ridiculously Cool Photoshop Text Effect Tutorials

  Easy Photoshop Text Tutorials for Beginners If you’re still learning the fundamentals of design or want some quick-and-easy text ideas to jazz up your print designs, these beginner tutorials will be a big asset. In your lessons you’ll learn how to apply texture and 3D effects, create logos, utilize masks and other simple techniques for enhancing your text. 1.  Using Text As A Container For More Text In Photoshop 2.  Glossy Emblem Text Effects 3.  Create a Realistic Emboss/Deboss Effect 4.  Icy Styles in Photoshop 5.  How To Create a Gold Text Effect in Photoshop 6. Moon Shine Text Effect 7. Simple Styled Text with Stars Effect 8.  Elegant Glossy Gold Text Effect 9.  Hipster Text Effect in Photoshop CS6 10.  The Sugar Bag Effect 11.  Easy Chalk Ornament Typography in Photoshop 12.  Abstract Shining Text Effect with Groovy Font 13.  Easy Plastic Text with Layer Styles In Photoshop 14.  Papercraft Text Effect 15.  Making a Clipping Mask With Text In Photoshop 16.  Simple Bokeh Text Effe