Step 1 – Setting up the Document
First of all create a new Photoshop Document 800 pixels by 1120 pixels, 72dpi, and set to RGB. Then create a new Gradient Fill Layer named "Gradient." I’m using these colors: #F20000 – #8E0000 anyway feel free to change them.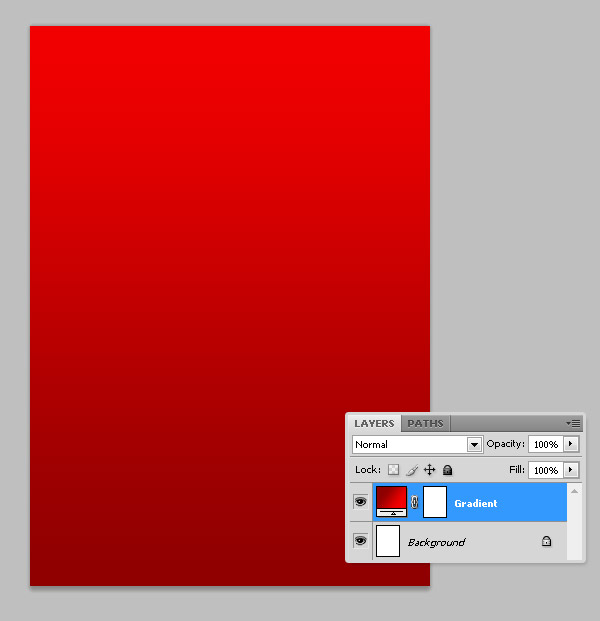
Step 2 – Extract the Image from its Background
Paste the splashing milk bowl into a new layer named "Splash." Next we need to get rid of the black background, for this go to Select > Color Range, sample the black background and set the Fuzziness value to around 85, then click OK to commit the selection. Now Expand the resultant selection 1px and create a Quick Mask or a Layer Mask hiding the Black background. Finally flip the image horizontally and place it at the bottom right of the document.
Step 3 – Whitening the Milk
In the picture the milk looks a little bit pink, to make it white just add a Hue/Saturation Adjustment Layer, select Reds on the colors selector and set the Lightness value to +100, ensure the clipping mask option is enabled on the Adjustments Panel in order to apply the adjustment only to one layer. In this case the "Splash" layer. We will leave the bowl as is for awhile, it’s time to create the cereal loops. Finally add both layers, "Splash" and the Adjustment into a folder named "Bowl."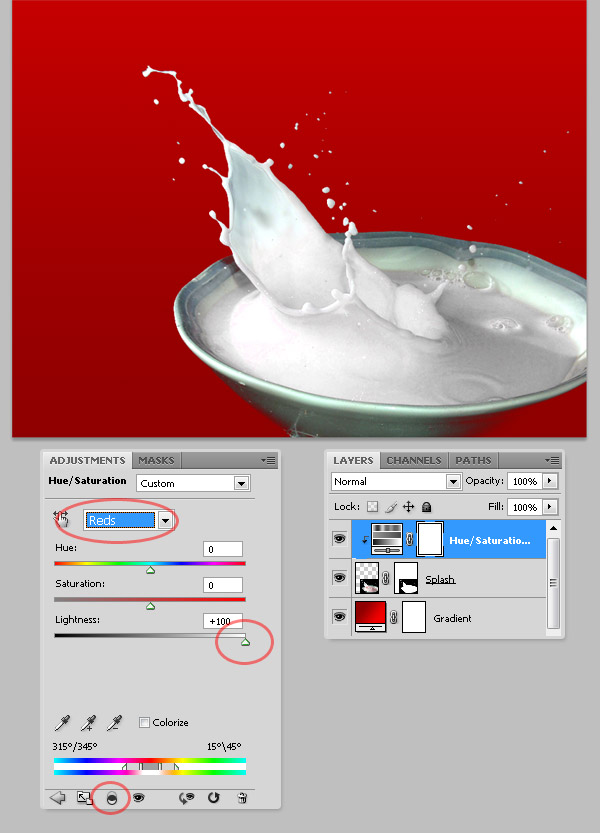
Render the Cereal Loops
Step 4 – Create a 3D Shape from a Layer
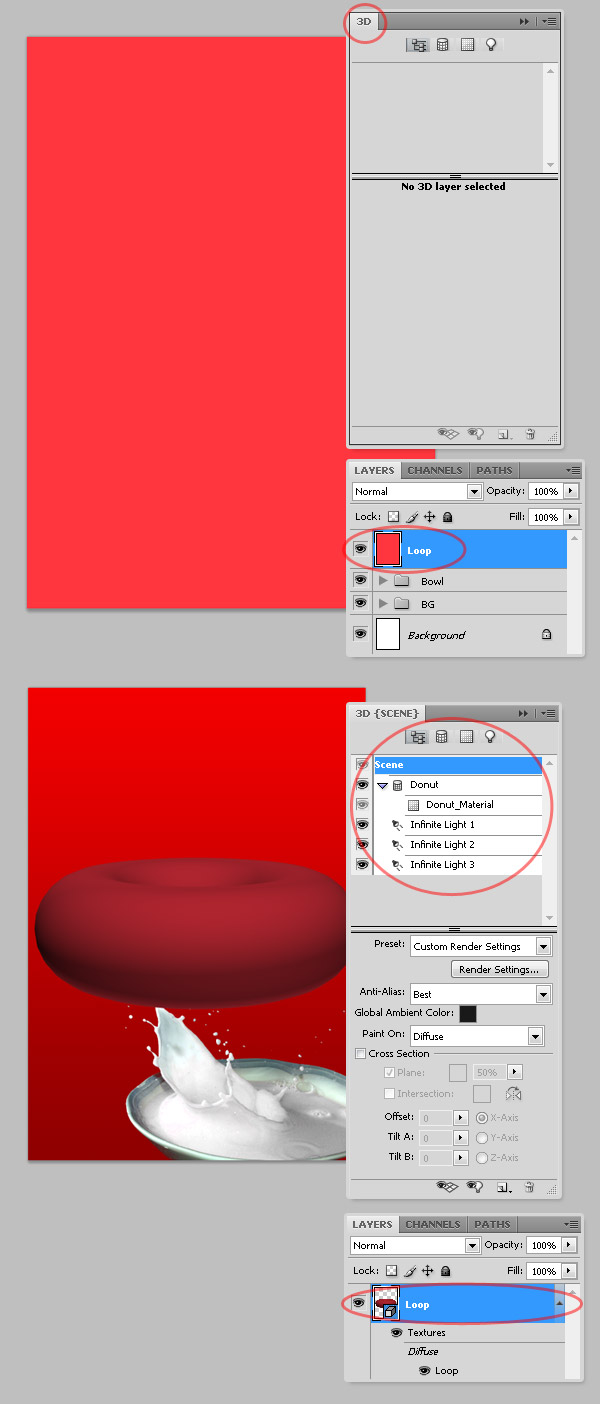
Here comes the fun, we’ll start creating the cereal loops using some 3D layers. First, create a new layer named "Loop" and fill it with some color. I’m using the Rectangular Marquee tool and the Paint Bucket to fill it with this color: #FF363E.Go to Window > 3D to show the 3D Panel. Now go to 3D > New Shape From Layer > Donut to automatically create a 3D Layer named "Loop." Leave it as is and go to the next step.
Step 5 – 3D Panel Overview
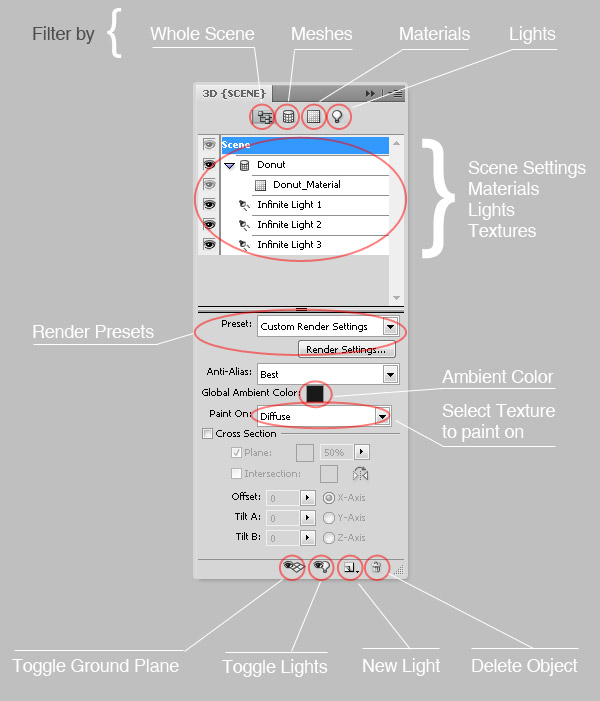
Before we move forward you’ll need to feel comfortable with the 3D panel. All the 3D objects are inside a container named Scene, each Scene may have several 3D objects that can be Meshes with its respective Textures or Lights. You can put as many objects as you want into a Scene.You can Filter the objects by clicking on any of the four buttons on top of the panel. Below there are the Scene options, there you will be able to change the Render Preset, Anti-Aliasing, Global Ambient Color (this one is very important in this tutorial) and select the texture where you will be painting on (we will see that shortly). Finally at the bottom of the panel you can toggle the Plane and Lights view on/off or add a new light, and of course the Delete button. Feel free to play with this panel before going to the next step.
Step 6 – Change Ambient Color and Show the Ground Plane
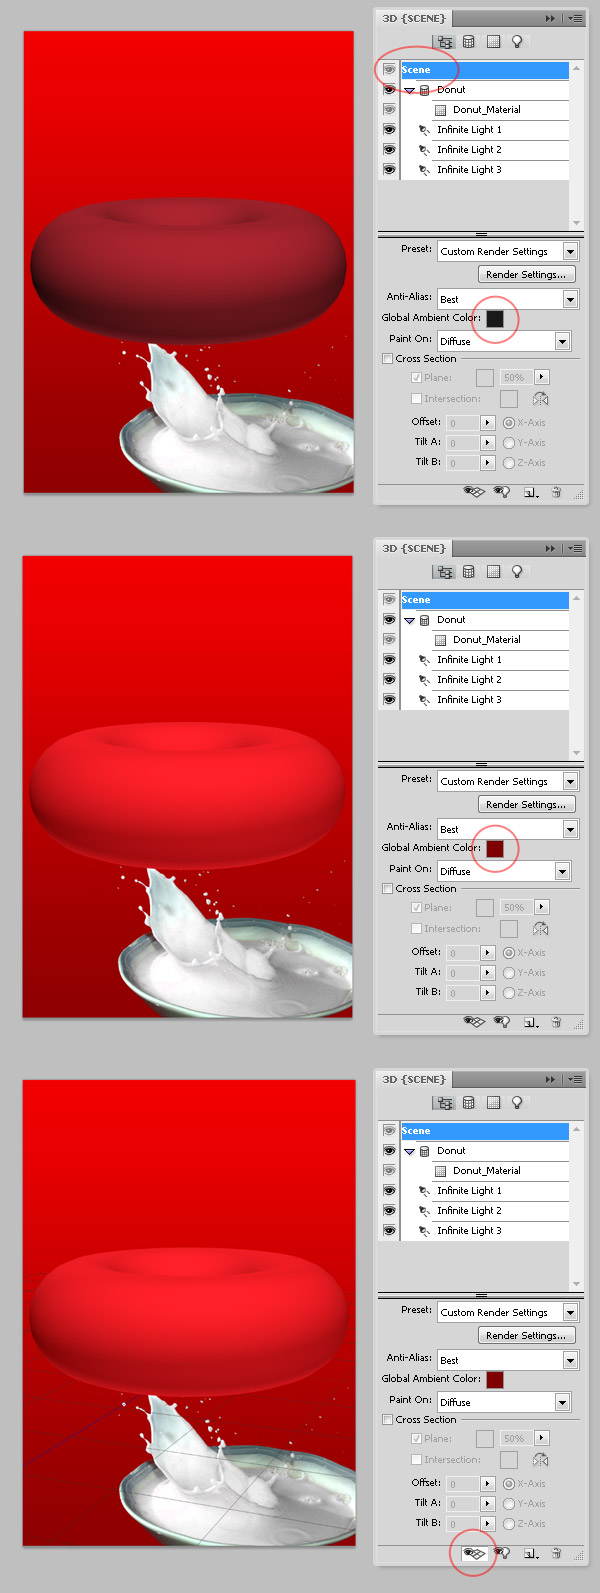
Our loop looks a little bit dark even though we create it from a pink layer, that’s because the Global Ambient Color is Black by default; click on the color box to change it into a dark red color (#7E0001). Now the loop looks pretty good, but there is so much left to do.Click on the Toggle Plane button to show the plane as a reference, you’ll notice the plane perspective is almost the same as the bowl perspective, which is very convenient for the composition and lighting so we will leave everything as is.
Step 7 – Transform the Mesh View
Following, click on the Mesh button to work only with the "Donut" object (See image 1 below). In the options panel there are several transform options related to this mesh. First we’ll need to rotate the loop by selecting the Rotate button on the Mesh Tools Panel; just drag the cursor over the 3D object to rotate it, as shown in image 2 below.Following, Roll the mesh a little bit if you need to. Then drag the mesh a little bit up, using the Drag button in the Mesh Panel (image 4), and finally slide the mesh a little bit inside the space by dragging the Slide cursor as shown in image 5 below, and then hide the Plane View.
At this point you should have something like the last image below. This step is important because we’ll repeat the 3D transform several times shortly. Feel free to practice with the Mesh options before moving forward. Remember, Photoshop isn’t 3D modeling software, so if you want to edit the mesh itself you will need other software.

Step 8 – Paint Over the Texture Layers
Now it is time to edit the textures a little bit. Select Paint On: Diffuse in the 3D options, then Select the Brush Tool and using this color #FFC6CA or something similar, chose a 100px soft brush (Opacity and Flow 50%) and paint directly over the 3D mesh. Rotate the mesh as much as you need in order to cover the entire surface of the object.Notice that there’s a Layer named "Loop" under Textures – Diffuse in the Layers Panel, Double-Click on it to open a .psb file containing a plain view of the texture. We’ll work on that layer in the next step.

Step 9 – Working on the Diffuse Texture
On the .psb file, select the "Loop" Layer (this layer name may vary depending on your previous editing), and apply a Patter Overlay Effect to it, I chose a Rock Pattern named "Granite" built in Photoshop, but feel free to try with different textures. To keep the layer color, set the Effect’s Blending Mode to Soft Light. Finally save the .psb file, close it, go back to the main document and see how the texture looks now.
Step 10 – Bumping
Now we’ll make the surface a little bit irregular. In the 3D options panel set Paint On: Bump, select an irregular black Brush, and start paining.Since the Bump texture is not created yet, you will see an alert about it, just hit OK on it. Then just start painting over the 3D object, using black as foreground will emboss the object, otherwise using white as the foreground will bevel the object, play with both colors until you feel happy with the texture. It’s very important to have the entire surface texturized and not only the front view (we will see why shortly).
If is easier for you, Double-click on the "Bump" texture layer in the Layer Panel and paint the bump texture over the .psb file as shows the bottom of the image below, you can use the Clone Tool for that purpose. Once you feel happy with the result, close the .psb file and go back to the main document.

Step 11 – Glossiness
To finish the texturing process we’ll add a Glossiness texture layer. Select Paint On: Glossiness in the 3D panel and using any Brush paint a little invisible white spot somewhere over the 3D layer. The important thing in this step is to switch to the Materials View, and change the Shininess Value from 40% to 80% in order to make the gloss less intense.You can paint over the texture layer as well just like in the previous steps, but this time use a light color, white will be OK.
The loop is not finished yet, we’ll need further edits on it to make it look more real.

Step 12 – Duplicate the Loop
Now we’ll duplicate the loop in order to create several flavors. Select the Move Tool (V), then while holding the Alt Key select the 3D layer and drag it to duplicate it. Hide the original "Loop" 3D layer and select the copy, by the way I name it "Loop 2." Show the 3D panel, switch to Mesh view and use the Rotate Tool to rotate the new mesh in order to make it look different.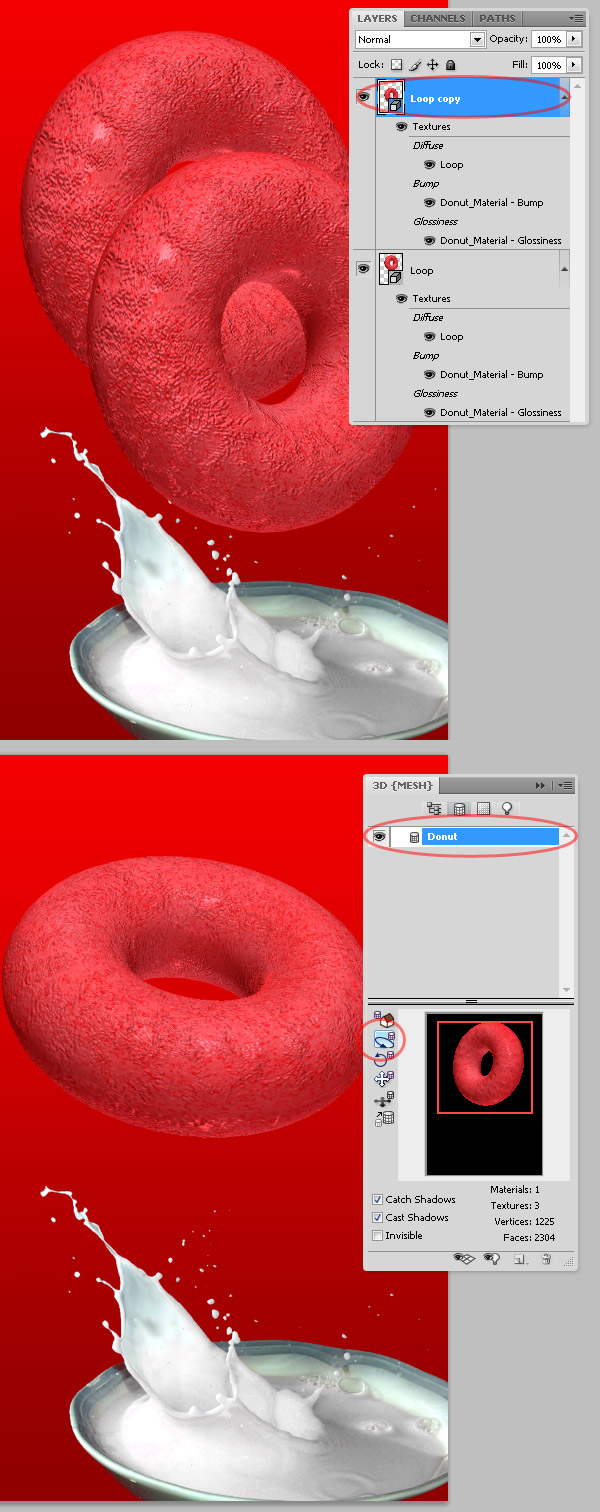
Step 13 – Change the Loop’s Colors
Double-click over the Diffuse Texture of the "Loop 2" layer in the Layers Panel, you will see the texture that we’ve created in Step 9. In order to easily change the color we will use a Hue/Saturation Adjustment Layer as shown below. Save the changes, close the .psb file and see how it looks.
Step 14 – Change the Glossiness Color
Following, double-click over the "Loop 2" layer’s Glossiness texture. You’ll see the color of the texture just as we left it in Step 11. We’ll change its color by adding a new Hue/Saturation Adjustment Layer. The final color is up to you, but try to obtain almost the same color tone as the previous step. Save the texture file and see how it looks in the main document.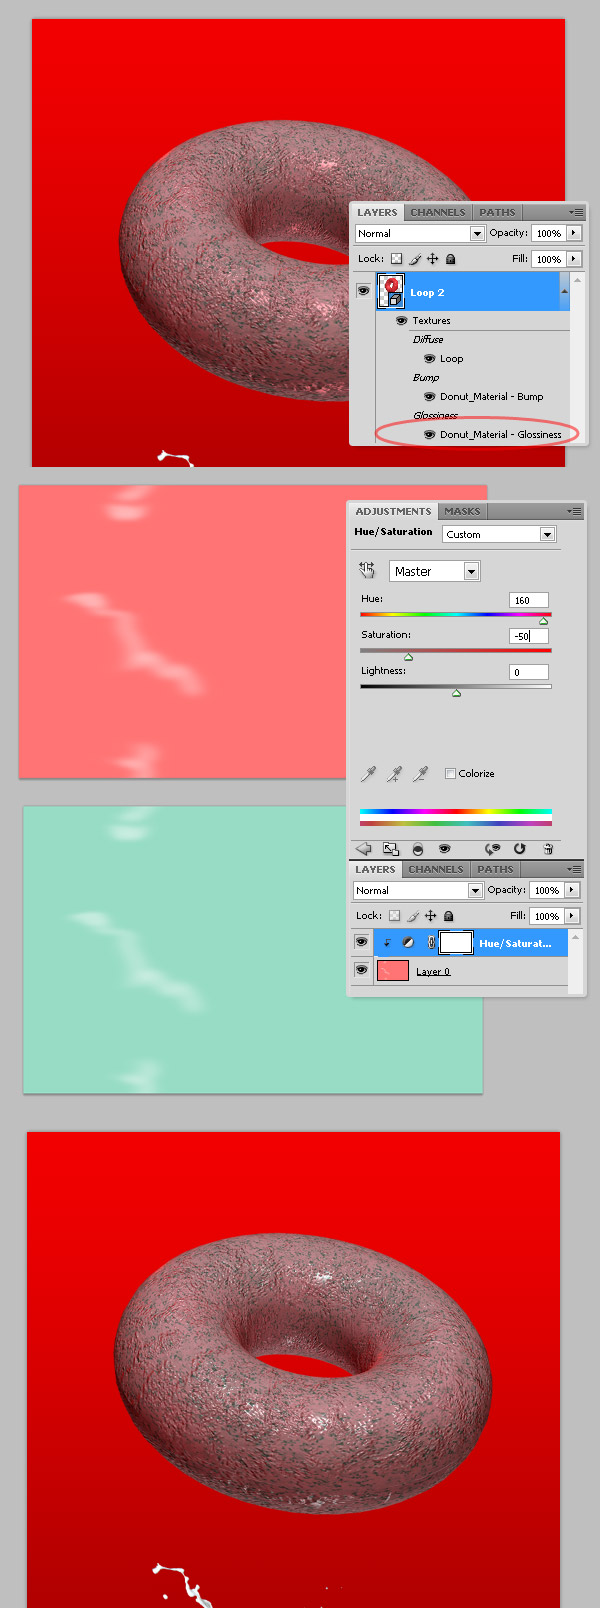
Step 15 – Change Ambient Light
Finally, to complete the new flavor, change the Global Ambient light of the new 3D Scene to a more appropriate tone, in this case the following color: #01261E.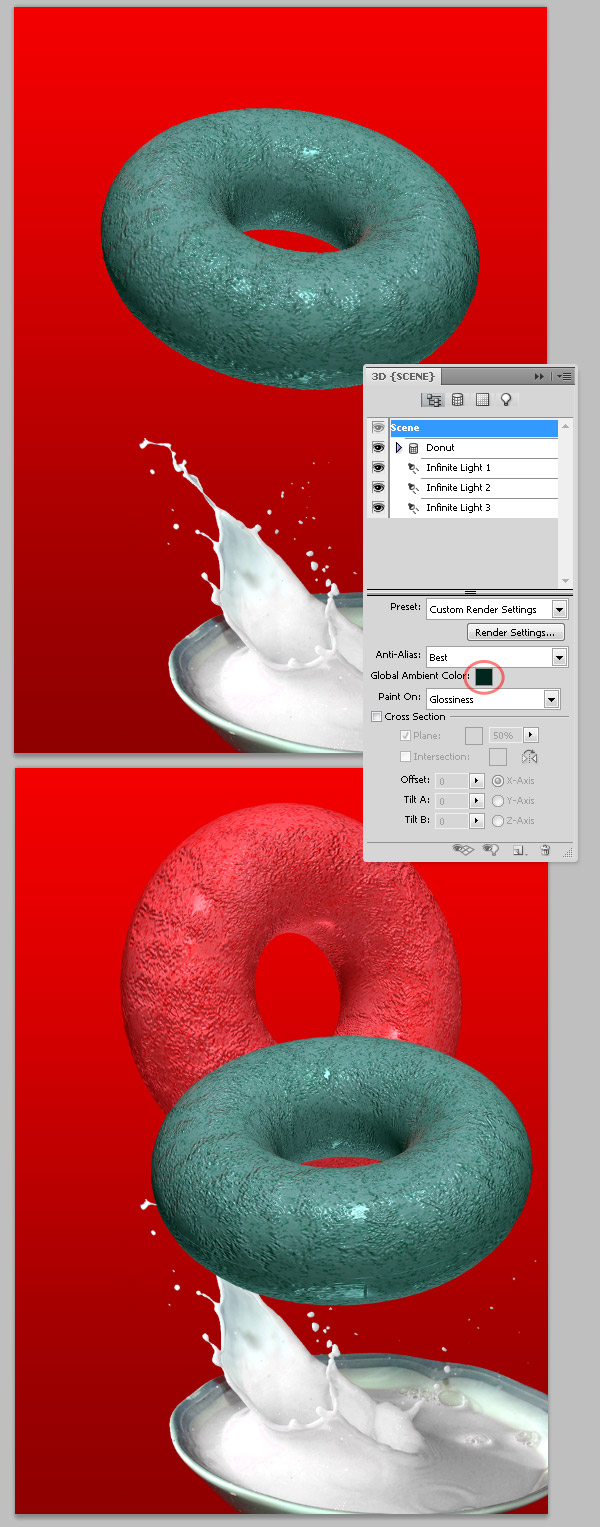
Step 16 – Do it All Again
Repeat the Steps from 12 to 15 to create different flavors of cereal loops, the colors are entirely up to you. Remember keep your layers organized, I created a Folder named "3D Loops" and four sub folders each one containing its respective loop.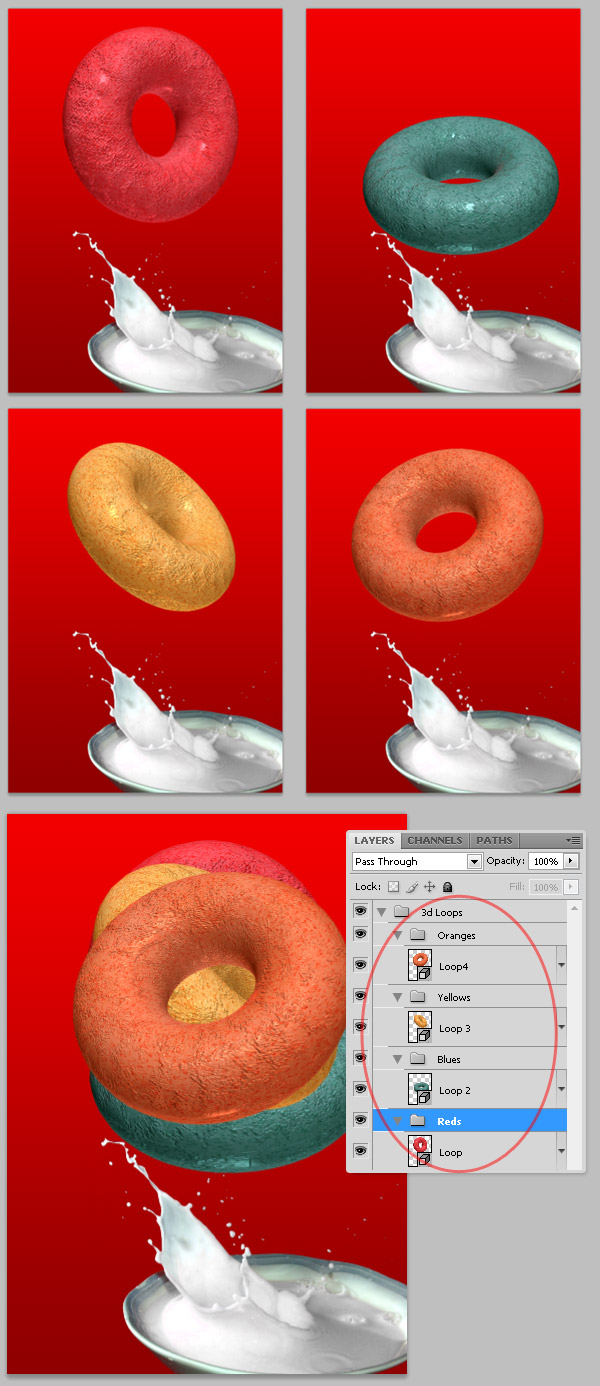
Step 17 – More and More Loops
Since each loop is inside a folder named with its respective color, we will duplicate and rotate each loop several times in order to create many of them. This time I’m creating four copies for each color.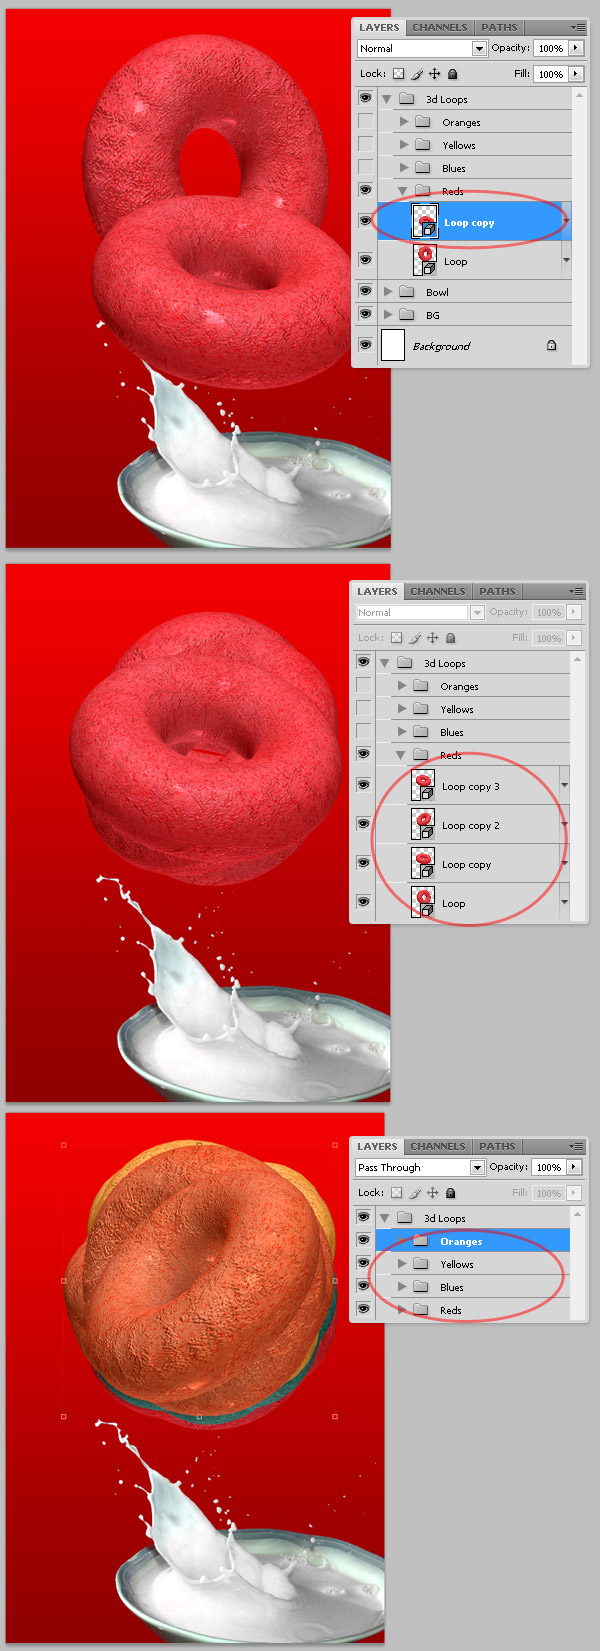
Step 18 – Rasterize the Loops
Create a copy of the entire "3D Loops" folder and hide the original, just in case you need to use any 3D layers later in the process. Now rasterize every single 3D layer in the "3D Loops" copy folder. Do this by Right-clicking a 3D Layer and selecting the Rasterize 3D option.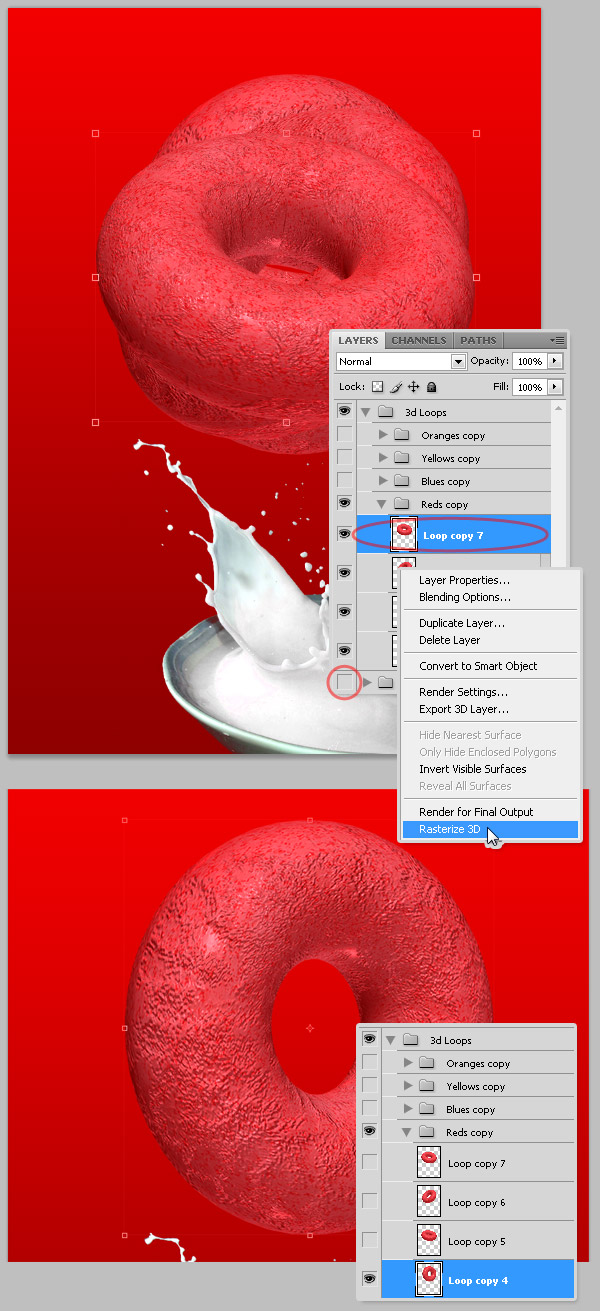
Step 19 – Liquify
Since we’ve got all our 3D layers rasterized, we will distort them a little bit to make the loop’s borders irregular. Select any of the "Loop" layers and go to Filter > Liquify. In the Liquify window, select the Forward Warp Tool, set 100 as the Brush Size and 25 as the Brush Density and push the loop’s edges inside and outside, as shown below. Repeat this step with every single rasterized loop in your document.
Step 20 – Resize and Distribute the Loops
Now that we have a handful of nice cereal loops we’re going to put them into the milk bowl. First of all, duplicate the folder containing the rasterized loops, hide the original (by the way I named it "3D loops raster big") and name the copy something like "3D loops raster small." Next resize the entire folder in order to make the loops really small. Now use the Move Tool to distribute the loops randomly.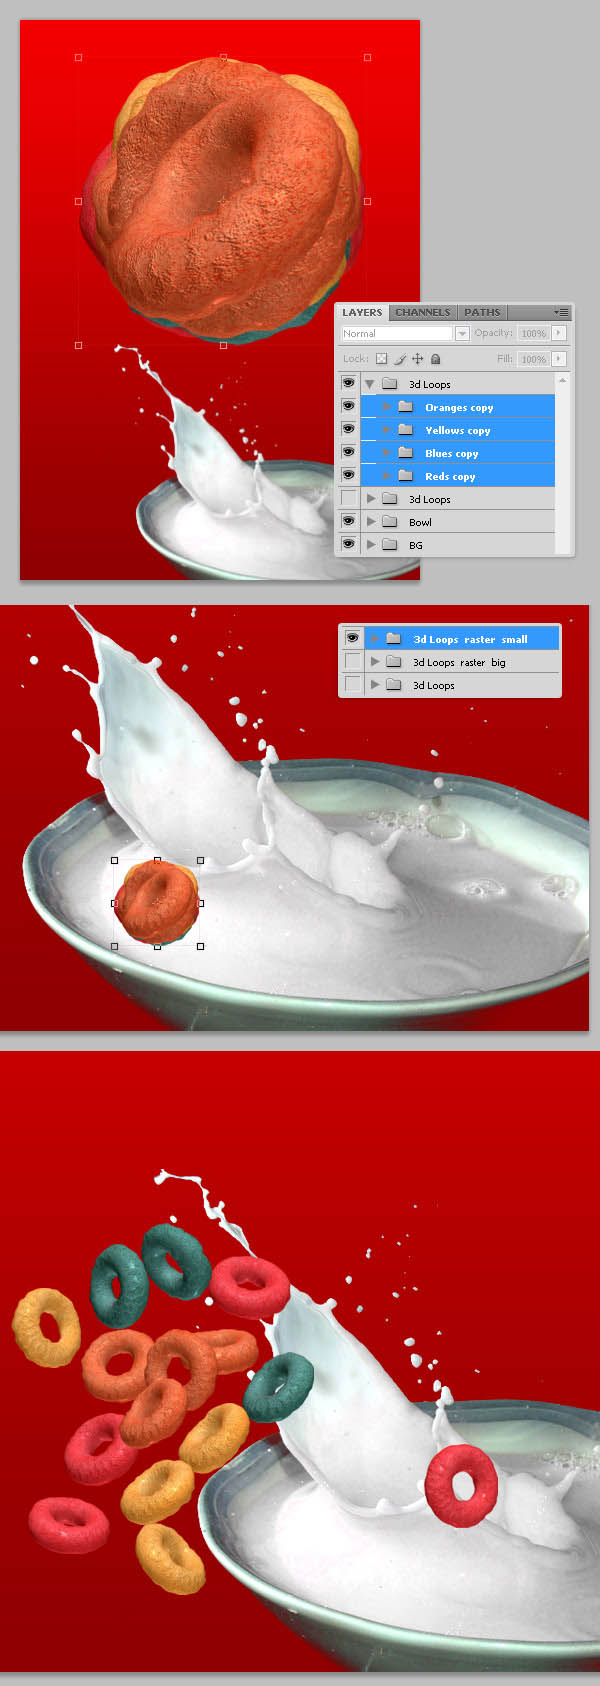
Step 21 – Placing the Loops
Grab any loop and place it somewhere over the bowl, try to cover a milk splash with it. Then select the mentioned loop and add a Layer Mask > Reveal All. Select the mask and using a small black brush, hide some of the loop’s areas with the milk splash. Repeat this step with all the "Loop" layers. This is maybe the most difficult part of the process, since you’ll need to re-order the Loops distribution several times.
Step 22 – Some Shadows
Create a new Layer named "Shadows" above "3d Loops raster small" folder. There paint some shadows using a small black brush (use the brush settings shown below). Besides you can use an irregular brush (like a chalk brush) and add some irregular shadows over the loops.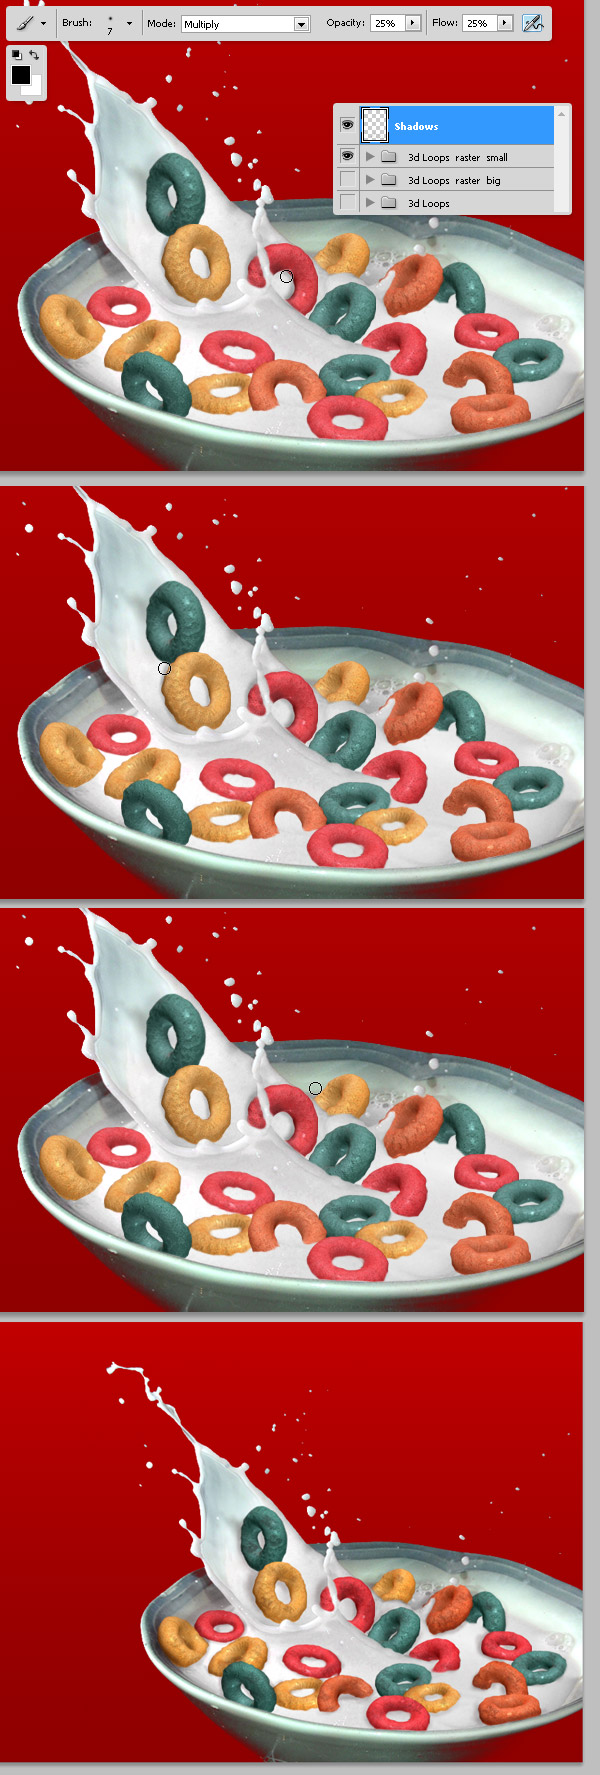
Step 23 – More Splashes!
As a final touch, merge the "Bowl" folder (look at Step 3) and use the Clone Tool to duplicate some areas of the splashing milk into a new Layer above all the others named "More Milk." This is easy, grab the Clone Tool, select the rasterized "Bowl" layer and hold down the Alt key, then click somewhere over the milk splashes as the clone source. Ensure the Sample value in the Options Panel is Current Layer, then select the "More milk" layer and start painting anywhere. Finally use a small Eraser to delete the extra milk. This is only one way to create more milk splashes.Another way to do it (my personal favorite) is to grab the Selection Tool, select a portion of the milk splashes, copy, paste and delete the undesired areas. Finally, put the "3D loops raster small" folder, and the “Bowl” folder into a new Folder and name it "Bowl Final."

Step 24 – Add it into the Scene
Merge the "Bowl Final" folder (I always duplicate the folder, hide the original and merge the copy in case I need to roll back). Then look over the web for a nice mascot for our brand new cereal box, or draw one yourself. I’m using one of these nice birds of the twitter icon set, since the author has released the .PNG source file (you can open it with Fireworks) I increased its size a lot. Paste it just behind the milk bowl.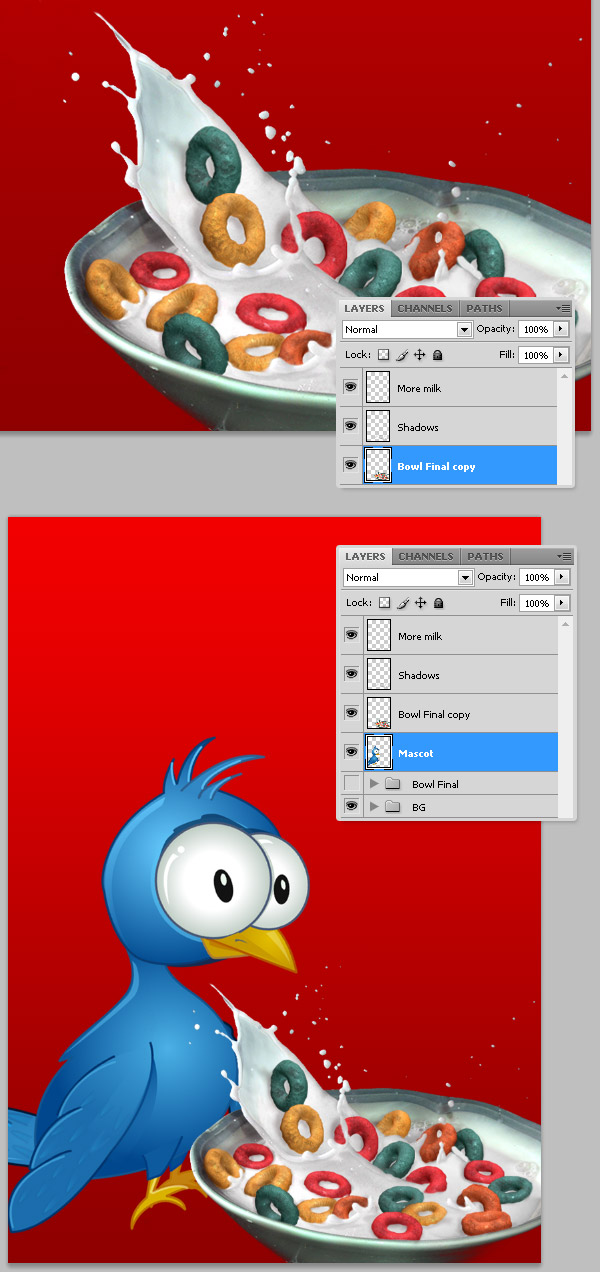
Step 25 – Add Some Background Details
Following we will add some background details, in this step I’m adding a White oval above the mascot. Select and copy a part of the bird’s wing and paste it above the oval, then duplicate the wing, turn down its Lightness and Opacity, then place it behind the original in order to create a subtle shadow.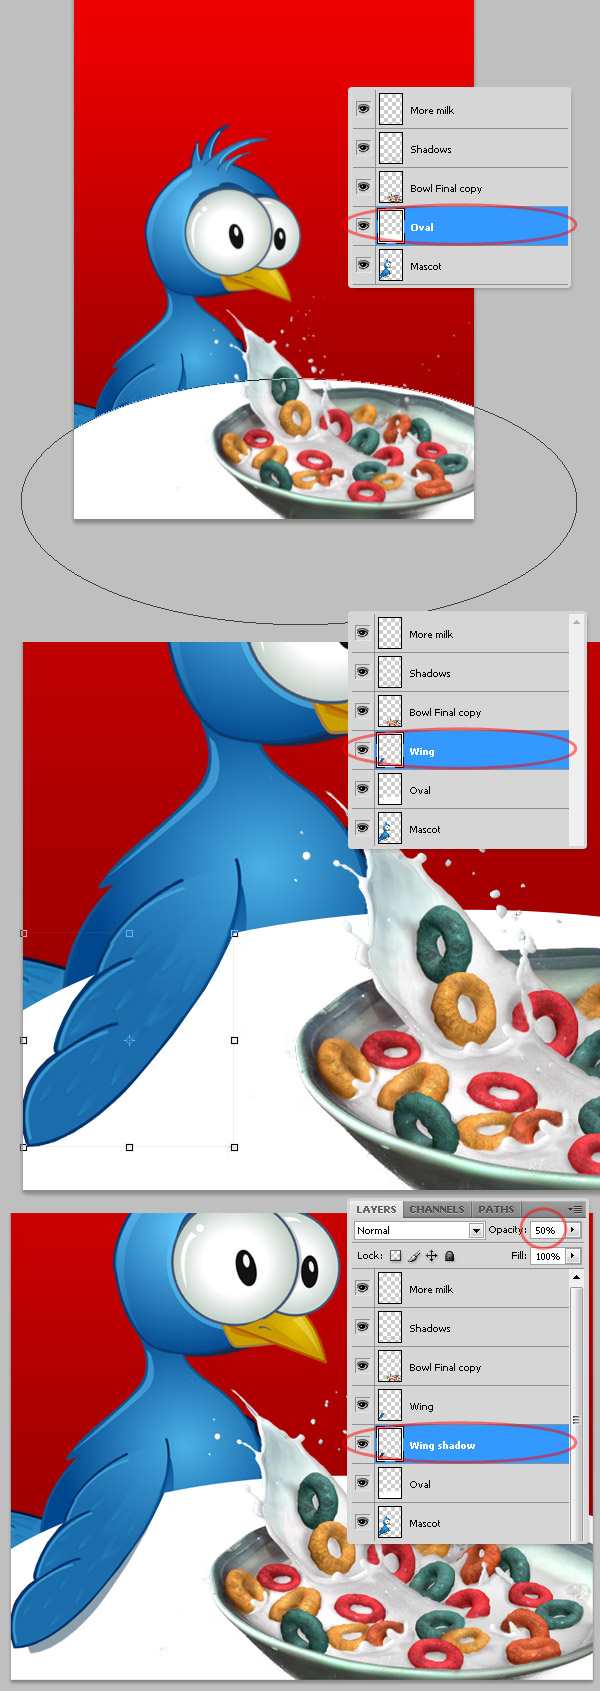
Step 26 – Some Layer Styles
Continue with the background details, select the White Oval and add to it a Gradient Overlay (yellow tones), and a Stroke effect. Repeat this with a smaller oval but this time with red tones. Remember: keep your layers organized.
Step 27 – Brighten the Background
Create a white circle above the red gradient from Step One. Apply a Gaussian Blur to it and change its Blending Mode to Overlay, and its Opacity to 75% or so. Now you have a brighter background.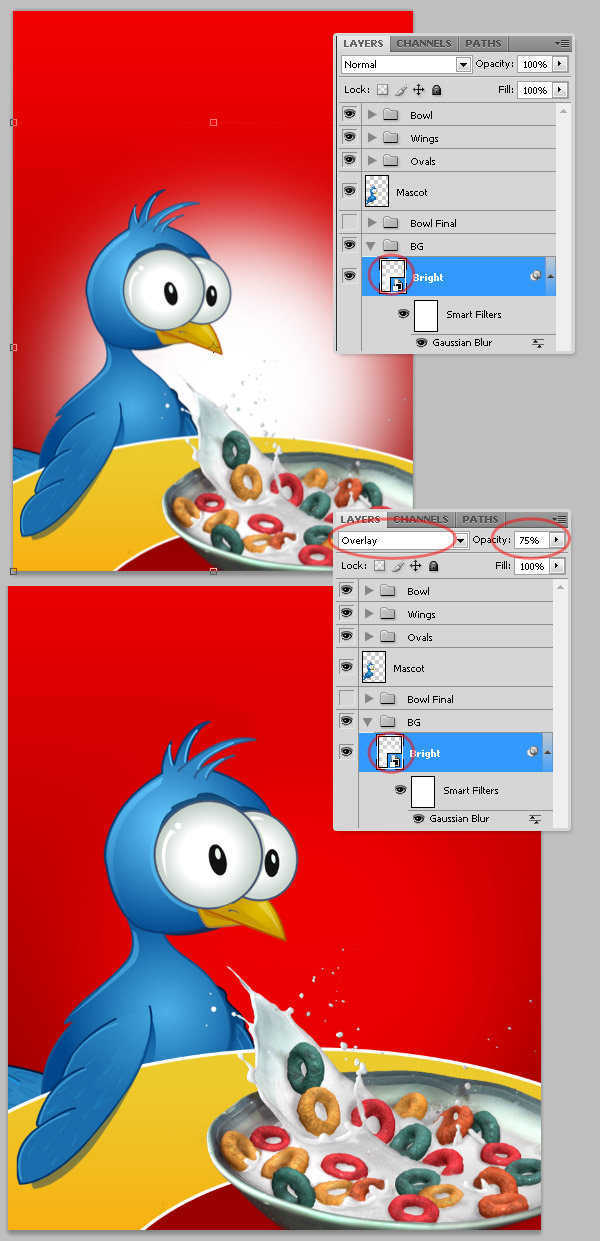
Step 28 – Add a Shadow to the Milk Bowl
Duplicate the “bowl” layer, name it "Bowl shadow" and turn down its Lighting value to -100 using Hue/Saturation Adjustments. Delete the shadow outside of the background ovals and turn down its Opacity to 40%.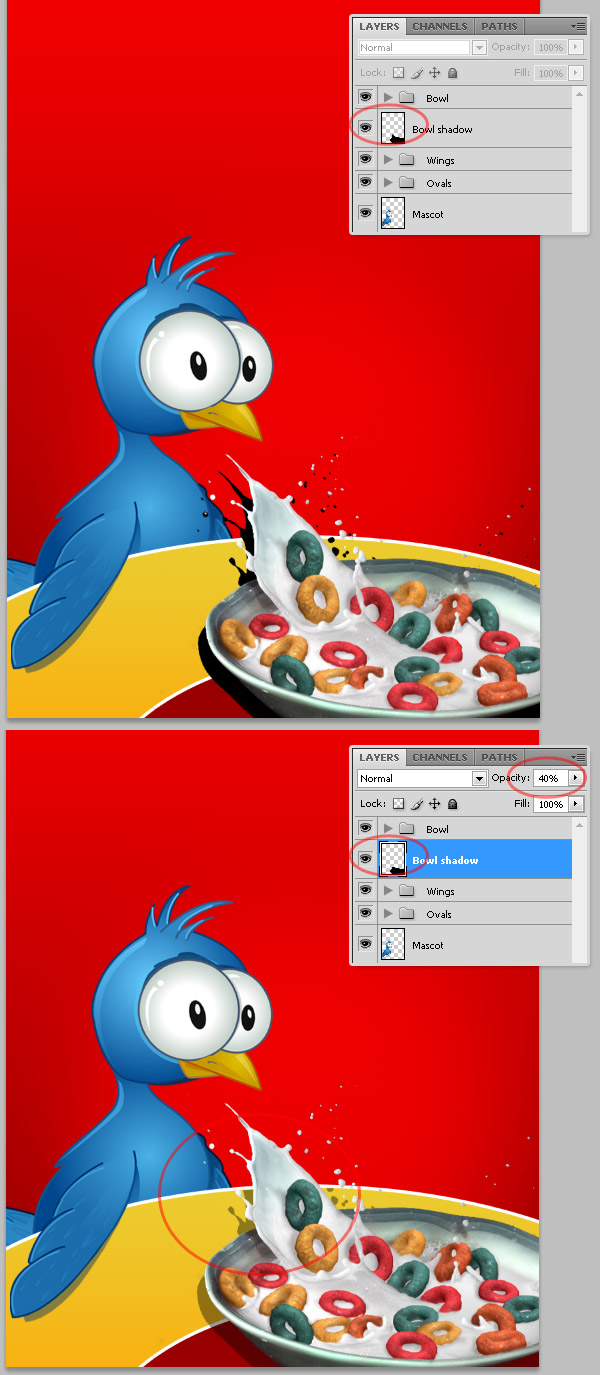
Step 29 – Type the Name
Type a sticky cereal name, use a bold and narrow font with all caps. Using the Text Warp options distort it a little bit.
Step 30 – Convert the Type into a Shape and Distort it
Select the “Type” layer and go to Layer > Type > Convert to Shape in order to convert the text into a vector mask. Then use the Direct Selection Tool (A) to distort the paths a little bit, this way you can add a comic style to any kind of typography.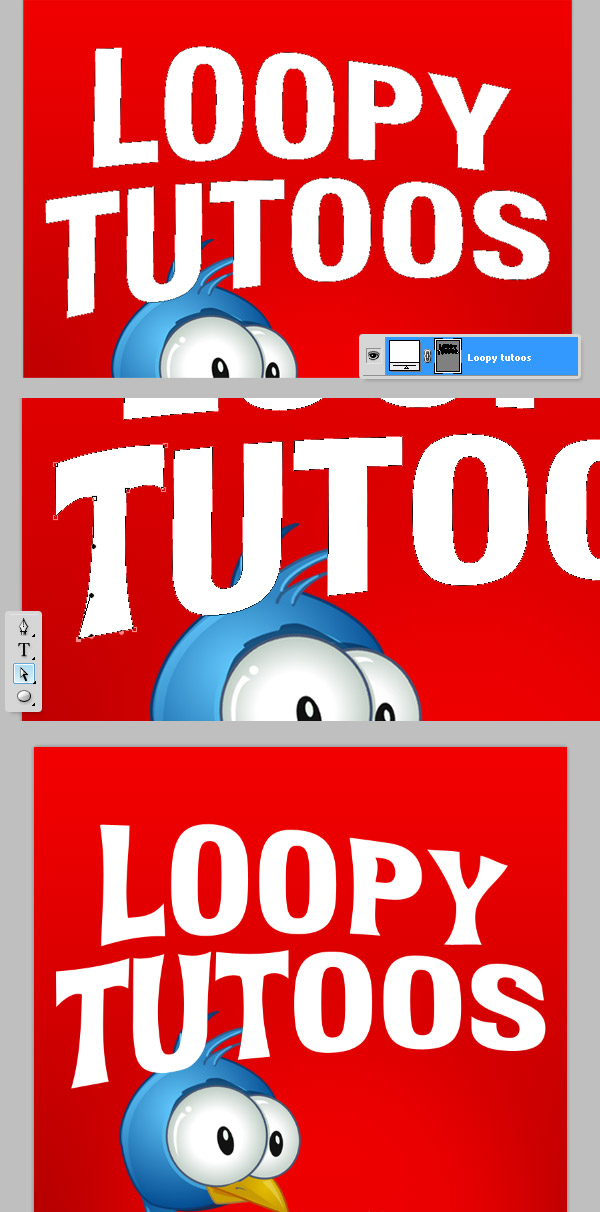
Step 31 – Delete the O’s
Using the Path Selection Tool (A) delete the “O” letters.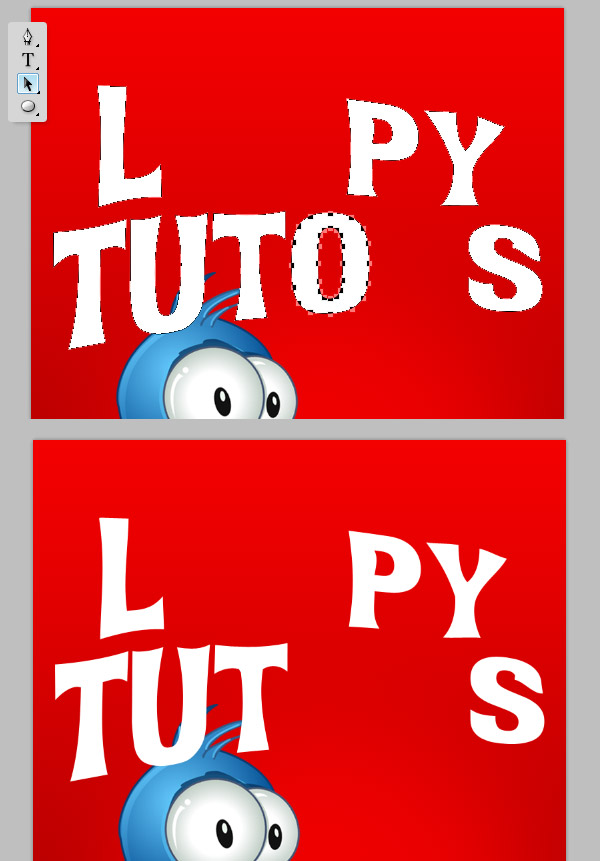
Step 33 – Add New O’s
Remember the "3D loops raster big" folder of the Step 20? It’s time to use it again, make that folder visible, duplicate it and put it above everything else. Then select four loops, delete the rest, and place each one of the four loops as an “O” in the word.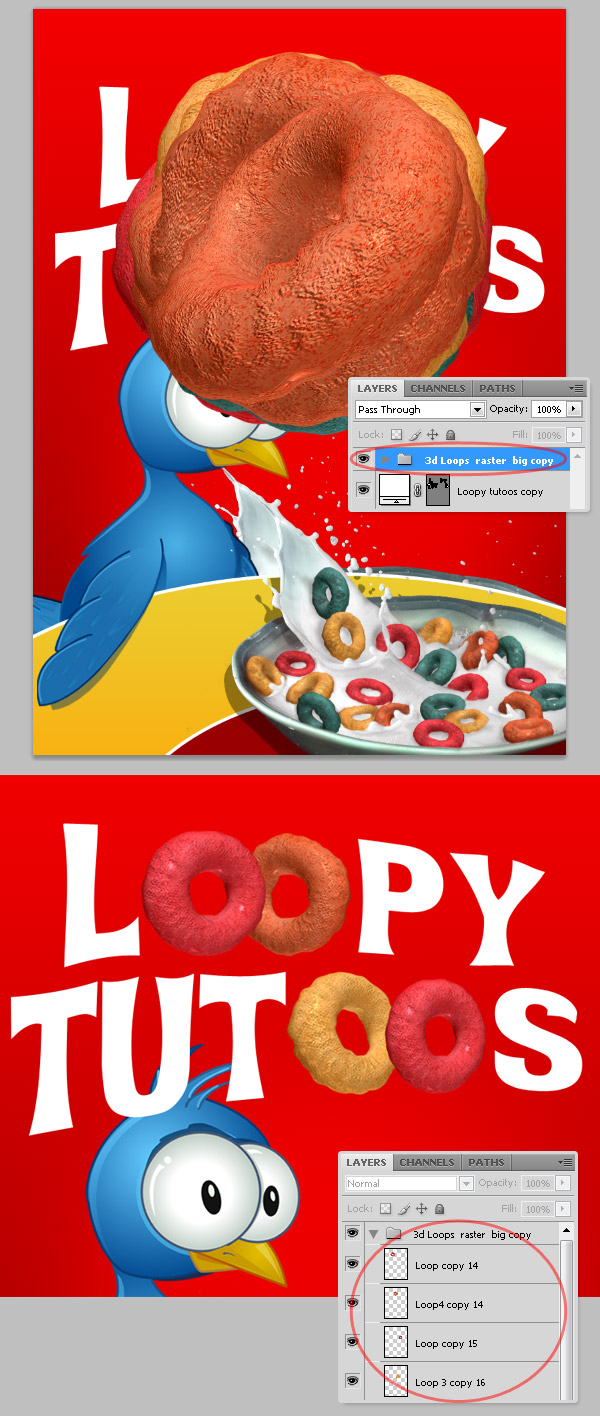
Step 34 – Style the O’s
We’ll add a simple Drop Shadow style to each loop in the title.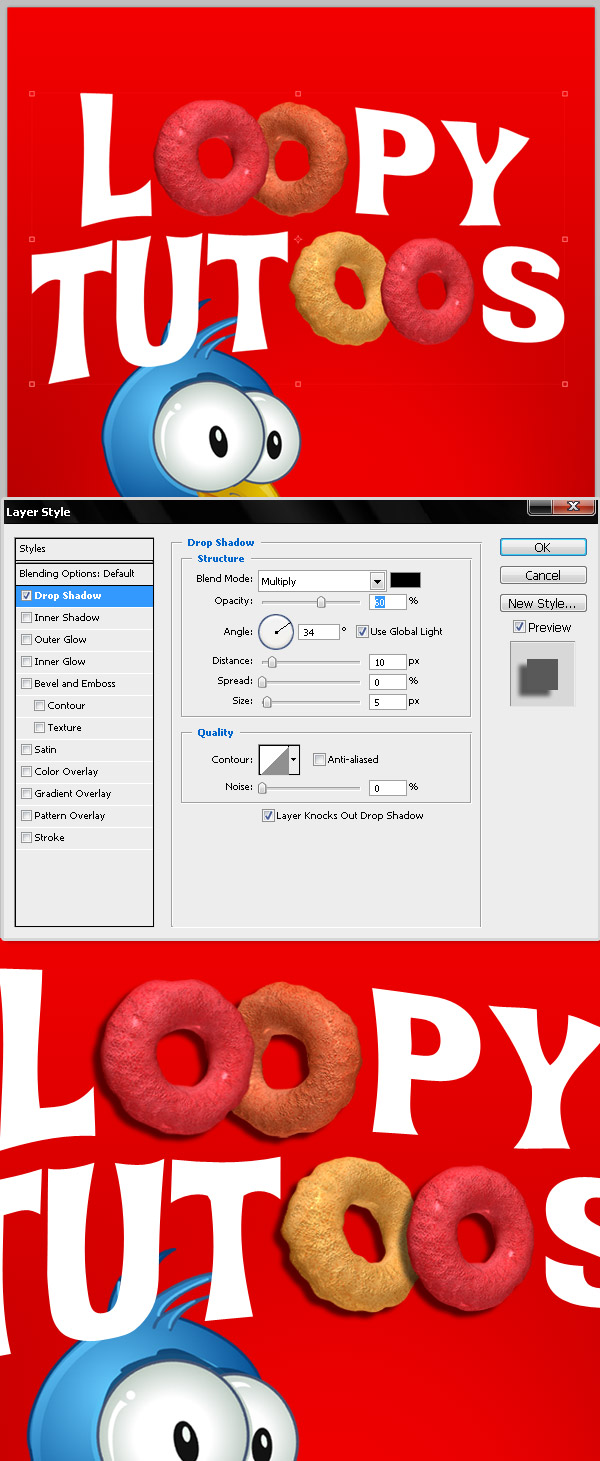
Step 35 – Style the Text
A simple Drop Shadow and soft Bevel effects will be enough to increase the visual impact of the name. As always, it’s up to you to create more advanced effects or work with more detailed and complex layer styles. Finally put all the logo related layers into a folder named "Logo."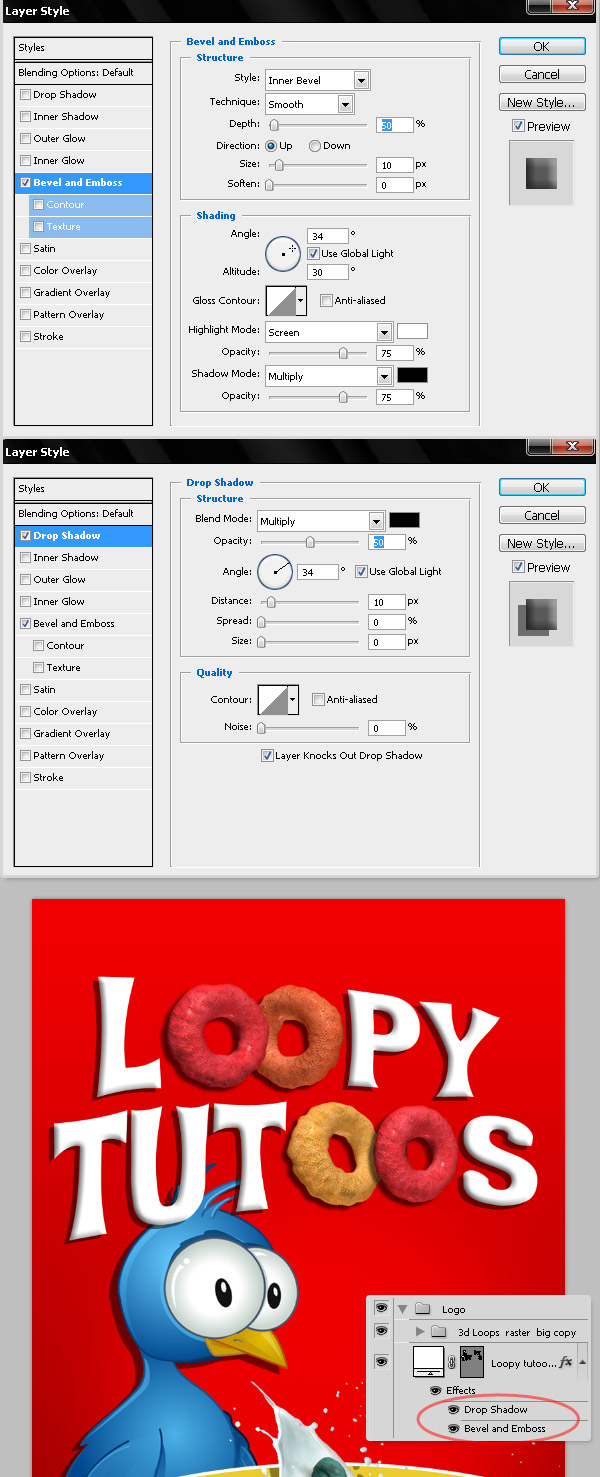
Step 36 – More Effects on the Logo
Duplicate the "Logo" folder, rasterize it and apply a Gaussian Blur over the Copy, then Command-click over the blurred layer in the Layers Panel to create a selection around the text. Expand the Selection by 25 pixels. Then grab the Marquee Tool, Option-click over the selection and choose Make Work Path…, set the Tolerance value to 5 pixels and hit OK. Finally, go to Layer > Vector Mask > Current Path and fill the masked layer with a reference color like red. Name this layer "LogoBG."
Step 37 – More Layer Styles
I’m using a red Gradient Overlay, a yellow Stroke and a black Drop Shadow for the "LogoBG" layer. Feel free to try something different if you want to. Place the "Logo" folder behind the "Mascot" layer, I added a Drop Shadow to the bird as well.Conclusion
And we’re finished! I hope you liked this tutorial and found it useful. Feel free to try it with different colors, styles and create your own cereal box!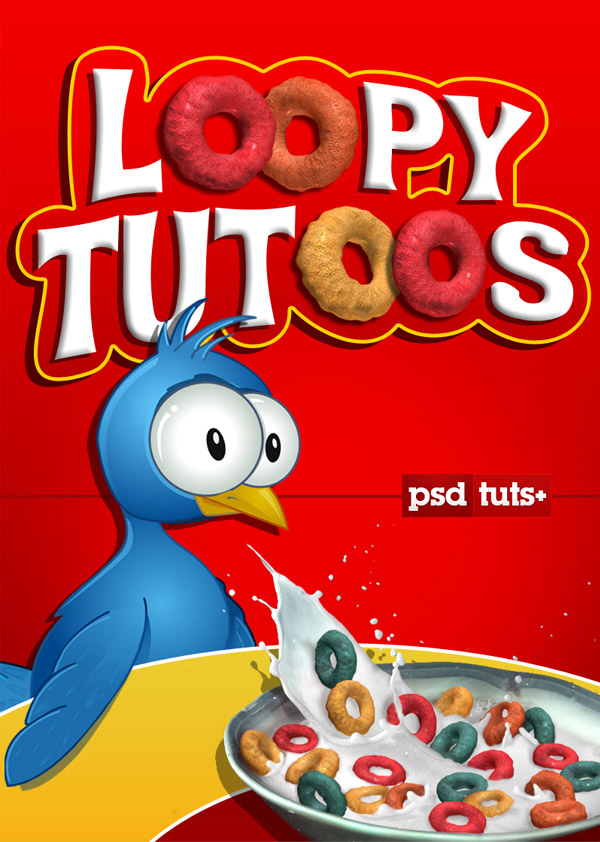

Comments
Post a Comment