Create a Medieval Fantasy Castle Gate in Photoshop
Step 1
First, create a new file with a size of 800 x 800 px and a resolution of 300 ppi.
Step 2
Next, open the files: SoilSand.jpg and Grass.jpg then resize it (Cmd/Ctrl + T) as shown below.
Step 3
Next change the Hue/Saturation (Cmd/Ctrl + U) levels of the SoilSand.jpg with the values below.
Step 4
Next open WoodPlank.jpg then resize it and place it as shown.
Step 5
Using
the Pen tool (P), draw the shape shown below. After defining the shape,
right-click and select Make Selection from the drop-down menu. Inverse
the selection by pressing Cmd/Ctrl + Shift + I, then hit delete.
Step 6
Now press Cmd/Ctrl + L to adjust the Levels of WoodPlank.jpg and change its values as indicated below.
Step 7
Next
we’ll make a set of stones to form an arch. To do this, open
Concrete.jpg, then rename it "Stone." Then press Cmd/Ctrl + T to resize
it as shown. Use the Eraser tool (E) to erase the edges of the "stone".
Then, use the Burn tool (O) to burn the indicated areas shown in figure
(c). After that, apply a layer style to the “Stone” layer and apply a
small Drop Shadow as shown in figure (d). Now, create a new layer and
place it below the "Stone" layer and Cmd/Ctrl + click the thumbnail of
"Stone" layer to activate its selection as shown in figure (e). Using
the Paint Bucket tool (G), fill the entire selection with #000000 as
shown in figure (f). Finally, go to Filter > Blur > Gaussian Blur,
and apply a radius of 5.0px.
Step 8
After
merging the "Stone" layer and the blurred selection from Step 7,
duplicate (Cmd/Ctrl + J) the layer until you’ve reached the other side
of the arch.
Step 9
Using the Burn tool (O), burn the areas as indicated below in the "SoilSand" layer and in the "Grass" layer.
Step 10
Next, use the Eraser tool (E) to erase the areas as indicated below in the "SoilSand" layer.
Step 11
Now,
let’s create the gap between the doors. To do this, use the Pen tool
(P), then create a line as shown in figure (a). Then, right-click and
select Stroke Path from the drop-down menu. Make sure to set the Brush
tool (B) as indicated in figure (b) prior to using the Pen tool. Lastly,
go to Filter > Blur > Gaussian Blur and enter a 2.5 px radius as
shown in figure (c).
Repeat the same process to create the gap below the door as well.
Step 12
Using
the Pen tool (P), make a line as shown below. Next, right-click and
select Stroke Path from the drop-down menu. Make sure to set the Brush
tool (B) to a Master Diameter of 20px and Hardness of 100% prior to
using the Pen tool. Next, go to Filter > Blur > Gaussian Blur and
set it to 8.0px. After that, decrease its opacity to about 50%.
Step 13
Now,
let’s add the door hinges. To do this, open the file "Ornament." Then,
using the Magic Wand tool (W), select the background of the image.
Next
select the Refine Edge tool (Cmd/Ctrl + Alt + R) and check the box for
Smart Radius. Then using the brush for Smart Radius, follow the outline
of the hinge. After that, check the box for Decontaminate Colors and hit
OK.
After hitting OK, add a Drop Shadow in the Layer Style window by double-clicking the "Ornament" layer.
Duplicate this layer three times and position them as shown below.
Step 14
Using
the Pen tool (P), make a shape as shown below. Right-click and select
Stroke Path from the drop-down menu. Make sure to set the Brush tool (B)
to a Master Diameter of 45px, Hardness of 0% with color #000000 prior
to using the Pen tool. Finally, set its Blend mode to Soft Light.
Step 15
Open
the file "OrnamentHead.jpg." Using the Magic Wand tool (W), select the
background of the image. Next select the Refine Edge tool (Cmd/Ctrl +
Alt + R) and check the box for the Smart Radius. Then, using the brush
for the Smart Radius, follow the outline of the Ornament Head. After
that, check the box for Decontaminate Colors and hit OK.
Add a drop shadow to "OrnamentHead."
Duplicate the "Ornament" layer and place them as shown.
Step 16
Next
we’ll add some Sunrays. Using the Pen tool (P) make a line as shown
below, after that right-click and select Stroke Path from the drop-down
menu. Make sure to set the Brush tool (B) to a Master Diameter of 95px,
Hardness of 0% with color #ffffff prior to using the Pen tool.
Add some more using the same technique. After that, merge them and name them "Lights."
Next, go to Filter > Blur > Gaussian Blur with a 25 px radius
Finally, decrease its opacity to 50%.
Step 17
Next we’ll add some sparkes. Using the Paint Brush tool (P) set to Hardness 0% and color #000000, apply varying sizes of “dots.”
Next go to Filter > Blur > Gaussian Blur and apply a radius size of 5px. Decrease its Opacity to 40%.
Step 18
Next
step is to add highlights for the stones of the arch. To do this, use
the Brush tool (B) set to a Master Diameter of 7px and a Hardness of 0%.
Add the highlights according to the source of light, like as shown
below.
Then go to Filter > Blur > Gaussian Blur and apply a radius of 3px.
Step 19
Next
we’ll add a brownish tint for the image. First, add a new layer and
fill it, using the Paint Bucket tool (G), with #714200. Next, change its
Blend mode to Color Dodge and decrease its Opacity to 60%.
Step 20
For
the last step, we’ll add subtle shading to complete the effect. To do
this, first add a new layer, then fill it with the #000000 and name it
"Shade."
Using the Polygonal Lasso tool (L), make a shape as shown below, then hit delete.
Lastly, go to Filter > Blur > Gaussian Blur and change its radius to 22px then decrease its Opacity level to 60%.
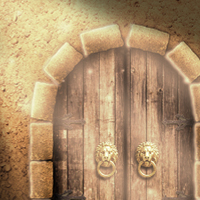
Final Image
That’s it! The final product is shown below. Hope you had fun working on this project! Thanks for reading.


Comments
Post a Comment