2013 latest Text effects

Delicious Bagels Text Effect

Step 1
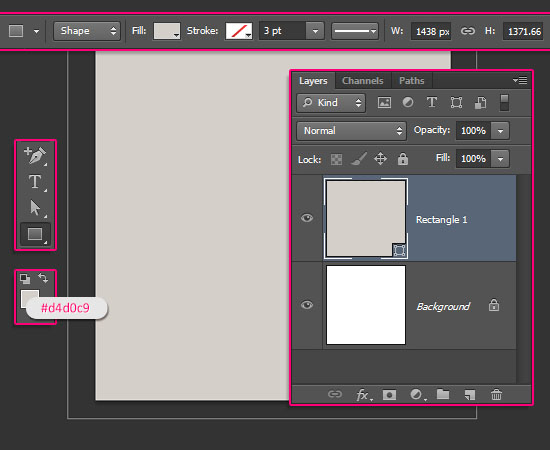
- Create a new 1250 x 1250 px document (you can use any Width value you like, but make sure that the Height value is not less than 1250).
Pick the Rectangle Tool, Set the Foreground color to #d4d0c9, and draw a rectangle that extends a little bit outside the document.
Delicious Bagels Text Effect step 1
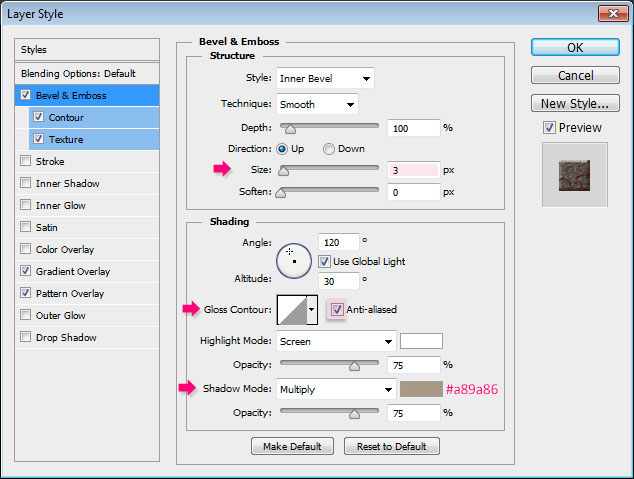
- Double click the Rectangle shape layer to apply the following Layer Style:
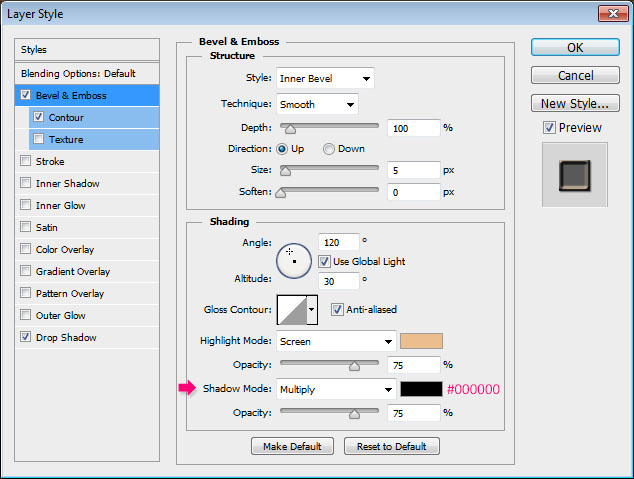
- Bevel and Emboss
Size : 3
Check the Anti-aliased box
Shadow Mode – Color : #a89a86
Delicious Bagels Text Effect step 1
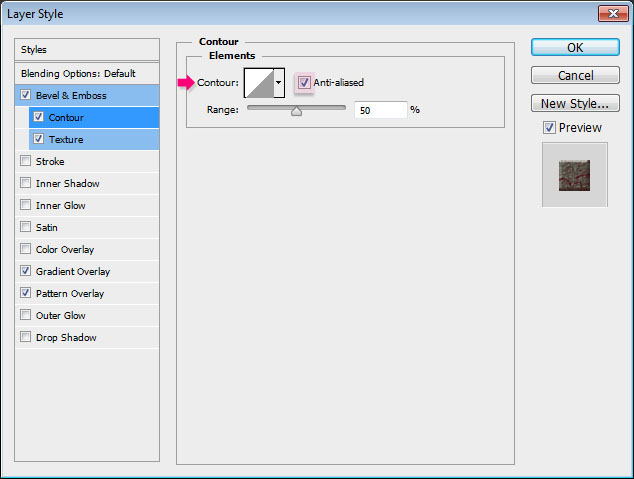
- Contour Check the Anti-aliased box.
Delicious Bagels Text Effect step 1
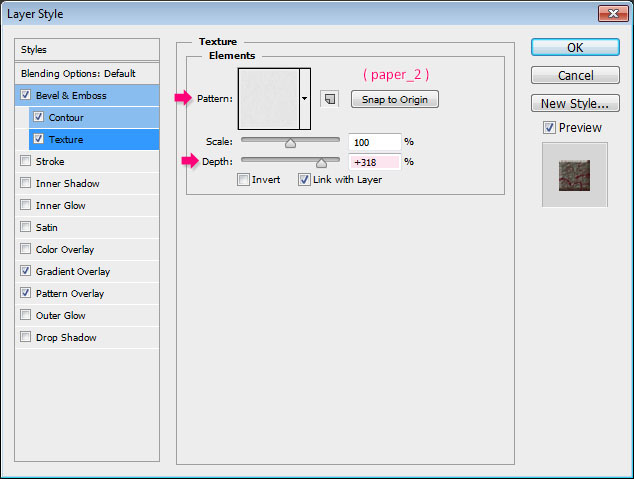
- Texture
Pattern : paper_2
Depth : 318%
Delicious Bagels Text Effect step 1
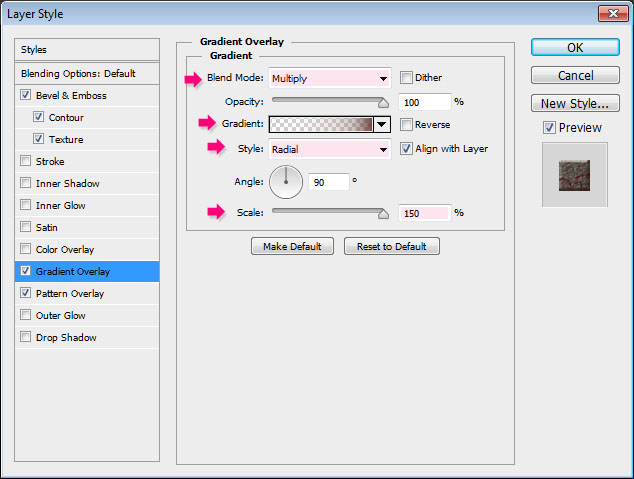
- Gradient Overlay
Blend Mode : Multiply
Style : Radial
Scale : 150%
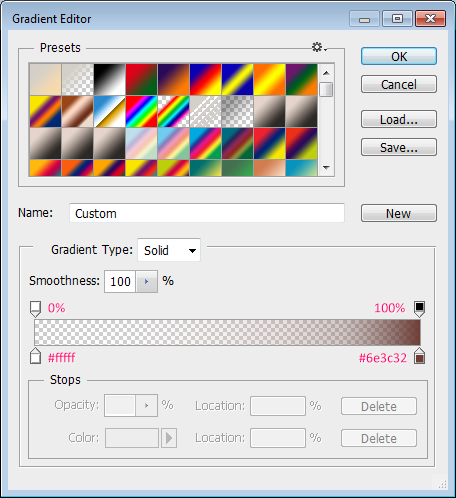
Click the Gradient box to create the gradient.
Delicious Bagels Text Effect step 1
To create the Gradient, you’ll need to click below the gradient bar to add Color stops, and above it to add Opacity stops.
This gradient is created using two colors: #ffffff to the left, with the opacity 0%, and #6e3c32 to the right, with the opacity 100%.
Delicious Bagels Text Effect step 1
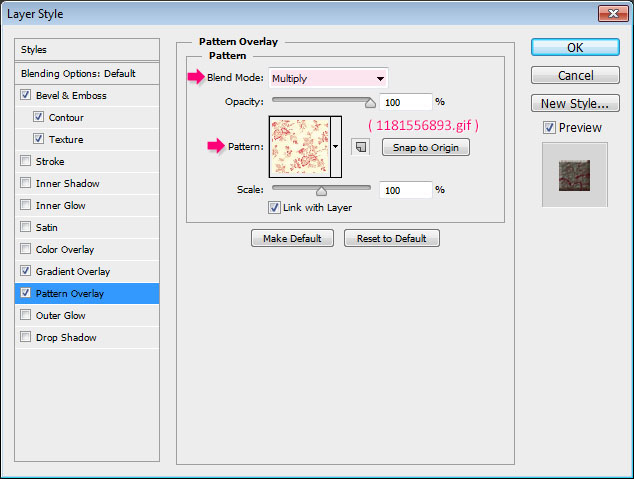
- Pattern Overlay
Blend Mode : Multiply
Pattern : 1181556893.gif
Delicious Bagels Text Effect step 1
This will create the main background.
Delicious Bagels Text Effect step 1
Step 2
- Set the Foreground color to #d8d1b9, pick the Ellipse Tool, then press and hold the Shift key, and click and drag to create a circle that fits within the document.
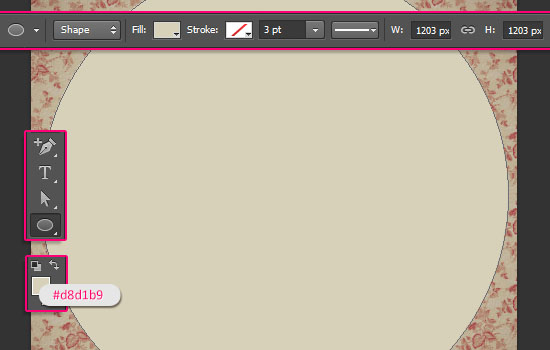
Delicious Bagels Text Effect step 2
-Double click the Ellipse shape layer to apply the following Layer Style:
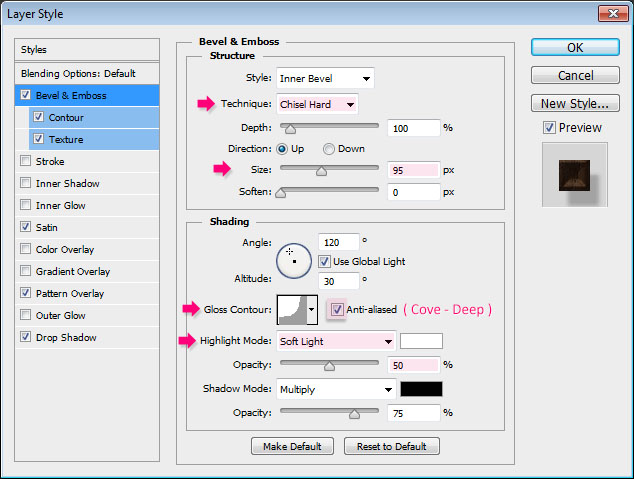
– Bevel and Emboss
Technique : Chisel Hard
Size : 95
Gloss Contour : Cove – Deep
Check the Anti-aliased box
Highlight Mode : Soft Light – Opacity : 50%
Delicious Bagels Text Effect step 2
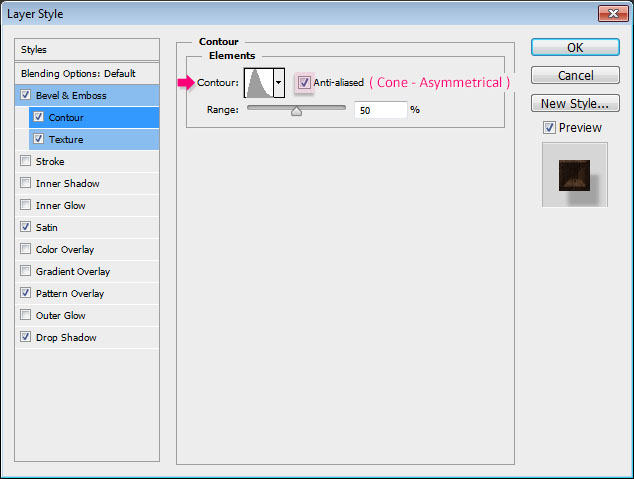
– Contour
Contour : Cone – Asymmetrical
Check the Anti-aliased box.
Delicious Bagels Text Effect step 2
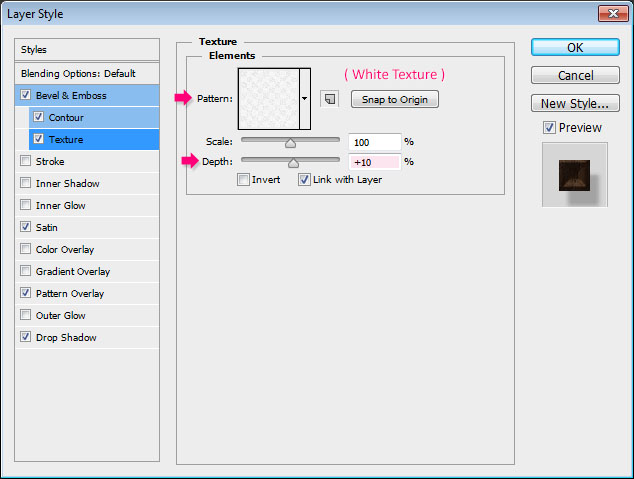
– Texture
Pattern : White Texture
Depth : 10%
Delicious Bagels Text Effect step 2
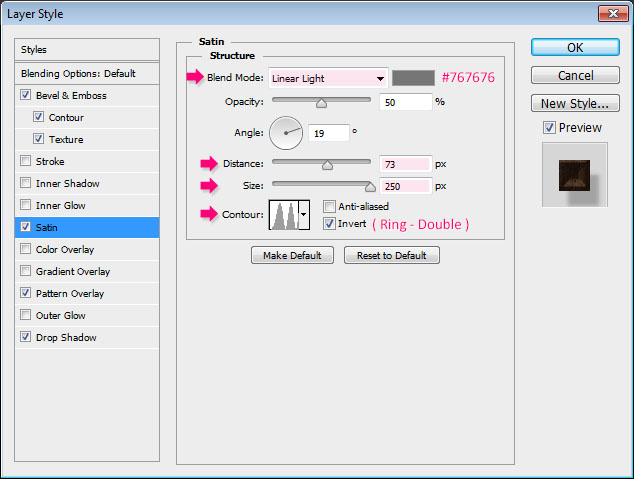
– Satin
Blend Mode : Linear Light
Color : #767676
Distance : 73
Size : 250
Contour : Ring – Double
Delicious Bagels Text Effect step 2
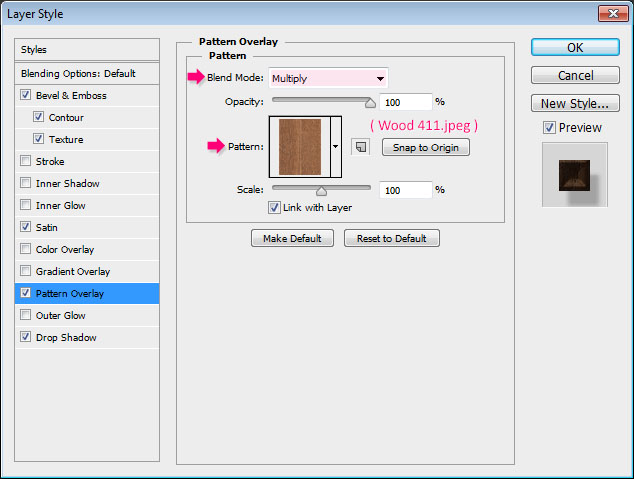
– Pattern Overlay
Blend Mode : Multiply
Pattern : Wood 411.jpeg
Delicious Bagels Text Effect step 2
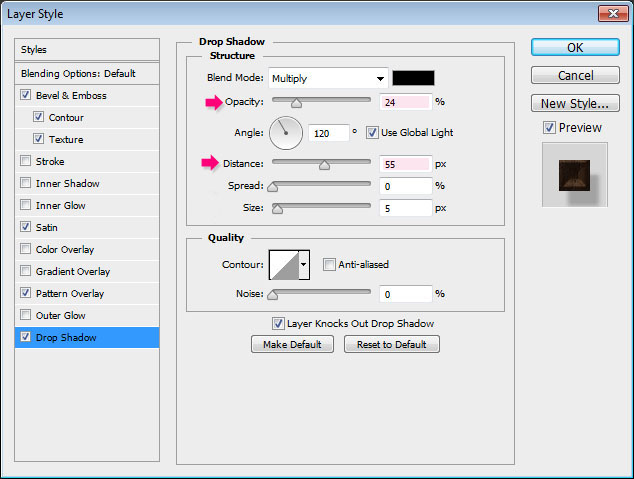
– Drop Shadow
Opacity : 24%
Distance : 55
Delicious Bagels Text Effect step 2
This will create the bowl/dish/plate material. You can play around with the Bevel and Emboss values, or use different colors and textures if you like.
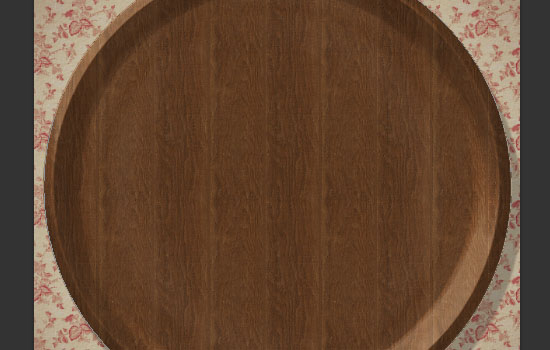
Delicious Bagels Text Effect step 2
Step 3
- Create the first letter of the word you want to create in All Caps, using the font “Franks”, the color #e3d1ab, and the font Size 570.
You can work simultaneously on all the letters, or work on each one separately. That’s totally up to you.
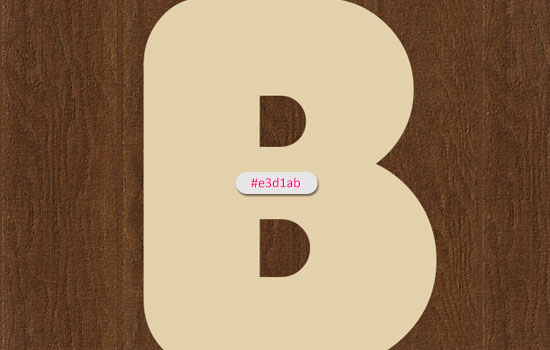
Delicious Bagels Text Effect step 3
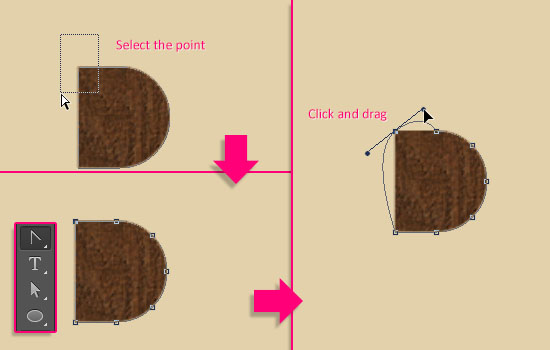
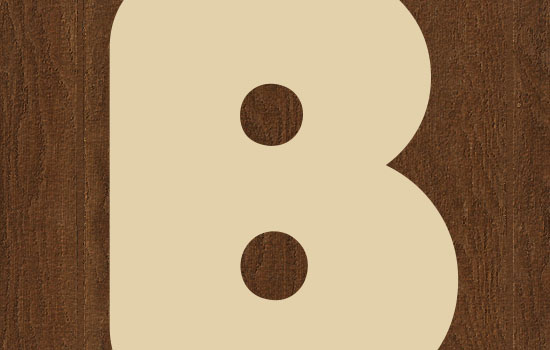
- If the letter contains closed counters (holes), you’ll need to convert it to a shape to remove the sharp corners of the aperture.
To do so, right click the text layer, then choose Convert to Shape.
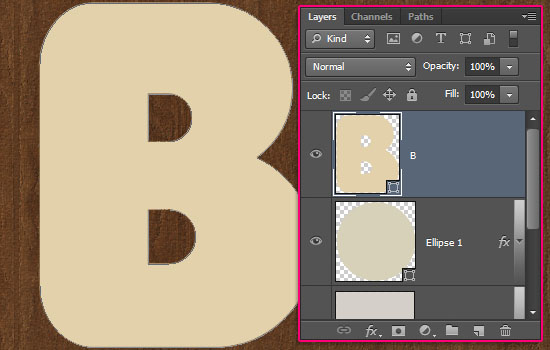
Delicious Bagels Text Effect step 3
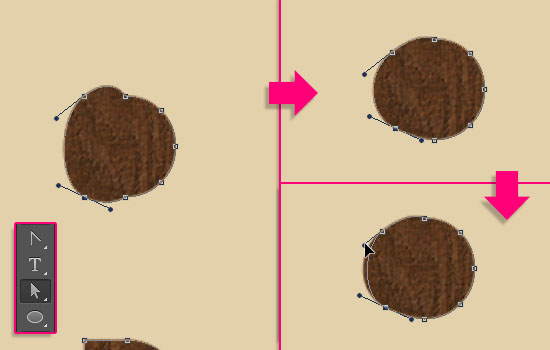
- Pick the Convert Point Tool, click and drag around the sharp corner to select it, then click and drag the anchor point to convert the sharp point into a curve.
Delicious Bagels Text Effect step 3
- Then, you might need to pick the Direct Selection Tool, click and drag the points to move them around, or click and drag the Direction Points to widen or narrow the curve.
Delicious Bagels Text Effect step 3
- The final result doesn’t have to be perfect; in fact, it better be not.
Delicious Bagels Text Effect step 3
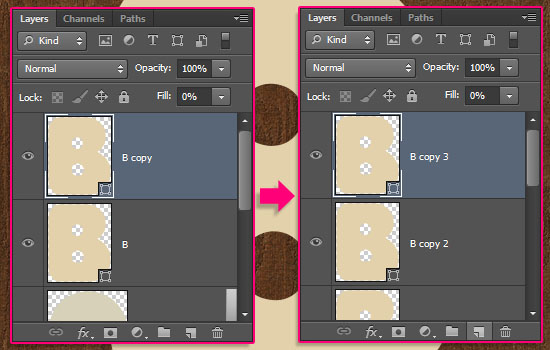
- Duplicate the shape layer, change the copy’s Fill value to 0, then duplicate the copy twice. So you’ll have the original text layer, a “copy”, “copy 2″, and “copy 3″ layers.
Delicious Bagels Text Effect step 3
Step 4
- Double click the original text layer to apply the following Layer Style:
– Bevel and Emboss
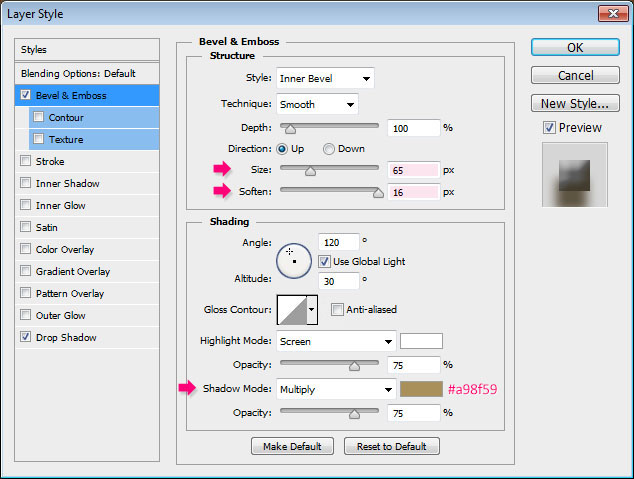
Size : 65
Soften : 16
Shadow Mode – Color : #a98f59
Delicious Bagels Text Effect step 4
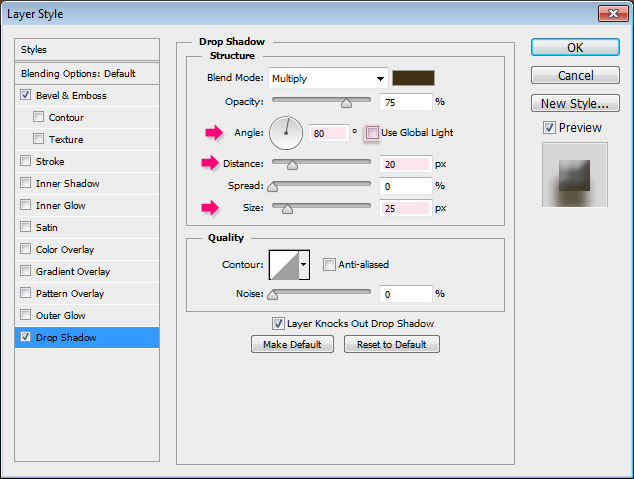
– Drop Shadow
Uncheck the Use Global Light box
Angle : 80
Distance : 20
Size : 25
Delicious Bagels Text Effect step 4
- This will create the basic 3D shape of the bagel.
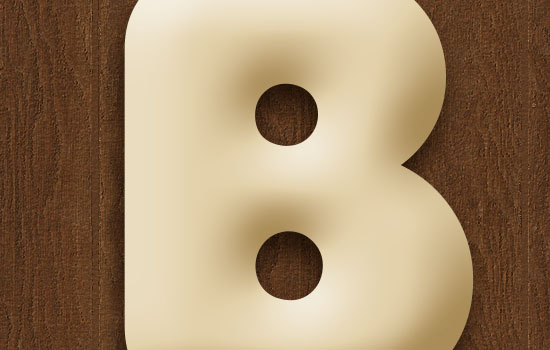
Delicious Bagels Text Effect step 4
Step 5
- Double click the “copy” text layer to apply the following Layer Style:
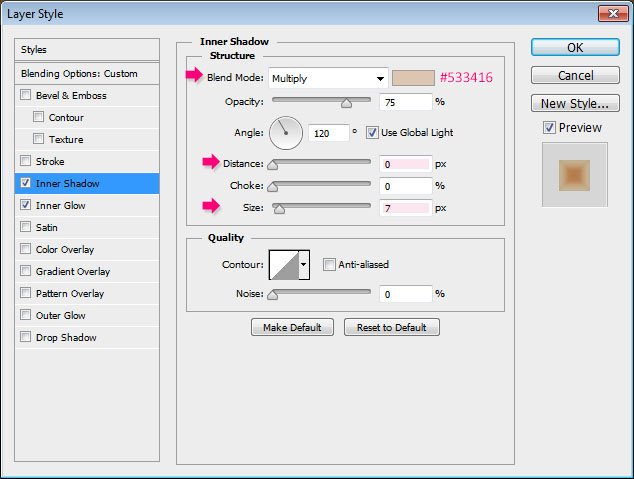
– Inner Shadow
Color : #533416
Distance : 0
Size : 7
Delicious Bagels Text Effect step 5
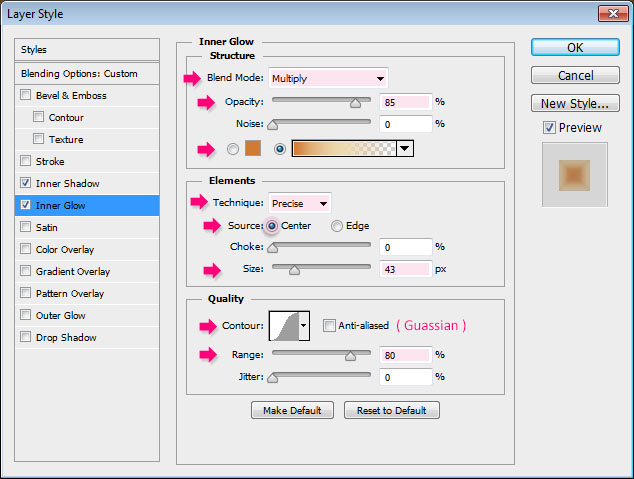
– Inner Glow
Blend Mode : Multiply
Opacity : 85%
Fill : Choose the gradient fill – we’ll create the gradient in a minute.
Technique : Precise
Source : Center
Size : 43
Contour : Gaussian
Range : 80
Delicious Bagels Text Effect step 5
- Click the gradient box to create the gradient.
The three colors used and their Locations are:
# – Color – Location
1 – #d17a34 – 0%
2 – #ecd8ad – 45%
3 – #e0c09a – 88%
As for the Opacity values:
# – Opacity – Location
1 – 100% – 0
2 – 100% – 45%
3 – 0% – 100%
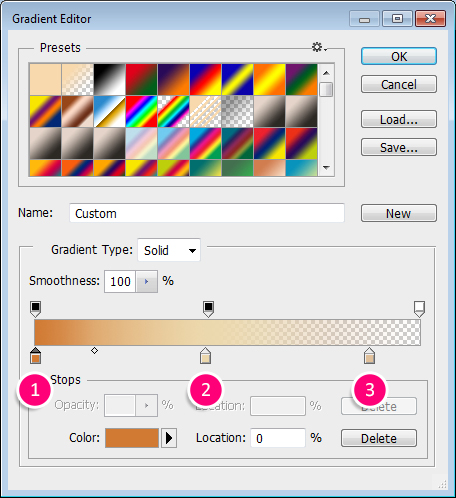
Delicious Bagels Text Effect step 5
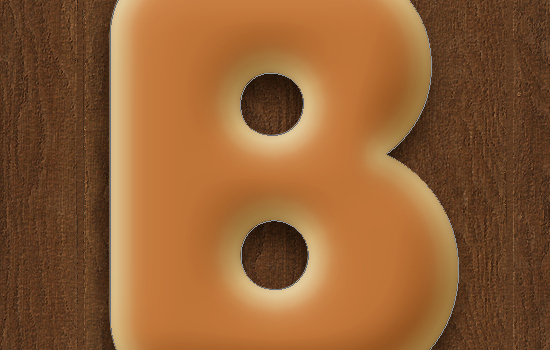
Using a gradient for the glow will help create a dark to light coloring from the center of the letter towards the edges.
Delicious Bagels Text Effect step 5
Step 6
- Double click the “copy 2″ text layer to apply the following Layer Style:
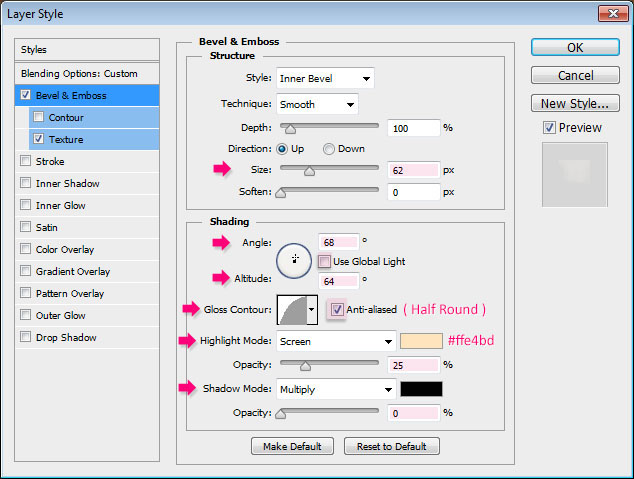
– Bevel and Emboss
Size : 62
Uncheck the Use Global Light box
Angle : 68
Altitude : 64
Gloss Contour : Half Round
Check the Anti-aliased box
Highlight Mode – Color : #ffe4bd – Opacity : 25%
Shadow Mode – Opacity : 0%
Delicious Bagels Text Effect step 6
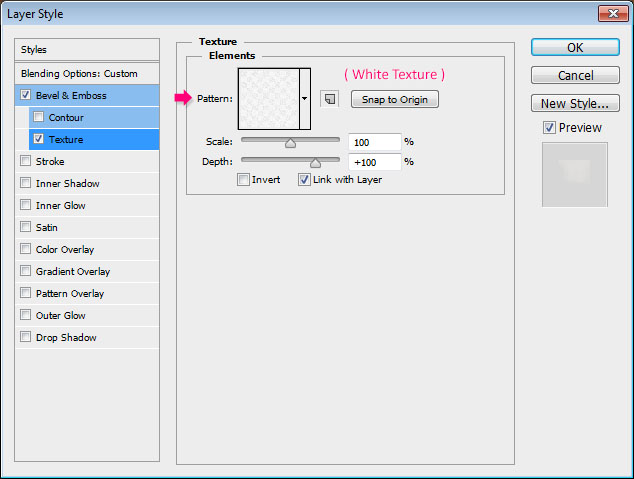
– Texture
Pattern : White Texture
Delicious Bagels Text Effect step 6
- This will add some texture (bump) to the text.
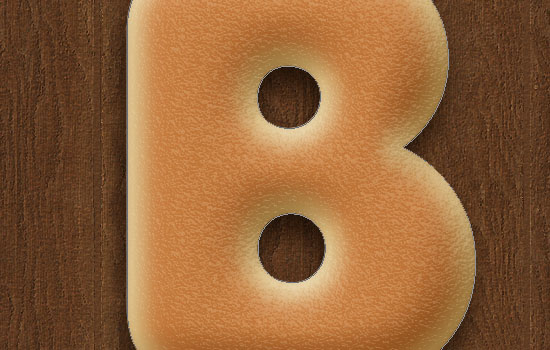
Delicious Bagels Text Effect step 6
Step 7
- Double click the “copy 3″ text layer to apply the following Layer Style:
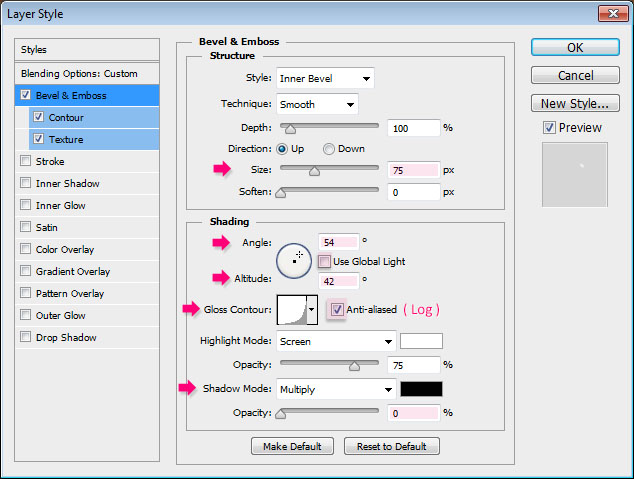
– Bevel and Emboss
Size : 75
Uncheck the Use Global Light box
Angle : 54
Altitude : 42
Gloss Contour : Log
Check the Anti-aliased box
Shadow Mode – Opacity : 0%
Delicious Bagels Text Effect step 7
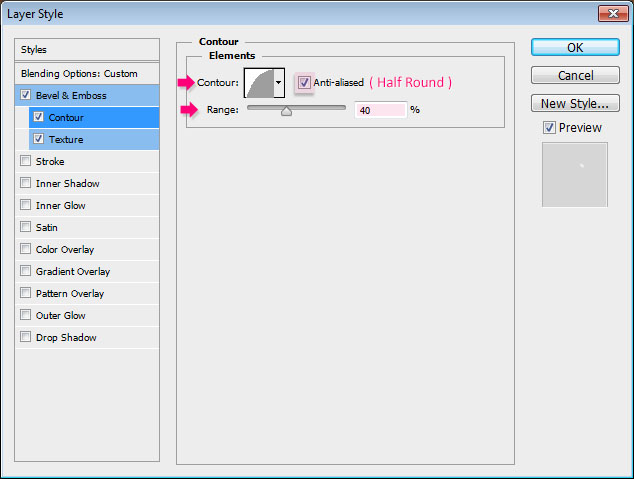
– Contour
Contour : Half Round
Check the Anti-aliased box.
Range : 40%
Delicious Bagels Text Effect step 7
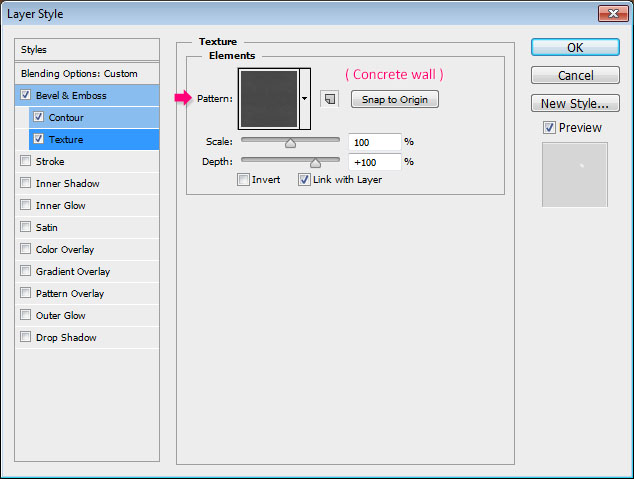
– Texture
Pattern : Concrete wall
Delicious Bagels Text Effect step 7
- This will add some shine. The shine will change its angle when it will be rotated near the end of the tutorial, which will make it more dynamic.
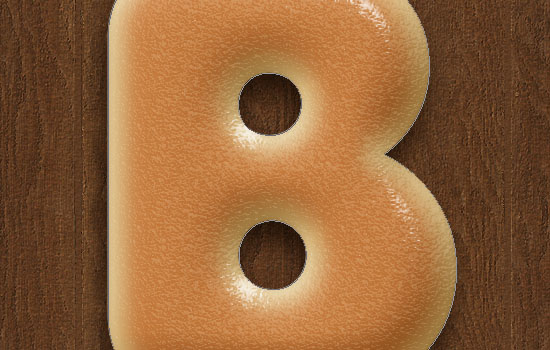
Delicious Bagels Text Effect step 7
Step 8
- Ctrl + click any letter layer’s thumbnail to create a selection.
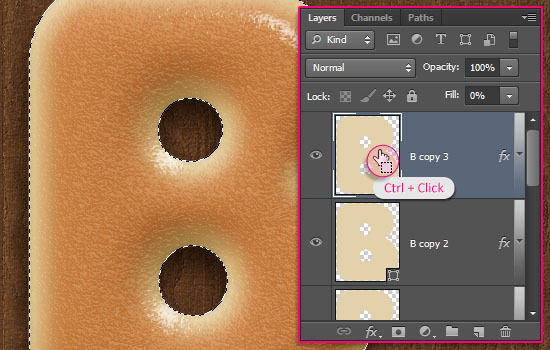
Delicious Bagels Text Effect step 8
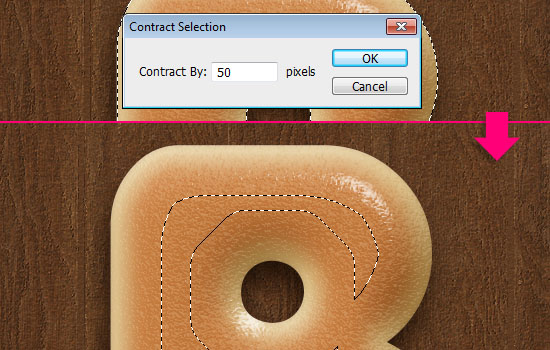
- Go to Select -> Modify -> Contract, and type the value 50. This will contract the selection 50 px inwards.
Delicious Bagels Text Effect step 8
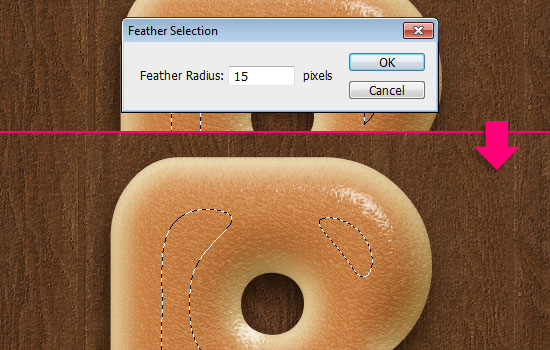
- Go to Select -> Modify -> Feather, and type the value 15. This will soften the edges of the selection.
Delicious Bagels Text Effect step 8
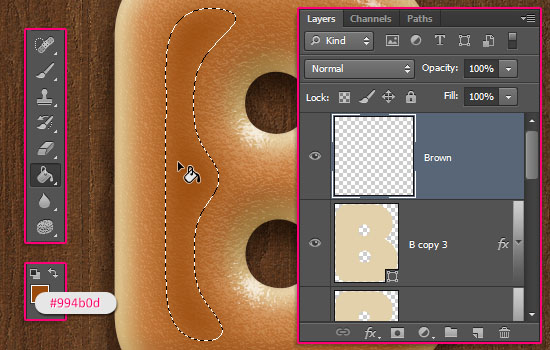
- Set the Foreground color to #994b0d, pick the Paint Bucket Tool, create a new layer on top of all layers, call it “Brown”, and fill the selection with the Foreground color.
Delicious Bagels Text Effect step 8
Step 9
- Ctrl + click any letter layer’s thumbnail to create a selection one more time. Create another new layer and call it “Texture”. Set the Foreground color to #e4c8a0 and the Background color to #936d2f.
We’ll apply some filters to create a simple texture that will also enhance the coloring of the letter.
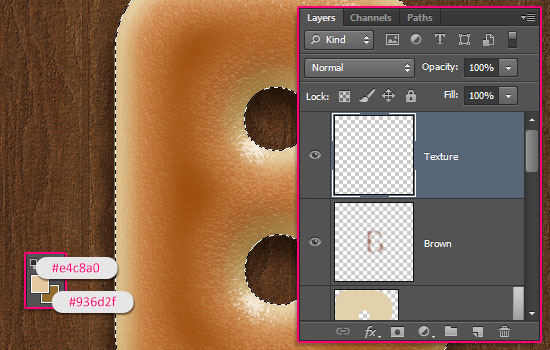
Delicious Bagels Text Effect step 9
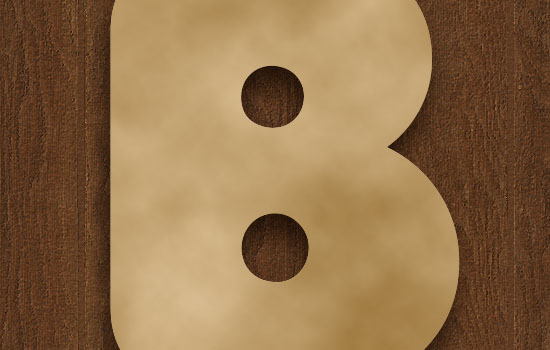
- Start by going to Filter -> Render -> Clouds. Then Go to Select -> Deselect (Ctrl + D) to get rid of the selection.
Delicious Bagels Text Effect step 9
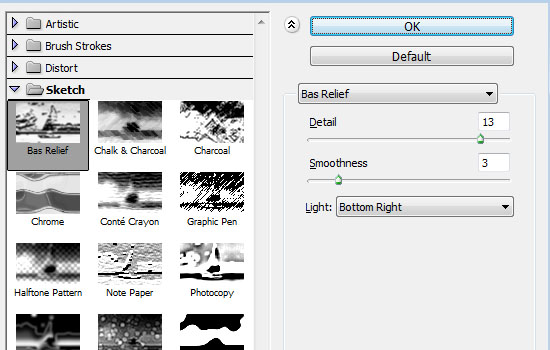
- Go to Filter -> (Filter Gallery) -> Sketch -> Bas Relief, and change the values as shown below.
Delicious Bagels Text Effect step 9
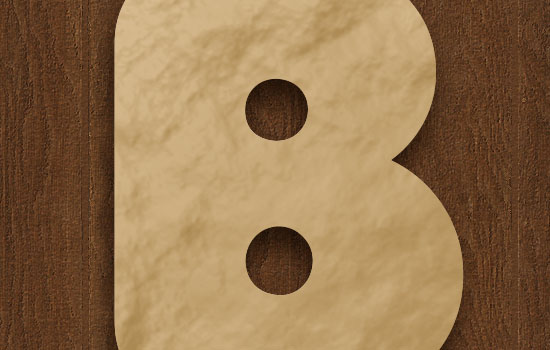
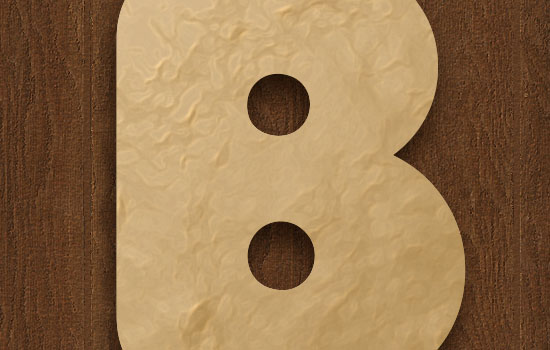
- This is what you should get.
Delicious Bagels Text Effect step 9
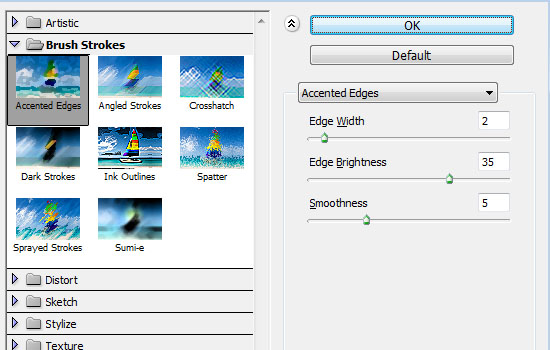
- Go to Filter -> (Filter Gallery) -> Brush Strokes -> Accented Edges, and modify the values as shown below too.
Delicious Bagels Text Effect step 9
- That’s it for the texture. Really simple.
Delicious Bagels Text Effect step 9
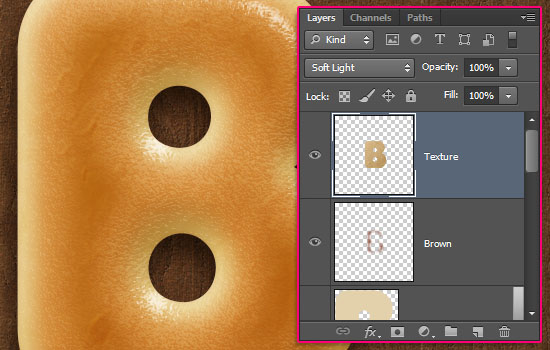
- Change the “Texture” layer’s Blend Mode to Soft Light. You can see the difference it makes.
Delicious Bagels Text Effect step 9
Step 10
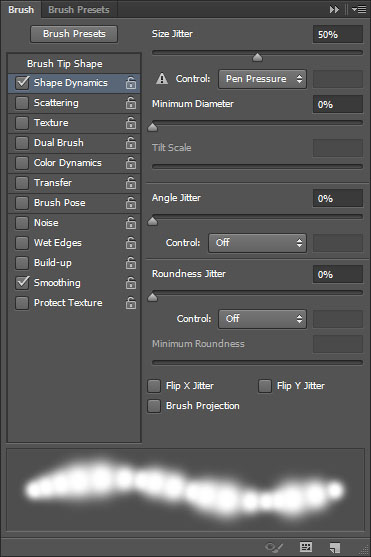
- Pick the Brush Tool, and open the Brush panel (Window -> Brush).
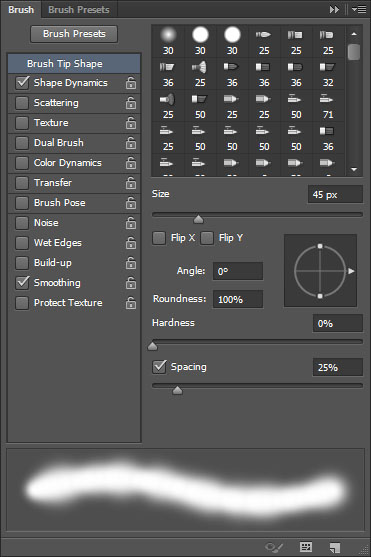
Choose a soft round brush, and modify its settings as shown below:
- Brush Tip Shape:
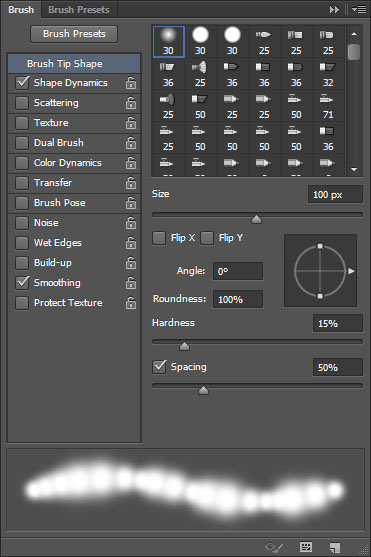
Delicious Bagels Text Effect step 10
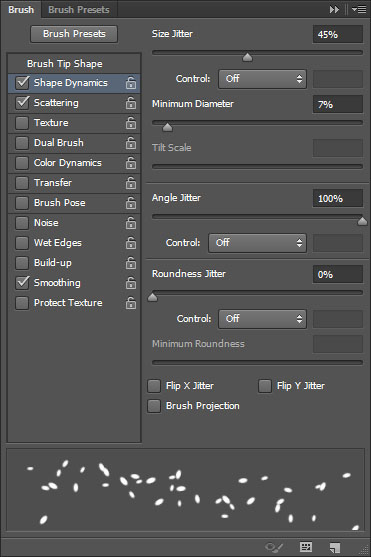
- Shape Dynamics:
Delicious Bagels Text Effect step 10
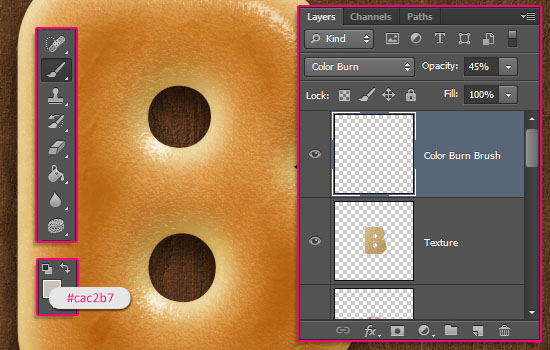
- Create a new layer on top of all layers, call it “Color Burn Brush”, change its Blend Mode to Color Burn, its Opacity to 45%, and set the Foreground color to #cac2b7.
Delicious Bagels Text Effect step 10
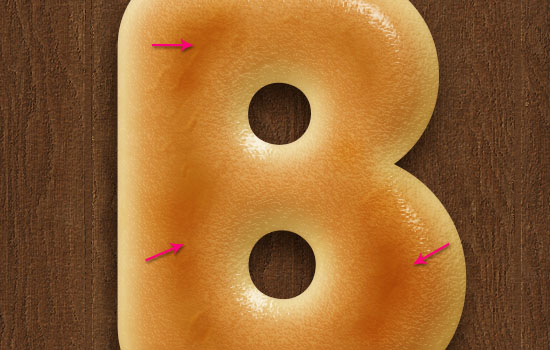
- Click and drag slightly to intensify some areas on the letter. This will make the golden-brown part look more realistic.
Delicious Bagels Text Effect step 10
Step 11
- Create a new layer, call it “Inner Shadow”, and change its Blend Mode to Multiply. Set the Foreground color to #e7cf93 and reduce the Brush Size to 45 px.
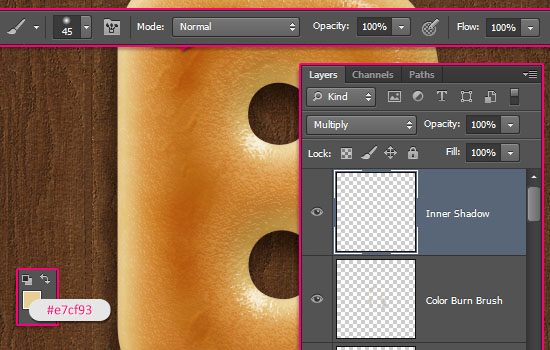
Delicious Bagels Text Effect step 11
- In the Brush panel, under Brush Tip Shape, set the Spacing value back to 25%.
Delicious Bagels Text Effect step 11
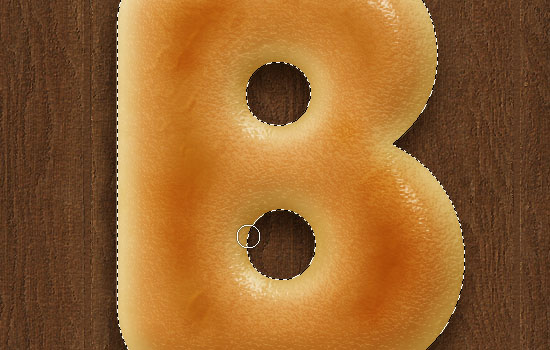
- Select the text like you did previously, then paint around the counters to add more shadow.
Delicious Bagels Text Effect step 11
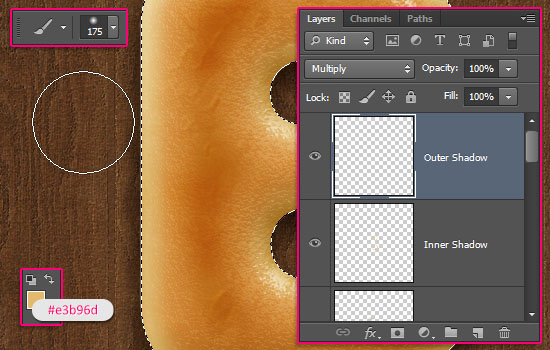
- Create another new layer, call it “Outer Shadow”, change its Blend Mode to Multiply, set the Foreground color to #e3b96d, and increase the Brush Size to 175 px.
Click and drag a little bit far from (outside) the selection, and around the letter, to darken the edges.
Delicious Bagels Text Effect step 11
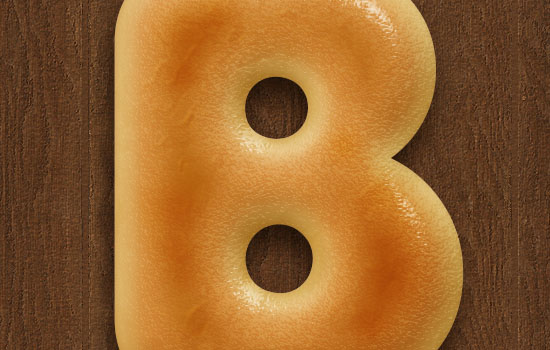
- When done, deselect (Ctrl + D).
This is the main bagel. The next steps are simple additions to this outcome.
Delicious Bagels Text Effect step 11
Step 12
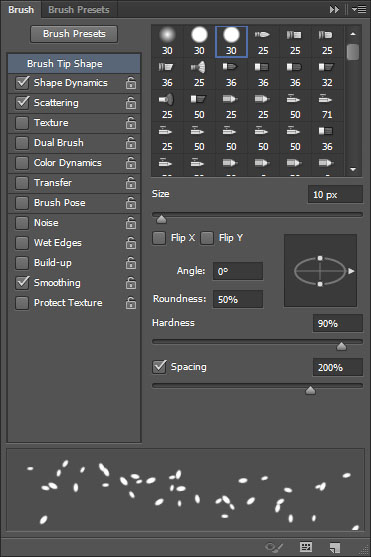
- Pick the Brush Tool and open the Brush panel. Choose a hard round brush, and modify its settings as below:
- Brush Tip Shape:
Delicious Bagels Text Effect step 12
- Shape Dynamics:
Delicious Bagels Text Effect step 12
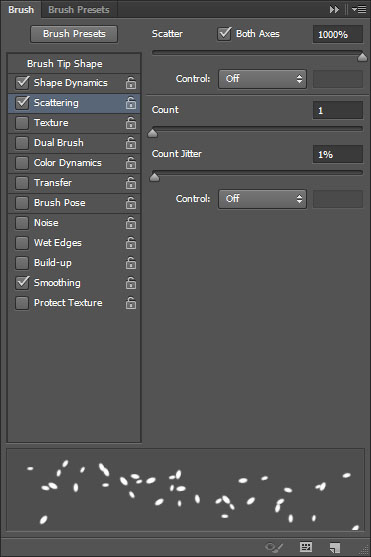
- Scattering:
Delicious Bagels Text Effect step 12
This will be the main seed brush.
Step 13
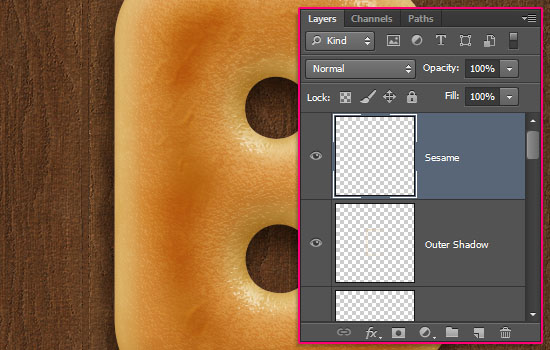
- Create a new layer on top of all layers and call it “Sesame”.
Delicious Bagels Text Effect step 13
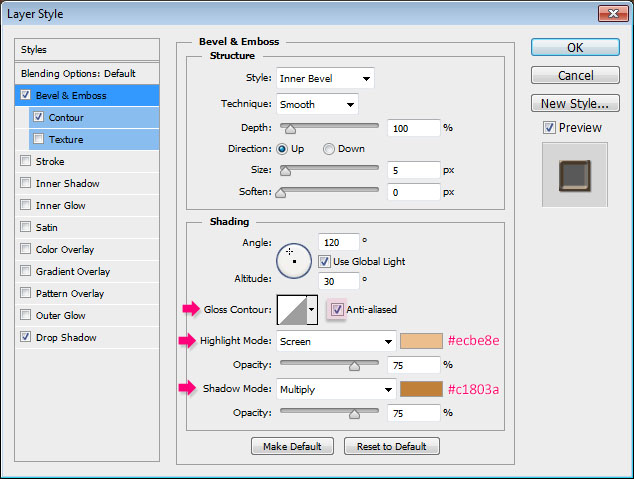
- Double click the “Sesame” layer to apply the following Layer Style:
– Bevel and Emboss
Check the Anti-aliased box
Highlight Mode – Color : #ecbe8e
Shadow Mode : – Color : #c1803a
Delicious Bagels Text Effect step 13
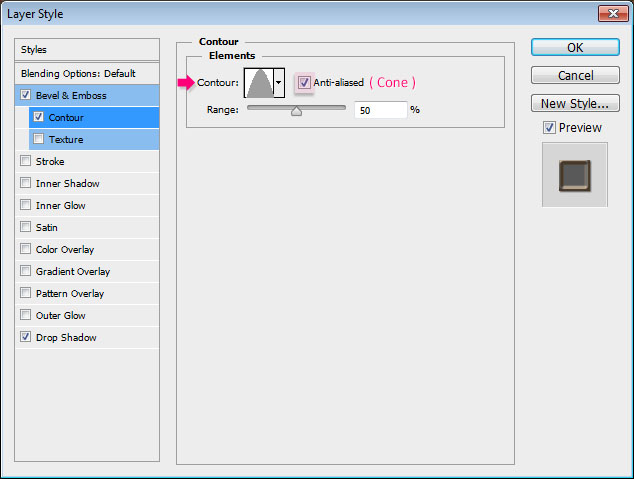
– Contour
Contour : Cone
Check the Anti-aliased box.
Delicious Bagels Text Effect step 13
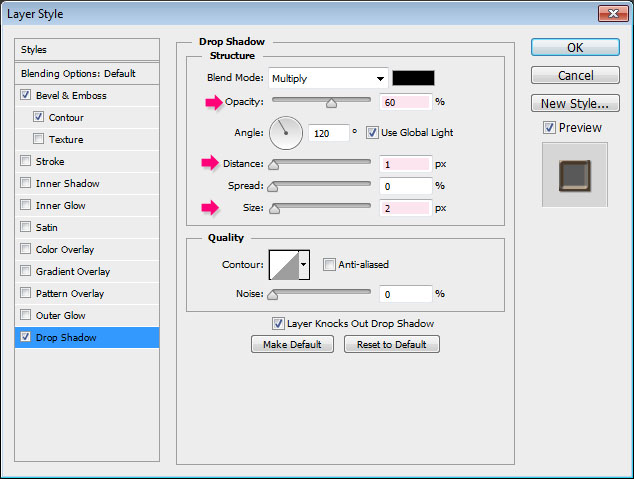
– Drop Shadow
Opacity : 60%
Distance : 1
Size : 2
Delicious Bagels Text Effect step 13
- Duplicate the “Sesame” layer, and rename the copy to “Poppy Seed”.
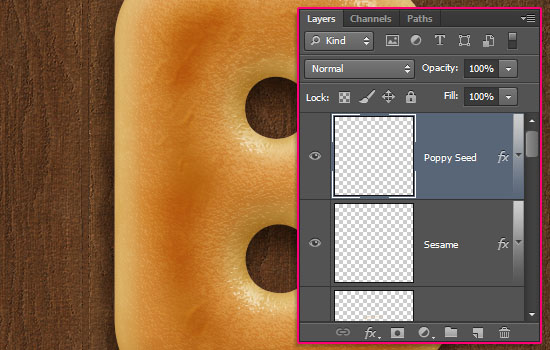
Delicious Bagels Text Effect step 13
- Double click the “Poppy Seed” layer to change the Bevel and Emboss Shadow Mode color back to Black.
Delicious Bagels Text Effect step 13
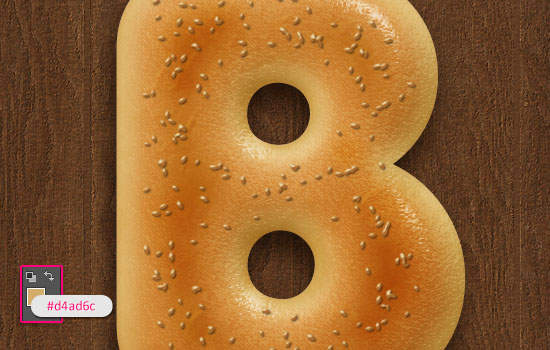
- Set the Foreground color to #d4ad6c, select the “Sesame” layer, then click and drag over the middle part of the bagel letter to scatter the sesame.
A helpful tip would be to drag in a subtle zig-zag motion. this will help better spread the seeds much better.
Delicious Bagels Text Effect step 13
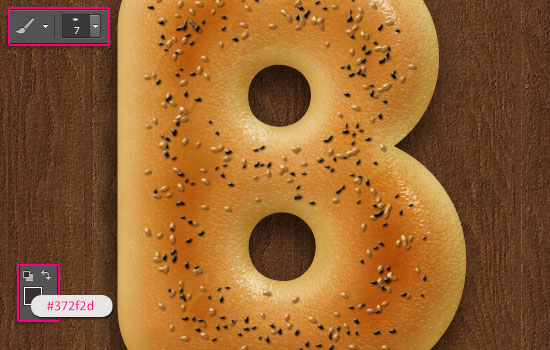
- Change the Foreground color to #372f2d, decrease the brush Size to 7, select the “Poppy Seed” layer, then click and drag to add the poppy seeds to the bagel.
Delicious Bagels Text Effect step 13
Step 14
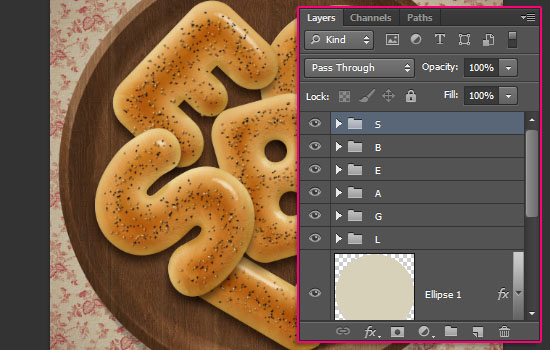
- The bagel letter is finished now. So group its layers, then go ahead and create the other letters.
When done, select each group, then go to Edit -> Free Transform, to rotate and position the letters inside the bowl.
Delicious Bagels Text Effect step 14
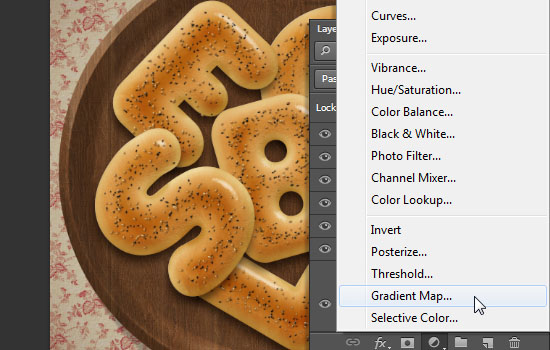
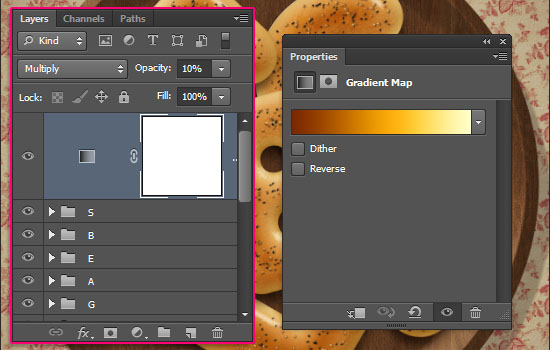
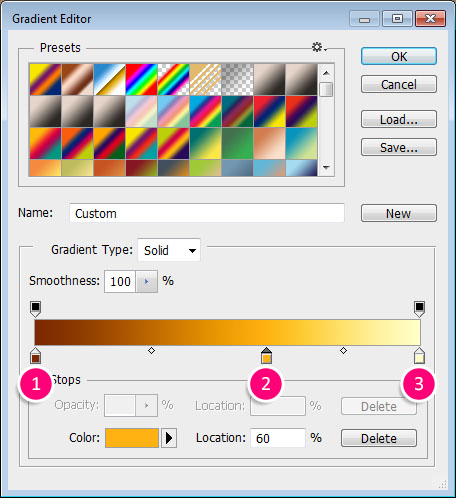
- Click the “Create new fill or adjustment layer” icon down the Layers panel, and choose Gradient Map.
Delicious Bagels Text Effect step 14
- Change the adjustment layer’s Blend Mode to Multiply and its Opacity to 10%.
Delicious Bagels Text Effect step 14
- The gradient is created using 3 colors:
# – Color – Location
1 – #7b2800 – 0%
2 – #ffb211 – 60%
3 – #ffffc7 – 100%
Delicious Bagels Text Effect step 14
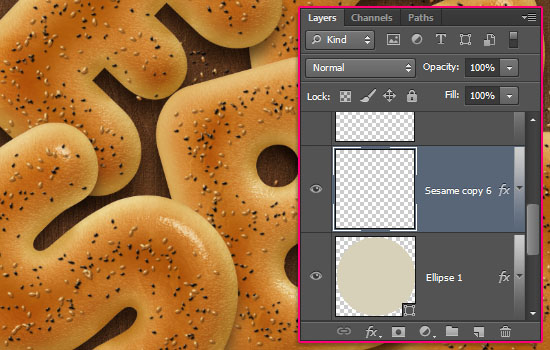
- Finally, you can add two more separate “Sesame” and “Poppy Seed” layers right on top of the bowl’s layer, and scatter some seeds around to finish off the effect.
Delicious Bagels Text Effect step 14
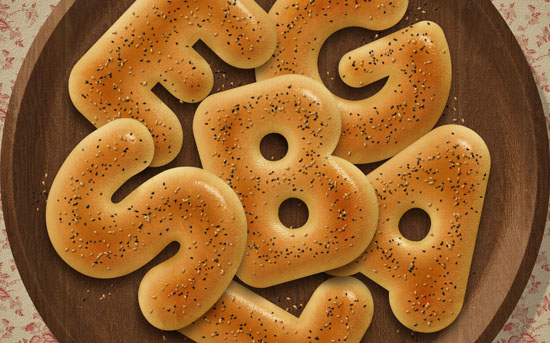
And there you have your bagels ready!
Hope you enjoyed the tutorial and found it delicious ;)
Comments

Popular posts from this blog

Use x-ray techniques in Photoshop to show naked skin through clothing

    Do those new naked body scanners have you freaked out at the airports? As far as the TSA is concerned, those x-ray machines are here to stay, but you might as well take comfort in knowing that airport security guards aren't the only ones looking at your private parts. Practically anyone with a computer can manage to see through your clothes, and it's all thanks to a little program called Photoshop. Thanks, Adobe. With a few tweaks using the tools in Photoshop, you can see those boobs in no time, male or female. The video is in German, but it's not hard to figure our what's going on, especially if you're familiar with Photoshop. First, create a few duplicate layers, then get a handle on some of these tools to make the naked body through the clothes: * Auswahl erstellen (Create Selection) * Tonwertspreizung (Input Levels) * Belichtung (Exposure) You can also do this see-through clothing effect in free design programs, such as  GIMP .

40 latest creative photoshop text effects

Create a Glowing Liquid Text with Water Splash Effect in Photoshop In this tutorial, we will show you the steps we took to create a Glowing Liquid Text Effect in Photoshop. We will be practising the use of liquify filter, layer blending options, as well as some image adjustments. Create a Realistic Wooden 3D Text Image In this tutorial we are going to take a few 2D textures as well as a few Photoshop techniques to create a realistic 3D text image. Easy X-Ray Typography In Photoshop In this tutorial we will show you how to create a simple x-ray effect of a letter, in this case the Abduzeedo logo A. The whole process is quite simple but it will require a couple of hours to pull it off. Easy Furry Text In Photoshop In this tutorial we will show you how to create a really cool and super simple furry text in Photoshop CS6. We will use basic filters and tools but it’s nice to say that we took advantage of the a new feature in Photoshop CS6 that is to apply layer...

Royal 3D Text Effect in Photoshop CS6

  Just make sure to check the 3D settings under Edit -> Preferences -> Performance, and Edit -> Preferences -> 3D. Default values should work fine, but if anything seems to be not working properly you can always check those settings. Step 1 - Create a new 1600 x 1200 px document and Fill the Background with black. Create the text in white using the font Dunkin Sans. The font size is 400 pt and the text is better written in All Caps (if you’re not using only numbers). Step 2 - With the text layer selected, go to 3D -> New Extrusion from Selected Layer. This will instantly convert the text layer into a 3D layer. All the 3D scene elements can be found in the 3D panel (Window -> 3D). Click the main mesh name to edit its settings. - The 3D Mesh settings and attributes can be accessed and modified through the Properties panel (Window -> Properties). If you scroll down the Properties panel you’ll find the Character Panel button, which ...