Step 1
Create a new document. In this tutorial we will be
designing our icon at 1024×1024 pixels but feel free to design yours at
256×256 or 512×512 pixels.
Step 2
With
the Rounded Rectangle Tool (U) draw a shape using a red color. (I
sampled the Eyedropper Tool (I) on the official Psdtuts+ icon).
Step 3
With the Brush Tool (B) Paint a vivid light red color to create a light spot on the upper right part of the icon.
Step 4
Add a black shadow with the Brush Tool. Use the image as a reference.
Step 5
Add a shape like this on top of the icon with the following Layer Style.
Step 6
Duplicate
and reduce the last shape with Cmd/Ctrl + T. In a new layer, set as a
Clipping Mask (Alt-click in the separation line between two layer in
Layers Palette), paint some light red color with the Brush Tool (B).
Step 7
Refine the upper lights using the Brush Tool (B) alternating light and dark red.
Step 8
I refined the bottom part using the same way as the previous step.
Step 9
In a separate layer, using Rectangular Selection Tool (M) add two thin stripes and select the blend mode in Overlay.
Step 10
Make
a Rectangular Selection. Fill it with the Gradient Tool (G) set White
to Transparent. Distort the layer with Cmd/Ctrl + T and set the layer’s
blending mode to Overlay.
Step 11
Create
a new layer and with the Rectangular Selection (M) select a thin stripe
of pixel. Fill it with black and distort the layer with Cmd/Ctrl + T to
obtain a result like the image below. Place the layer near the border
of the center white gradient. As you can see I duplicated the stripe for
the right side.
Step 12
Refine the shadow with the Brush Tool (B) in a new layer.
Step 13
Add two Highlights stripes. Use the Step 11 method again.
Step 14
Little
adjustment with the Brush Tool (B) to the center spotlight and borders.
I make a group with the center layers and added a layer mask to smooth
the lines just a bit.
Step 15
Add
a subtle texture to the icon with the filter Noise > Add Noise, set
the blending mode to Soft Light. Try to alter the layer with Cmd/Ctrl +
T.
Step 16
With The Rectangular Shape Tool (U) create a plus shape and add the following Layer Style.
Step 17
Duplicate the plus shape and shift it a bit to the bottom with the Move Tool (V). Add this Layer Style.
Step 18
Add some reflections with the Pen Tool (P). Draw some random black shape and with a low layer’s opacity.
Step 19
I refined the border of the upper cross adding white lines with the Pencil Tool.
Step 20
Magic Wand time. Add a black cylinder shape with this Layer Style.
Step 21
Add another white shapes on top of the wand with this Style.
Step 22
And finally the last shape with the following Layer Style.
Step 23
The brush is composed of two parts. First draw the main shape with the Pen Tool (P). Use this Layer Style.
Step 24
With
the Brush Tool (B) start to paint inside the brush with a small hard
brush. Use the Spacing Propriety inside the Brush Panel (F5) to boost
the velocity of this Step. Try to alter the brush’s color too.
Step 25
I added a bottom shadow and colored with yellow the top part with the Brush Tool (B) in a new Layer.
Step 26
Draw a cylinder shape with the Pen Tool (P) Apply the following Layer Style.
Step 27
Place the wood texture inside the document and apply it to the previous Shape as a Clipping Mask in Overlay Mode.
Step 28
For
the metal part, draw another shape with this Layer Style. I refined the
shadow of this part in a new Layer by painting some black inside.
Step 29
Create a new layer and paint the smoke using the Brush Tool (B) with purple and yellow colors.
Step 30
Draw a Star using the Custom Shape Tool. Add this Layer Style.
Step 31
Duplicate
the star shape and make it darker by selecting a dark yellow color.
Arrange this layer behind the previous one. I duplicated the star two
times and placed the copied one around the wand in various size.
Step 32
One
last step is to refine the entire icon lighting in a separate layer
with the Brush Tool (B). I added some small details to the icon, like
paint drop, sparkle, shadows simply just paint them.
Step 33
I added a blue color light between the objects with the Brush Tool (B) in a new layer.
Step 34
Finally I created a drop shadow to the icon, and a custom orange background, in separate layers.
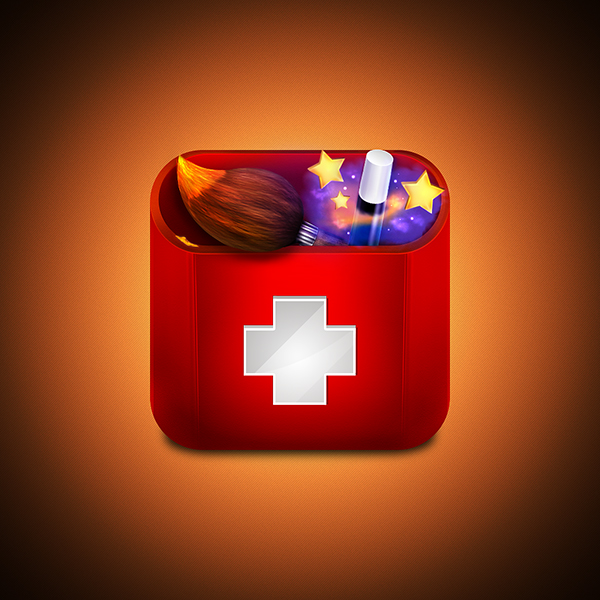
Final Image
Comments
Post a Comment