Photoshopping Aqua Wallpaper

Final Image Preview

Create the famous Aqua wallpaper in just a few minutes using Adobe Photoshop CS3
Create a new file (File>New) of 1920x1200px/72 dpi.
In this case we’ll select the Paint Bucket Tool (G) and fill our primary layer with blue color. The color’s code is #17CBFF
Create the famous Aqua wallpaper in just a few minutes using Adobe Photoshop CS3
Select now the Brush Tool (B) with the next demonstrated parameters. Opacity 30% and the color’s code is #0499E6
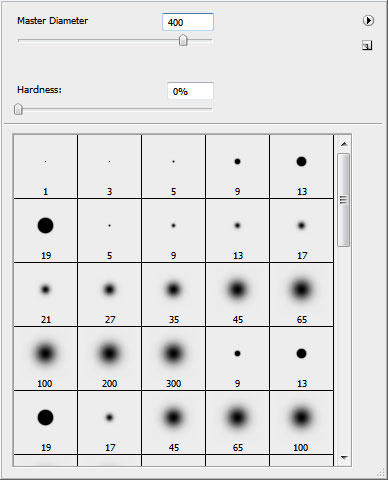
Create the famous Aqua wallpaper in just a few minutes using Adobe Photoshop CS3
Paint the blue background on its lateral sides.
Create the famous Aqua wallpaper in just a few minutes using Adobe Photoshop CS3
… and on the bottom part.
Create the famous Aqua wallpaper in just a few minutes using Adobe Photoshop CS3
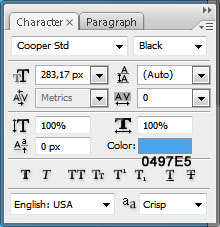
Take the Horizontal Type Tool (T) and type the word ‘aqua’ by separate letters. All the letters have the same next demonstrated parameters, except Q.
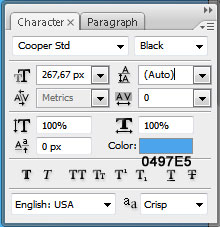
Create the famous Aqua wallpaper in just a few minutes using Adobe Photoshop CS3
The parameters for the Q letter.
Create the famous Aqua wallpaper in just a few minutes using Adobe Photoshop CS3
Place the word the same way demonstrated below:
Create the famous Aqua wallpaper in just a few minutes using Adobe Photoshop CS3
Mark out the letters on the layers’ panel and press Shift button while left clicking on the appropriate layer. Then press Ctrl+J and the marked layers will be copied. Move them lower, using the Move Tool (V) and change their colors – #084DA2
Create the famous Aqua wallpaper in just a few minutes using Adobe Photoshop CS3
Select now Blending Options – Outer Glow for each letter. Make a double click on the necessary layer on the layers’ panel.
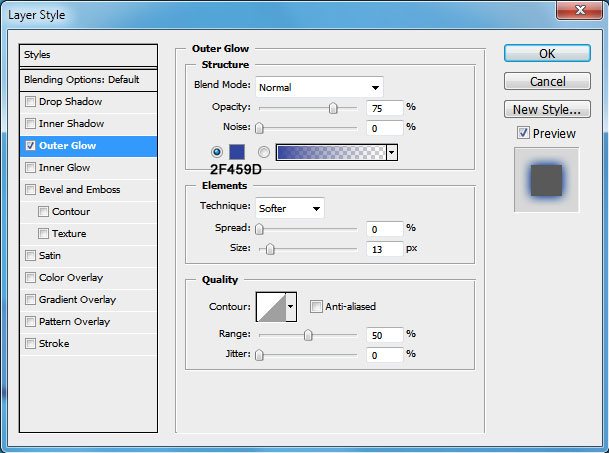
Create the famous Aqua wallpaper in just a few minutes using Adobe Photoshop CS3
It’s the result you should get:
Create the famous Aqua wallpaper in just a few minutes using Adobe Photoshop CS3
Now choose the next Blending Options – Inner Shadow for all the letters, except the last one.
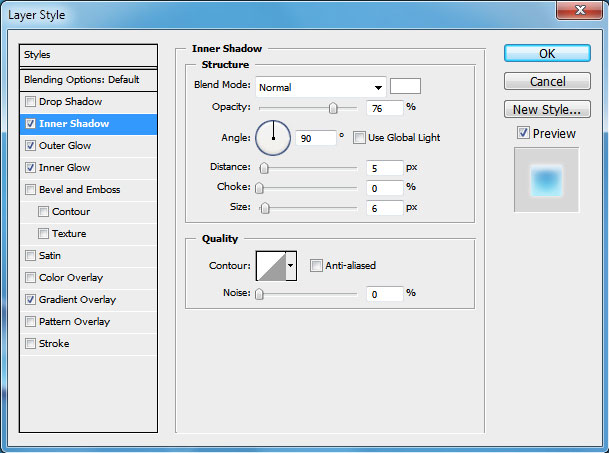
Create the famous Aqua wallpaper in just a few minutes using Adobe Photoshop CS3
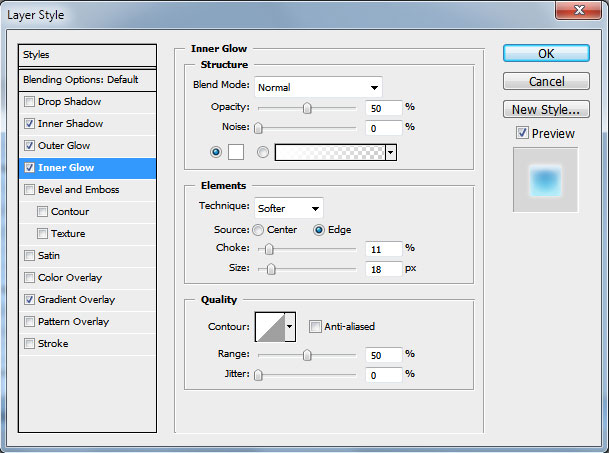
Blending Options – Outer Glow
Create the famous Aqua wallpaper in just a few minutes using Adobe Photoshop CS3
Blending Options – Inner Glow
Create the famous Aqua wallpaper in just a few minutes using Adobe Photoshop CS3
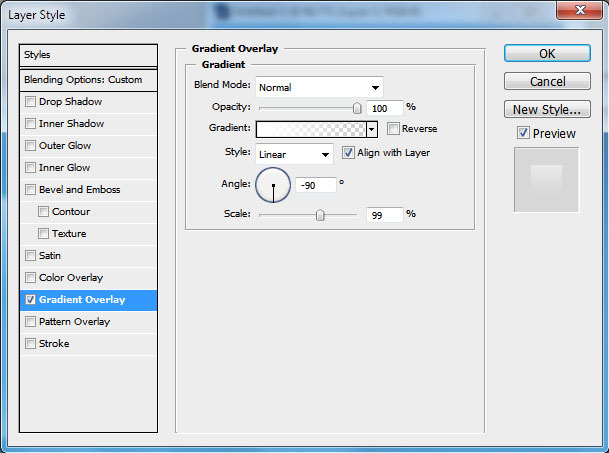
Blending Options – Gradient Overlay

Create the famous Aqua wallpaper in just a few minutes using Adobe Photoshop CS3
Gradient Editor
Create the famous Aqua wallpaper in just a few minutes using Adobe Photoshop CS3
The letters start to get a kind of marine nuance:


Create the famous Aqua wallpaper in just a few minutes using Adobe Photoshop CS3


Create the famous Aqua wallpaper in just a few minutes using Adobe Photoshop CS3
You may see on the picture that the last letter is a little darker than the others.

Create the famous Aqua wallpaper in just a few minutes using Adobe Photoshop CS3
On a new layer we’ll create the shadow coming from the letters. The brush’s parameters are the same with those from the beginning of the lesson.

Create the famous Aqua wallpaper in just a few minutes using Adobe Photoshop CS3
Take the Ellipse Tool (U) and represent an ellipse like the next from below:

Create the famous Aqua wallpaper in just a few minutes using Adobe Photoshop CS3
Set the Fill parameter as it is shown below:
Create the famous Aqua wallpaper in just a few minutes using Adobe Photoshop CS3
…. and the parameter Blending Options>Inner Shadow
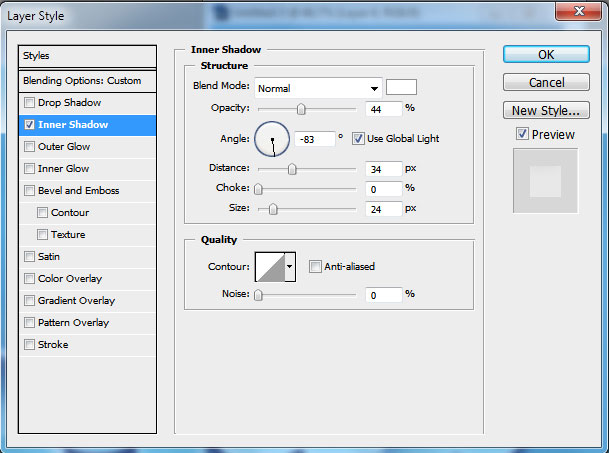
Create the famous Aqua wallpaper in just a few minutes using Adobe Photoshop CS3
Check it out with the picture from below:

Create the famous Aqua wallpaper in just a few minutes using Adobe Photoshop CS3
Continue working with the same layer. Mark out the first letter by pressing Ctrl+Left mouse click on the letter’s layer. When the letter’s marking is ready, press the button for representing the mask layer.
Create the famous Aqua wallpaper in just a few minutes using Adobe Photoshop CS3
Finally we’ll get the highlight only on the necessary zone.

Create the famous Aqua wallpaper in just a few minutes using Adobe Photoshop CS3
Do the same operation with each letter.

Create the famous Aqua wallpaper in just a few minutes using Adobe Photoshop CS3
On the final stage we’ll represent air bubbles. In this case we’ll select the Ellipse Tool (U) and represent a circle.

Create the famous Aqua wallpaper in just a few minutes using Adobe Photoshop CS3
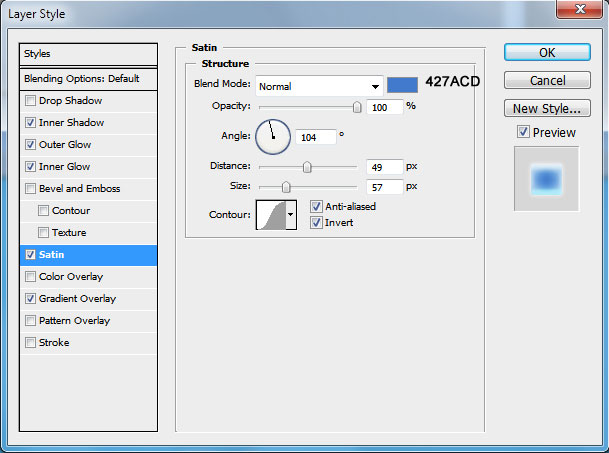
Fill 0% on the layer. Then set the next Blending Options.
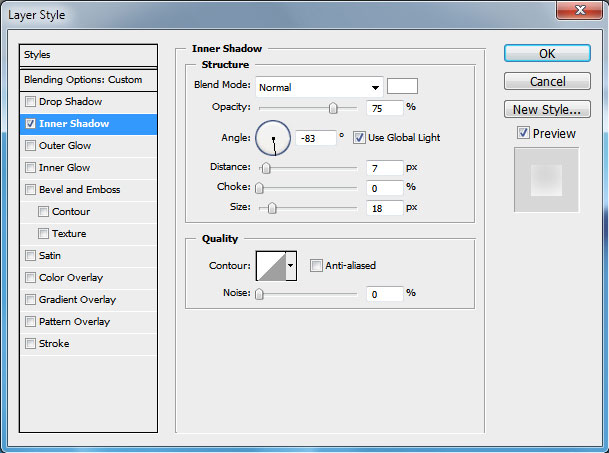
Create the famous Aqua wallpaper in just a few minutes using Adobe Photoshop CS3
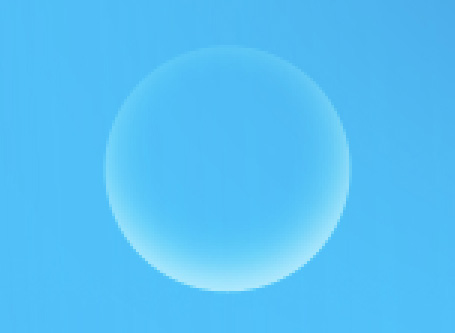
We’ll get a transparent sphere:
Create the famous Aqua wallpaper in just a few minutes using Adobe Photoshop CS3
Insert another circle. Fill 0% on this layer too.

Create the famous Aqua wallpaper in just a few minutes using Adobe Photoshop CS3
Select the next Blending Options.
Create the famous Aqua wallpaper in just a few minutes using Adobe Photoshop CS3
We’ll get an air bubble:
Create the famous Aqua wallpaper in just a few minutes using Adobe Photoshop CS3
Then make a copy of the new bubble we’ve got and change its size (Ctrl+T) to represent air jets, as it is demonstrated below:
Create the famous Aqua wallpaper in just a few minutes using Adobe Photoshop CS3
The final result!


Comments

Popular posts from this blog

Use x-ray techniques in Photoshop to show naked skin through clothing

    Do those new naked body scanners have you freaked out at the airports? As far as the TSA is concerned, those x-ray machines are here to stay, but you might as well take comfort in knowing that airport security guards aren't the only ones looking at your private parts. Practically anyone with a computer can manage to see through your clothes, and it's all thanks to a little program called Photoshop. Thanks, Adobe. With a few tweaks using the tools in Photoshop, you can see those boobs in no time, male or female. The video is in German, but it's not hard to figure our what's going on, especially if you're familiar with Photoshop. First, create a few duplicate layers, then get a handle on some of these tools to make the naked body through the clothes: * Auswahl erstellen (Create Selection) * Tonwertspreizung (Input Levels) * Belichtung (Exposure) You can also do this see-through clothing effect in free design programs, such as  GIMP .

40 latest creative photoshop text effects

Create a Glowing Liquid Text with Water Splash Effect in Photoshop In this tutorial, we will show you the steps we took to create a Glowing Liquid Text Effect in Photoshop. We will be practising the use of liquify filter, layer blending options, as well as some image adjustments. Create a Realistic Wooden 3D Text Image In this tutorial we are going to take a few 2D textures as well as a few Photoshop techniques to create a realistic 3D text image. Easy X-Ray Typography In Photoshop In this tutorial we will show you how to create a simple x-ray effect of a letter, in this case the Abduzeedo logo A. The whole process is quite simple but it will require a couple of hours to pull it off. Easy Furry Text In Photoshop In this tutorial we will show you how to create a really cool and super simple furry text in Photoshop CS6. We will use basic filters and tools but it’s nice to say that we took advantage of the a new feature in Photoshop CS6 that is to apply layer...

Royal 3D Text Effect in Photoshop CS6

  Just make sure to check the 3D settings under Edit -> Preferences -> Performance, and Edit -> Preferences -> 3D. Default values should work fine, but if anything seems to be not working properly you can always check those settings. Step 1 - Create a new 1600 x 1200 px document and Fill the Background with black. Create the text in white using the font Dunkin Sans. The font size is 400 pt and the text is better written in All Caps (if you’re not using only numbers). Step 2 - With the text layer selected, go to 3D -> New Extrusion from Selected Layer. This will instantly convert the text layer into a 3D layer. All the 3D scene elements can be found in the 3D panel (Window -> 3D). Click the main mesh name to edit its settings. - The 3D Mesh settings and attributes can be accessed and modified through the Properties panel (Window -> Properties). If you scroll down the Properties panel you’ll find the Character Panel button, which ...