
Step 1 – Setting up the document
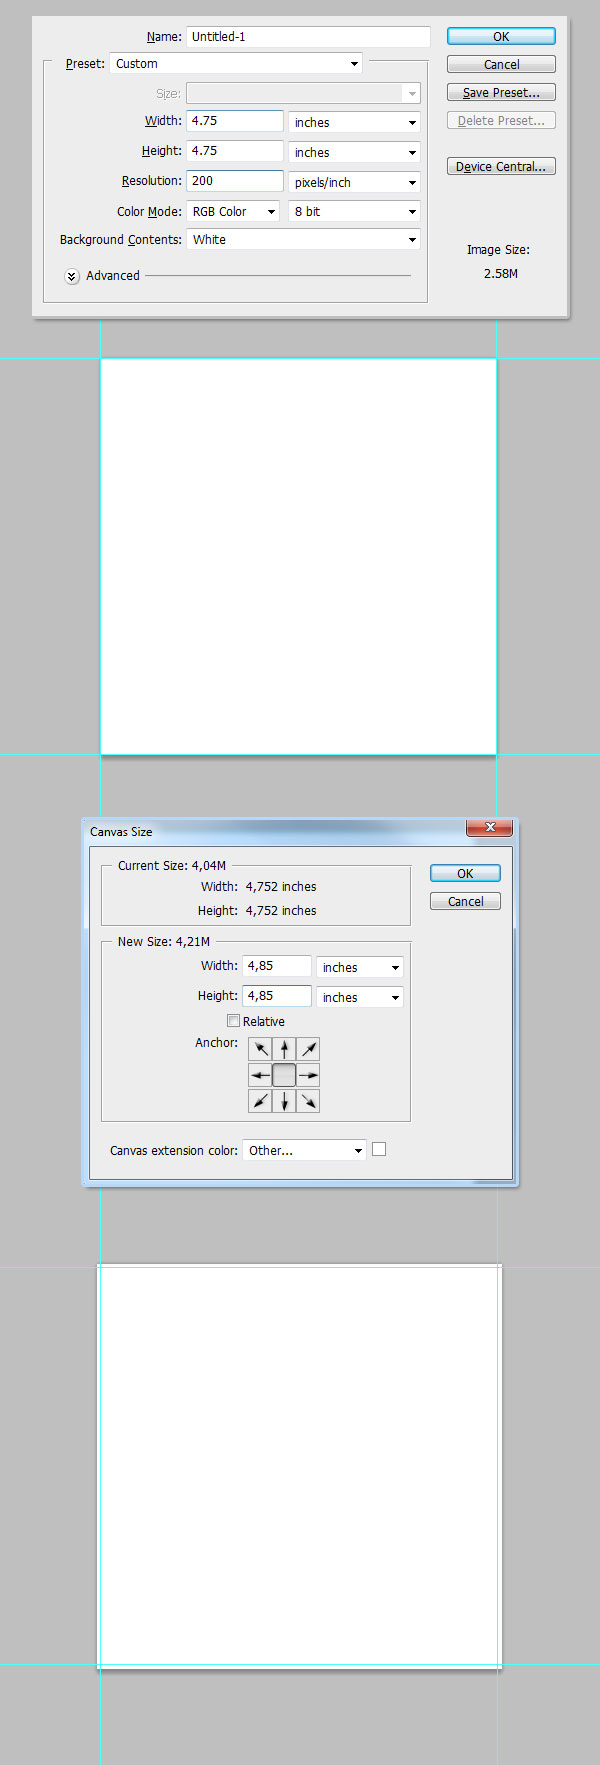
This time we will create a photo manipulation inspired from the classic poem of Edgar Allan Poe, "The Raven". This should not be interpreted as a graphical representation of the poem, just a twisted adaptation depicting the loneliness of the man who lost his beloved Lenore. Imagine this as an audio book project, or a rock band album cover.Start creating the document; a standard CD cover is 4.75 x 4.75 inches. So create a document in these dimensions. If you want to actually print this you should work on a resolution of 300+ pixels per inch, but this time I’m setting the document to 200 dpi because of the photo sizes.
Once you have your image resolution set, show your rulers (Command + R) and add some guides to the document’s borders. Since this will be a print design you should add a margin for security, so go to Image > Canvas size and change the dimension to 4.85 x 4.85 inches Anchor: Center.
Step 2 – The Room
The entire poem takes place in the narrator’s room, open the "Empty Room" image in Photoshop and save it with a descriptive name like "Room.psd". This image is wide and our design should be a perfect square. We will need to stretch it without distorting it. Is pretty simple actually, first draw a Guide trying to delimit a square on the left side, then using the Rectangular Marquee Selection Tool (M) select the right side of the image, copy it and paste it matching the right side of the segment with the guide. Then using the Free Transform Control (V) and hold the Command (Ctrl) key to distort the pasted area and match the room’s horizontal wall lines.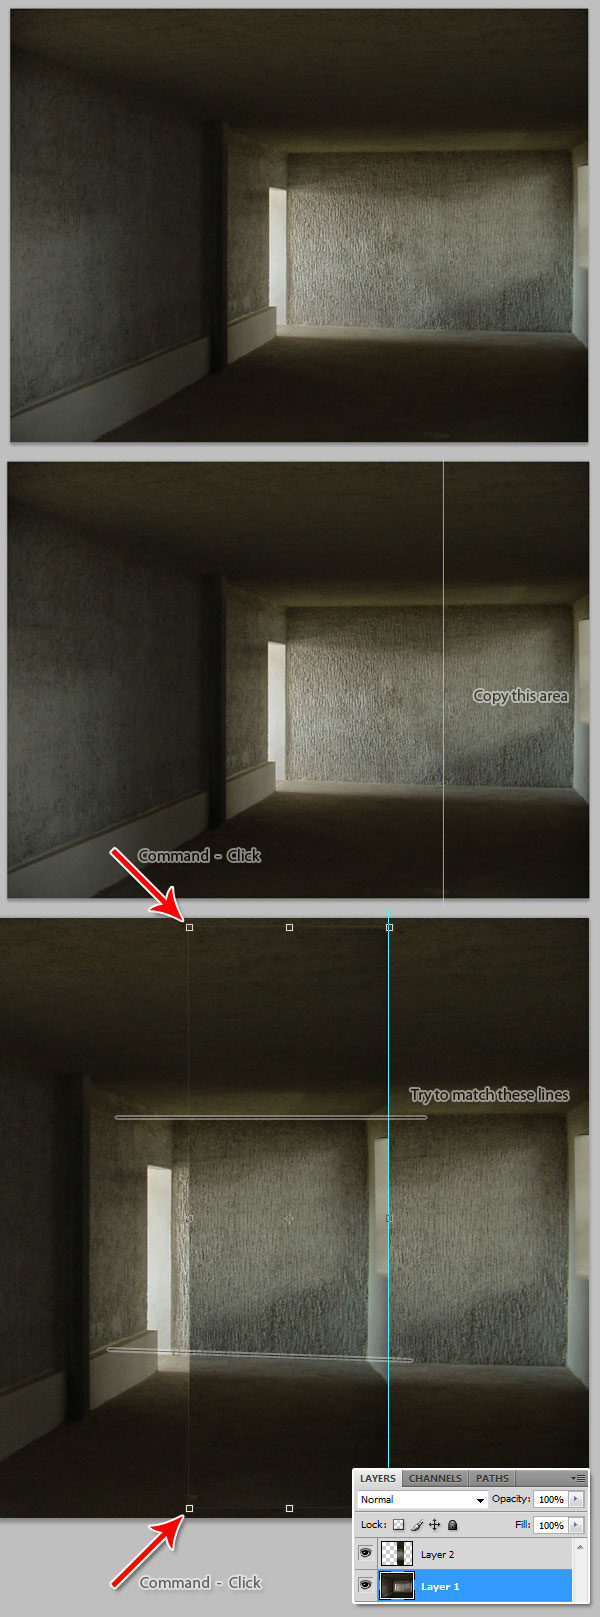
Step 3 – Join
In order to make the reduction as polished as possible, adjust the levels of "Layer 2" as shown in the image below. I did it in 2 rounds but you can try to get it done in only one. Then, add a Layer Mask > Hide All and fill the mask with a Horizontal Gradient (White – Black). This step will make the reduction work almost perfectly.
Step 4 – Add the room into the main document
In the "Room.psd" file using the Rectangular Marquee Tool (M) select the right side of the image and hit Command (Ctrl) + Shift + C to copy all the layers of the selection (this is to avoid the step of flattening the image and helps you to keep this part of the job editable for further changes just in case). Then paste it into the main document in a new layer named "Room."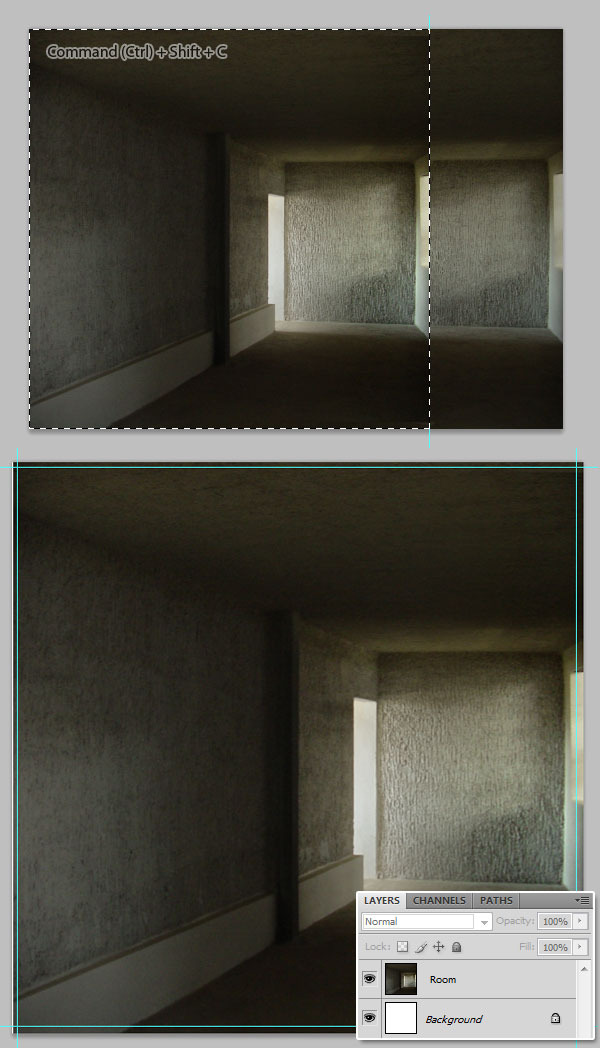
Step 5 – Add the guy
Now it is time to add one of the main characters, the guy. For this, grab the sitting guy image and open it in Photoshop, then using any technique select the guy’s shape (I’m using the Polygonal Lasso Tool). Copy the selection and paste it into the main document. Then go to Edit > Transform > Flip Horizontal to make it match the lighting of the scene. This is really important because all too often you’ll not have enough money to actually take your own shots and you’ll need to use stock and choosing just the right picture isn’t easy. Use the Free Transform Tool to reduce the guy’s size. Name the layer "Guy".
Step 6 – Overall shadow
Since I don’t want a 100% photo realistic scene, but a dramatic one; we will add several levels of shadows, the first one is the room’s shadow. Create a new layer named "Room Shadow"; using a big soft Brush (Color: #151610, Size: 300px Opacity and Flow 50%) paint all the right side of the scene, then change the Blending Mode to Multiply and its Opacity to 75%.
Step 7 – Adding more objects: a stool
Open the stool image, select its shape and paste it into the main document; name that layer "Chair". Once again you must flip it horizontally in order to match the lights.
Step 8 – Burn and desaturate
Grab the Burn tool, select "Guy" and burn all its right side to increase the shadows’ intensity. Then grab the default Sponge tool and desaturate the brighter areas. Do the same with "Chair" layer.
Step 9 – Here comes the raven
Open the " Crow1" image from the assets and select its shape using any technique (I did it with the Polygonal Lasso Tool), copy it and paste it into a layer named "Raven". Flip it Horizontally and resize it a little bit, make the crow bigger than the guy. Place it next to the room’s door.Next add a Layer mask to the "Raven" layer using the Rectangular Marquee Tool. Do this by drawing a rectangle over the door’s shape and by filling the area with black. This way we will create the illusion of a raven entering the door without actually being destructive to the image.

Step 10 – Some books
Open the "Pile of Books" file, select the shape and paste it into a new layer named "Books", resize it and place it just over the "Chair" layer, then burn its right side as well.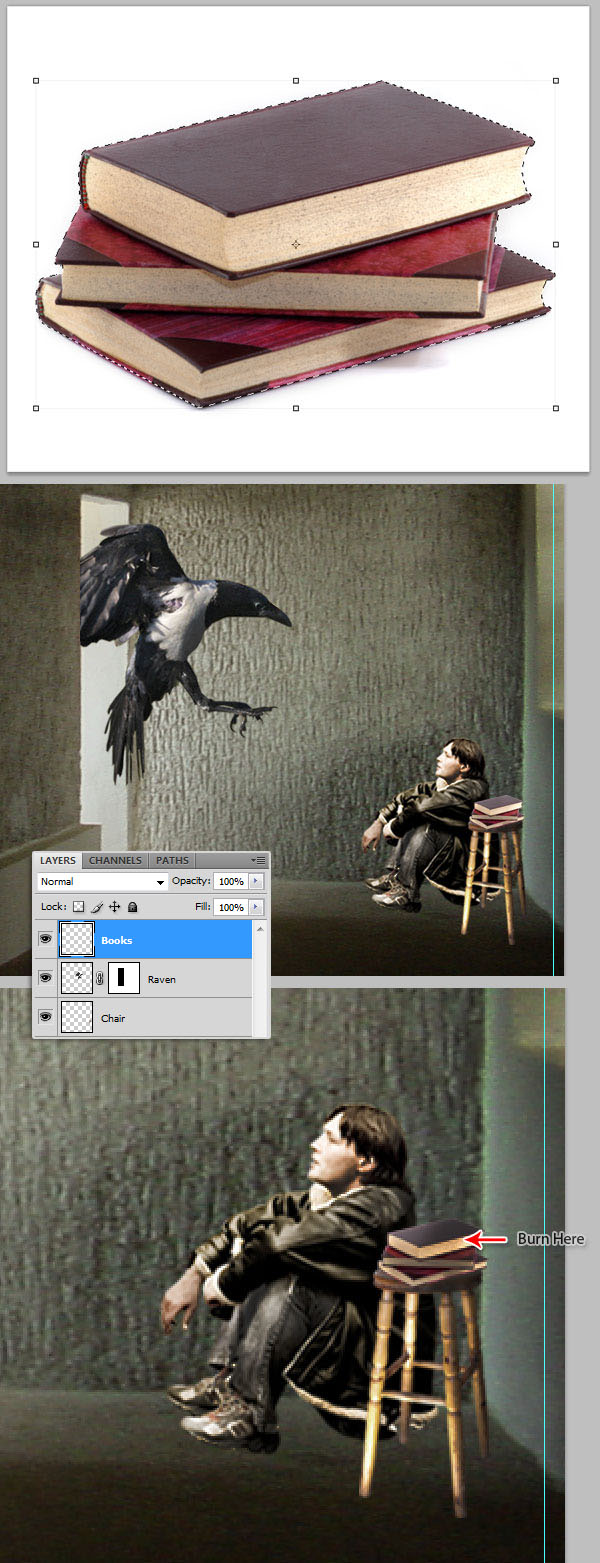
Step 11 – Combine crows
Our crow is pretty nice, but it is not quite right. To fix this, we will need to manipulate it a bit by giving it a new head. Open the "Crow 2" image from the assets and select only its head. Paste it, flip it, and resize it into a new layer named "Head" above the "Crow layer" then using the same technique showed in step 3 of this tutorial, merge the head with the body; but instead of using a gradient, use a black Brush. If necessary, delete some areas of the "Crow" layer’s head.
Step 12 – More books
Since the bird wings makes the air blow we’ll add a book opened because of the breeze. Open the "Open Book" image from the assets, extract only the top open book and paste it into a new layer in the main document named "Open Book". Finally add as many more books as you want. Always remember to Burn the right side of them.
Step 13 – Shadows
Duplicate the "Raven" layer using the Free Transform tool to distort it; making it wider. Then in the Hue / Saturation (Command (Ctrl) + U) bring down the Lightness value to -100. Go to Filter > Blur > Gaussian Blur, radius 8px to blur the shadow and bring down the layer’s Opacity to 50%.
Step 14 – More shadows
We will apply this technique on almost every object in the scene, is pretty easy. Create a layer behind the related object, in this case "Raven" Layer and name it "Raven Shadow" (we did it in the previous step) then using a big soft dark Brush (#110C06) paint a shadow there. Next create a new layer named "Front Shadow" and paint shadows over the related object, in this case the raven. Then using a big and soft Eraser (E) Opacity and Flow 50% delete some areas of the front shadow where you think there should be more light. Try grouping the shadow layers and the main object into a folder in order to keep the layers organized.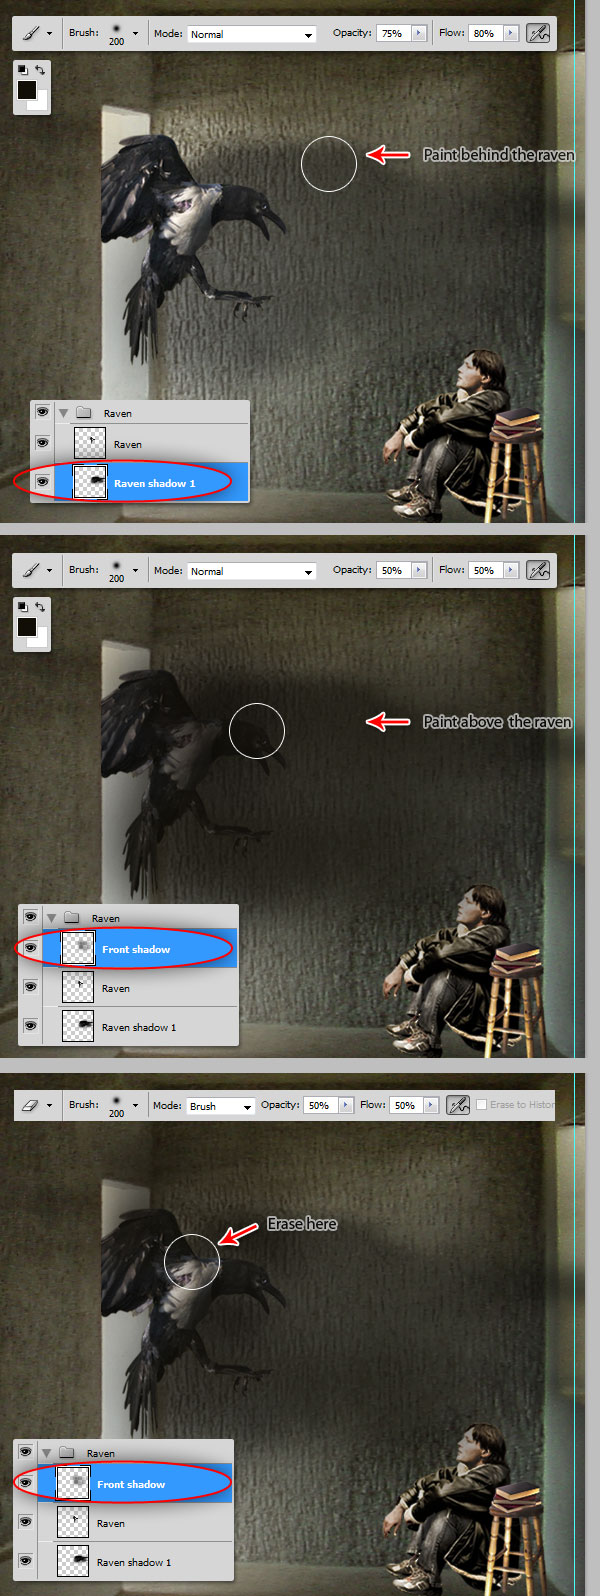
Step 15 – Shadows and more shadows
Repeat the previous shadow technique but this time with the "Open Book" layer. If you want you can use the Smudge Tool on the shadow layer to merge it better with the background.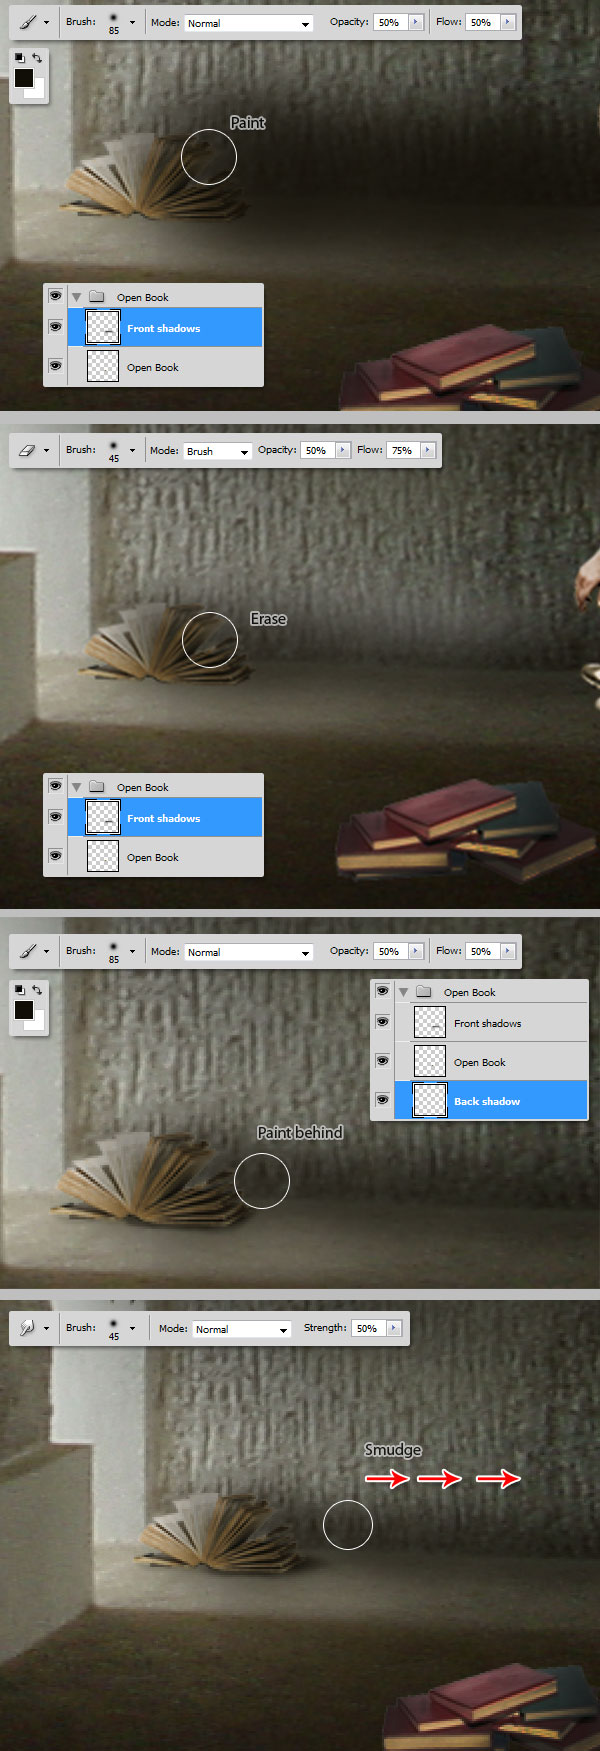
Step 16 – Guy’s shadow
Just like with the "Raven" layer on Step 14, duplicate the "Guy" layer, bring down its Lightness and Opacity and then paint both the front and back shadows as well just be sure to take special care of the shadow below his sneakers.
Step 17 – Chair and books’ shadows
Using the same technique paint the shadows of the "Chair" layer and the extra books on the floor, once again, don’t try to create a photo realistic outcome but a dramatic one, so feel free to add as many shadows as you desire but always try not to make the image too dark.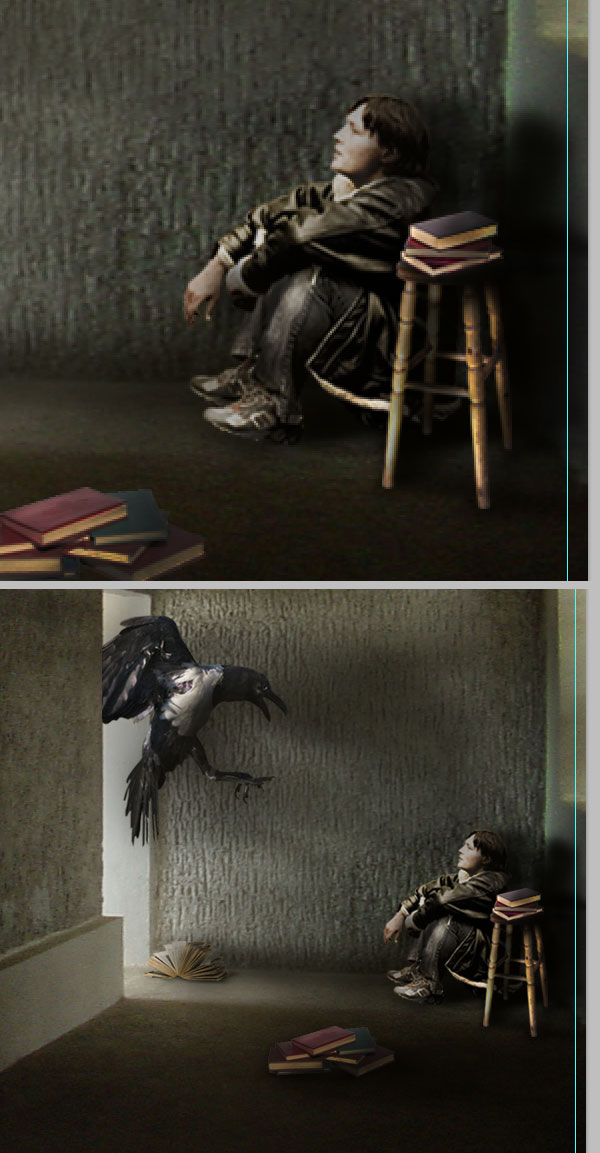
Step 18 – Room’s shadows
Using a larger dark Brush (#110C06) paint all around the room’s borders into a new layer named "Front shadows" somewhere above the "Room" layer. Finally bring down its opacity to 50%.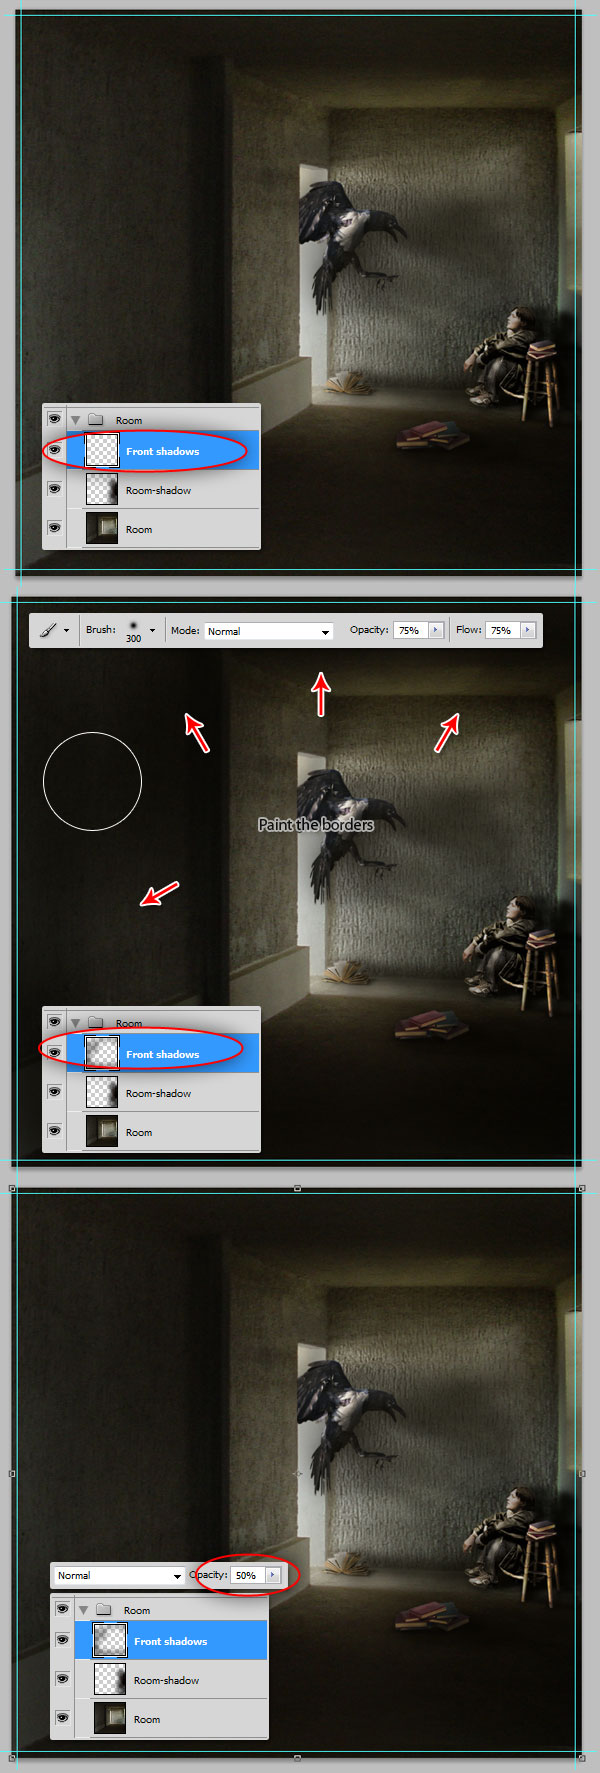
Step 19 – Words on the wall
This guy is really obsessed with his lost love Lenore, how can you depict a feeling like that into a mute image? That’s pretty hard isn’t it? That’s why I decided to add the word "Lenore" painted several times on the wall. For this, create a new document (any size is ok) with a neutral gray background (#A0A0A0) and using some hand drawn fonts (you can find several free fonts in dafont.com) write the word "Lenore" everywhere. Then hit Command (Ctrl) + A to select all and Command (Ctrl) + Shift + C to copy a flatten version of the image.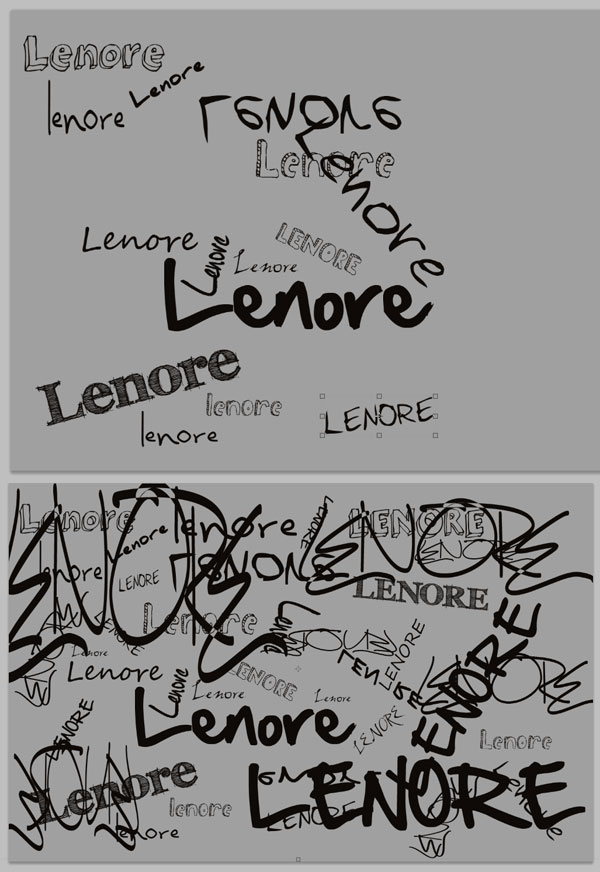
Step 20 – Use the vanishing point filter to paste the words on the walls and ceiling.
Create a new layer named "Wall words" above "Room" layers or "Room" folder. Then go to Filter > Vanishing Point. On the vanishing point window draw the necessary planes to put the words on the wall. If you’re not familiar with the vanishing point filter maybe you should read the following tuts first: Using the Vanishing Point Filter to Mock up a Business Card or Create an Impressive Mock-up of a Grunge Box.Once you’ve created the planes, paste the clipboard there, drag it and resize it until looks good. This isn’t an easy process so feel free to try as many times as you need before moving forward.
Once you’ve placed the text appropriately, change the "Wall words" layer’s blending mode to Overlay.
Tip: Windows 7 and the Vanishing Point filter don’t work well together, for some reason Windows’ Aero has a conflict with the Vanishing Point engine, so if you’re working with W7 and your system suddenly crash while using this filter try changing the desktop appearance to "Windows 7 Basic".

Step 21 – Delete the extra words
Using the Polygonal Lasso Tool select the areas without walls (door and window) with the "Wall words" layer selected, then delete the selection. Then change its Opacity to 50%.
Step 22 – Raven’s motion blur
Since our crow is flying, we will need to add a motion effect, that’s pretty easy. Duplicate the "Raven" layer and place it above the original. Go to Filter > Blur > Motion Blur, set Angle: 0º and Distance 20px and hit OK, then with the Eraser Tool or using a layer mask delete some portions of the blur layer as shown the images below.
Step 23 – Some pieces of flying paper
Grab the piece of paper from the assets, extract it from the white background and paste it into a new layer above all the others in our main document. Using the Warp Tool (Edit > Transform > Warp) distort the piece of paper as shown in the image below. Repeat this step as many times as you want with different pieces of flying paper. Put all them into a folder.
Step 24 – Add shadows to the flying papers
Merge the Flying paper folder and desaturate the resulting layer. Using the Burn tool to darken some shadows over the paper itself. Then using our same old technique of shadowing, add two shadow Layers, one on the front and other on the back, paint some shadows using a dark brush. Finally you can repeat Step 22nd’s process in order to add a Motion Blur effect.Put all the layers into a folder named "Art".

Step 25 – Add the title
Using the "Trajan" typeface, add the cover art’s title, put all the title Layers into a folder and name it "Title", then Option (Right) click on the layer miniature and select Convert to Smart Object. Then click on the Smart Object and go to 3D > New 3D Postcard From Layer, then the "Title" smart object will turn into a 3D layer with all the text still editable. This way no matter how many changes you do on the perspective, rotation and depth, you can still change the text at any time.Add a Bevel and Emboss and a Gradient Overlay effect to the 3D layer just as shown in the bottom of the image below. Don’t worry too much about the light position and the shadow right now; we will work it on the next step.

Step 26 – Transform the 3D postcard
Using the 3D transform tool Rotate, Move and Drag the layer to make it match the wall’s perspective. Once you’ve placed the layer appropriately, add the Drop Shadow Style setting the Light angle to 30% and a big distance between shadow and text (32px in this example).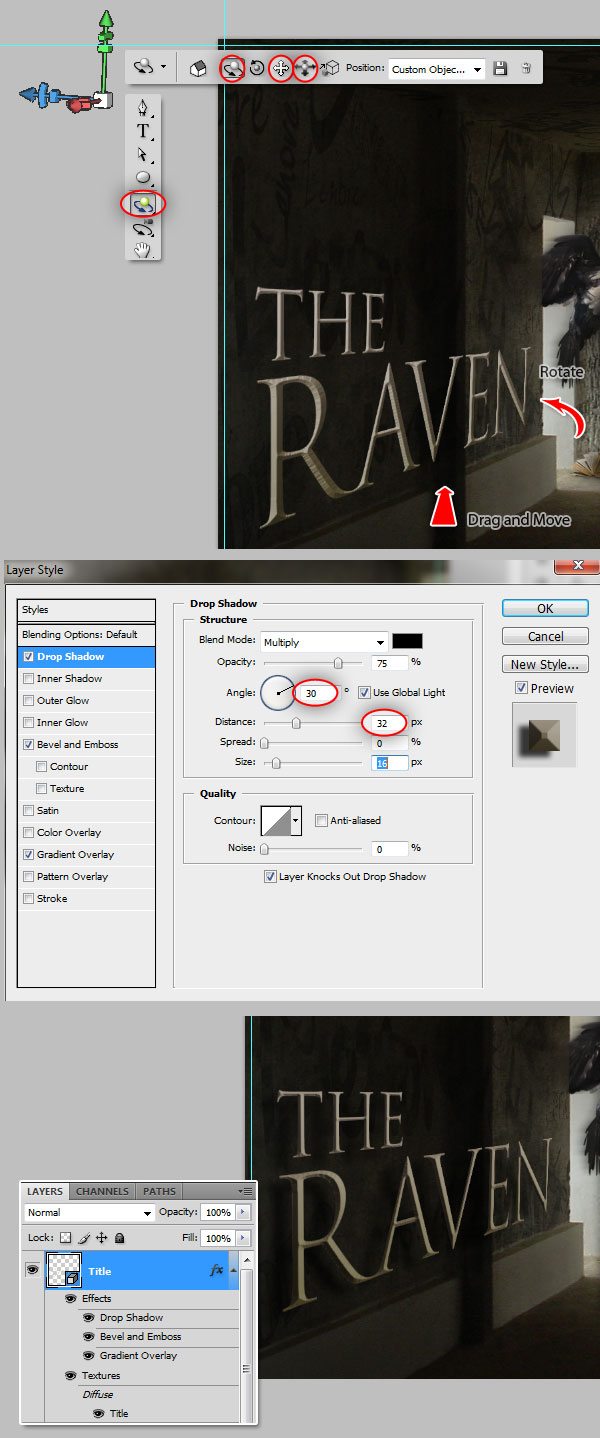
Step 27 – Edit the text
Often, clients change their minds in the middle of the project, that is why it is really important to keep your layers editable all the time. In this example we will be going to add some missing words to the title: the author name. For this you’ll need to dig trough the nested documents into the objects, first double click over the Diffuse Texture on the 3D layer ("Title" texture), a new file named "Title.psd", in this new document you will find the Smart Object layer, double click on it and finally you will see the text layers in a document named "Title2.psd", there you can expand the canvas’ size and add the third line of text. To commit the changes you should Save each document backwards, first "Text2.psd" and then "Text.psd" then you’ll see your 3D layer updated on the main document.
Step 28 – Add some grunge noise
As a grungy detail, we will add some noise to the composite. Hit D on your keyboard to load the default colors, create a new layer named "Noise" above the "Text" object and go to Filter > Render Clouds. Next go to Filter > Noise > Add Noise (set the values shown below). Finally change layer’s Blending Mode to Overlay and Opacity to 35%.
Step 29 – Adjusting the Levels
At this point you will know if the design is too dark or too light, that is why we will need to add a Levels adjustment layer to lighten the image. Now Select All (Command (Ctrl) + A) and Command (Ctrl) + Shift + C to flatten and copy the design.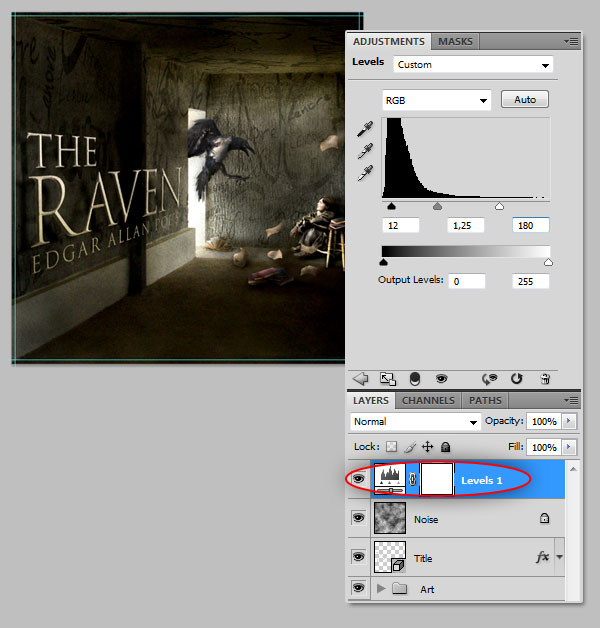
The Mock-Up
Step 30 – CD Case
Sometimes clients want to see a real life example of their product. It is really hard to send a printed version of a cover art file especially if your clients are far away from you but you can send them a picture. This time we will mock up our cover art in a CD case. Open the "CD case" image in a new document named "mockup.psd" and crate a new layer above the flattened layer. Select the new layer and go to Filter > Vanishing Point, there, paint a plane matching the case shape and paste the clipboard there.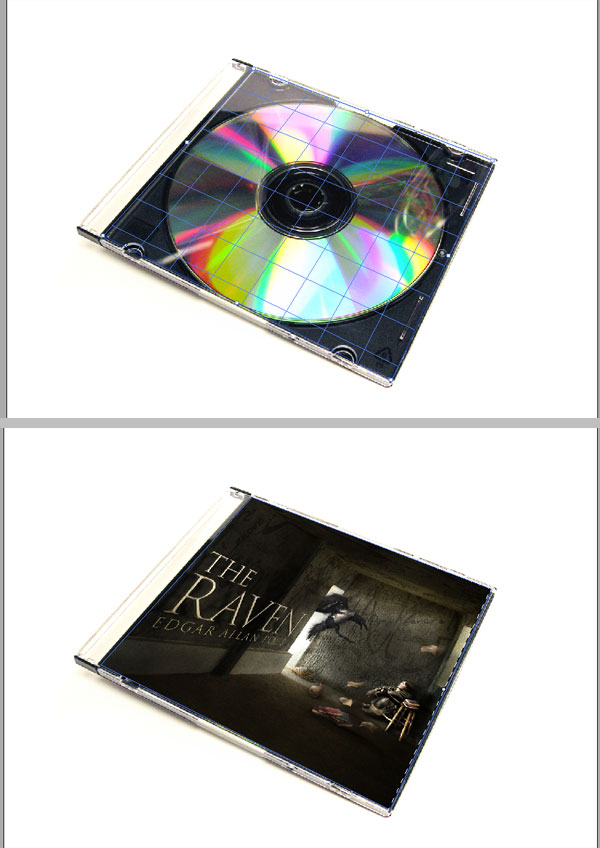
Step 31 – polish the mockup
Since the Cover art is behind the CD’s plastic case, we will need to delete some areas of the cover art layer. For this add a Layer mask to it and using the Polygonal lasso tool, select the tiny notches of the plastic cover, then fill the selection with black on the Layer Mask. You can bring down the covert art’s opacity to actually see the notches.Then, using the Polygonal Lasso tool, once again, select a semi-circle of the notch, where the paper will be clearly visible, and fill it with black or gray.

Step 32 – The plastic
We will use a Gradient Overlay on the artwork layer to create the ‘shiny plastic’ effect, this is pretty simple, just add several black-white transitions on the effect, and change its Blend Mode to Screen and its Opacity to below 20%. In addition, I’m adding an Inner Shadow to improve the depth perception.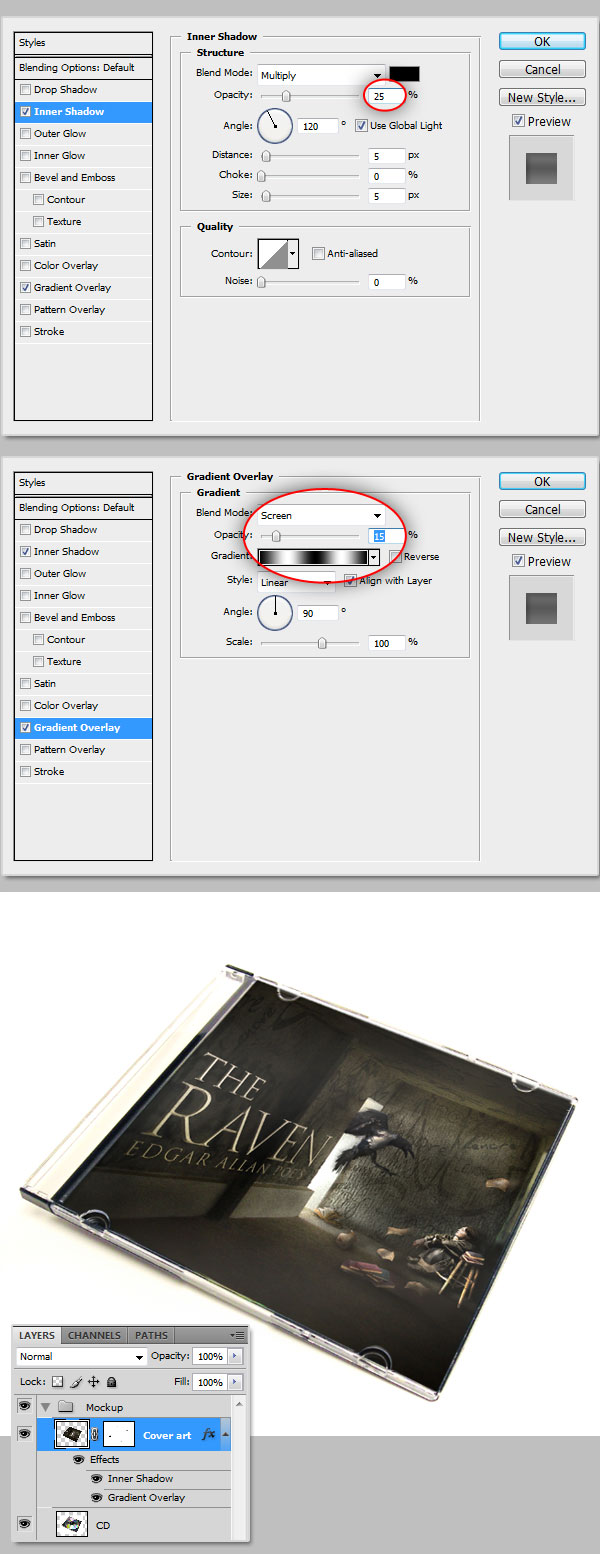
Step 33 – Final touches
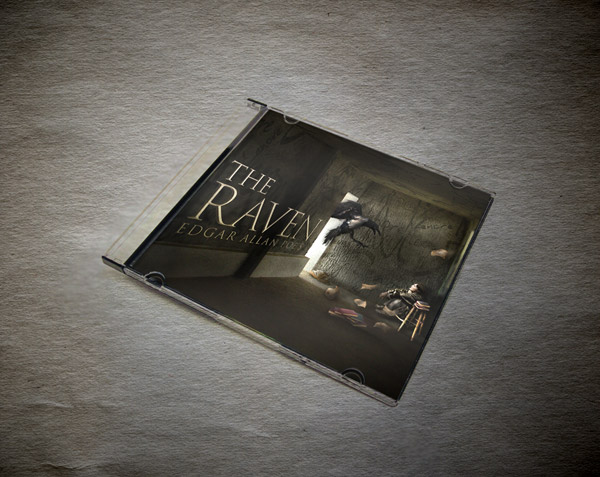
As some final touches I’m adding the "Paper Texture" layer from the assets into a new layer behind "CD" layer. Changing "CD" layer’s Blend Mode to Multiply works perfect in this case. Then just play with the texture layer, I added a dark (#36312D) Solid Color layer behind the texture; plus I increased the texture’s dark levels by adding a Layer Mask filled with a White – Black Radial Gradient; creating a dark vignette this way.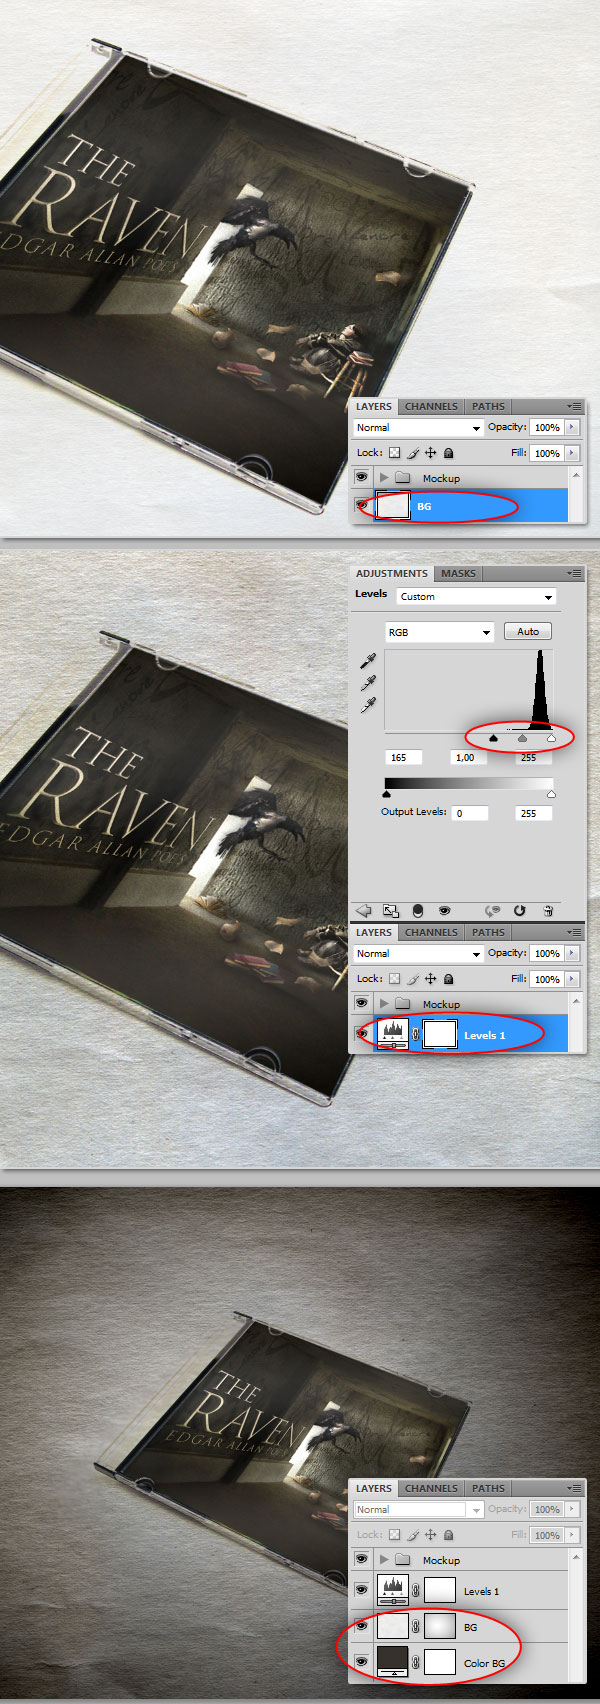
Final Image
Please take a look at the final version of our cover art.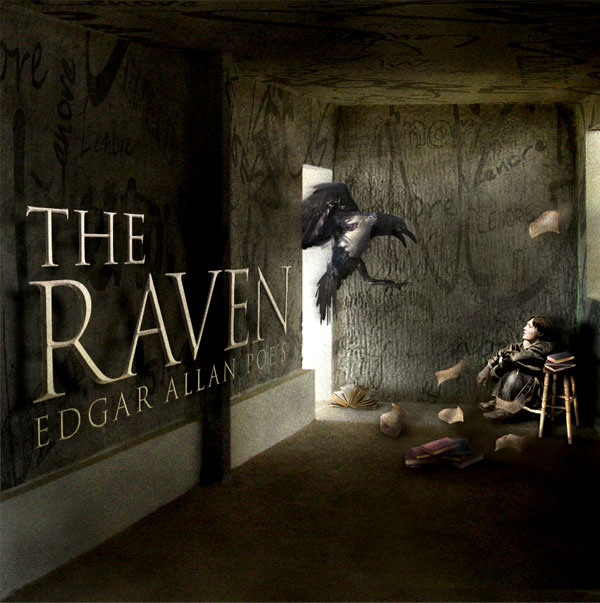

Comments
Post a Comment