
Step 1
Create a new canvas 14.85cm wide x 10.5cm high with the Resolution at 300dpi. Set the Color Mode to RGB and the Background Contents as White.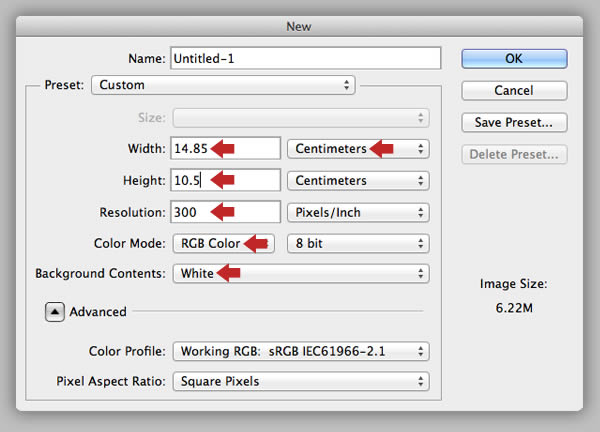
Step 2
Grab the Type Tool (T) and add the first character at 160pt in this font, then click the color chip in the Character tab and recolor it to # 5d1e0f.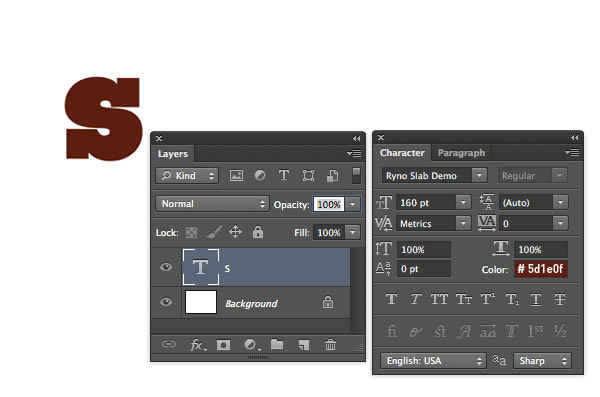
Step 3
Choose 3D > New Extrusion from Selected Layer. If you’ve not got the 3D workspace active, the following prompt will appear.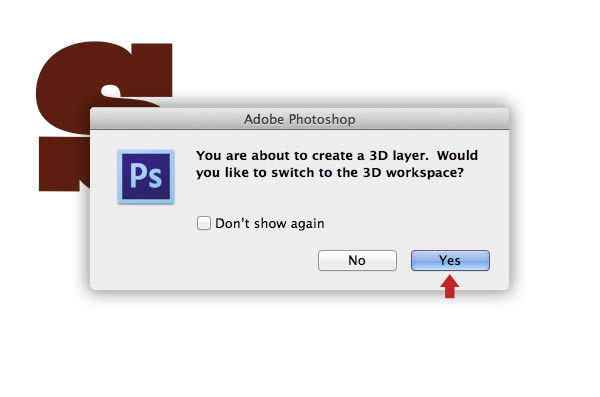
Step 4
If you ever used CS5′s 3D Repousse Tool, you’ll know how far it was from being user-friendly. The 3D experience in CS6 has been totally overhauled and is much more intuitive as everything is built into your workspace. Grab the Move Tool (V), drag to reposition the 3d plane as shown.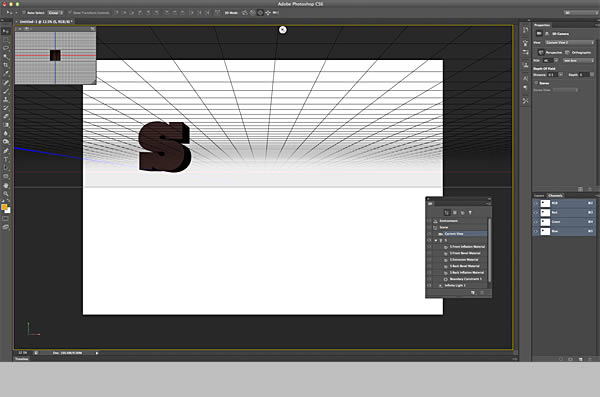
Step 5
You’ll see the Properties panel on the right. Click the Cap icon (1) and copy the settings shown. Now activate the Deform icon (2) and copy these settings too. Now activate the Mesh icon and turn off both shadow options.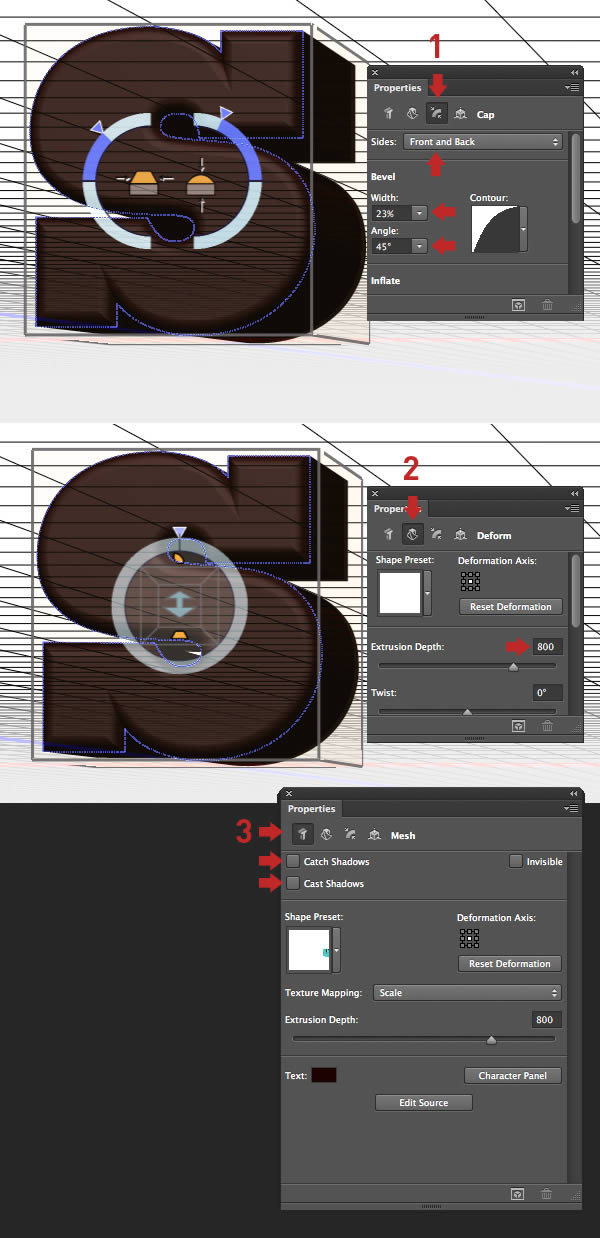
Step 6
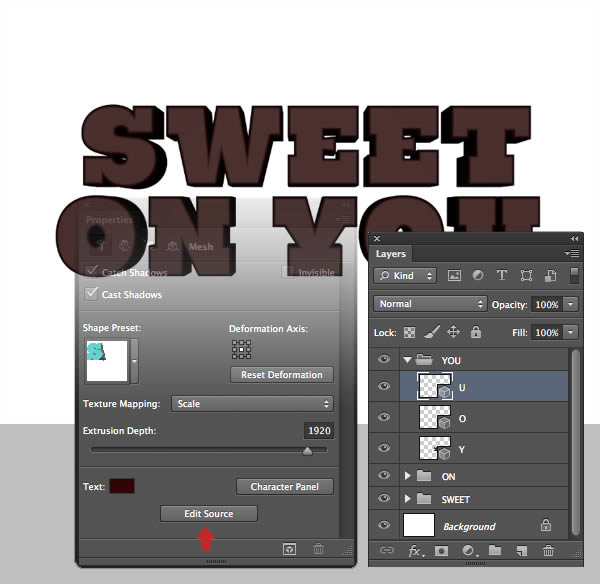
Duplicate your first 3D text layer. To modify text while still in 3D mode, click the Edit Source button in the Properties panel. This will open a "child document", edit, save, then close and your text will automatically update. Now drag the new 3D layer along the X axis in 3D space to reposition it.Repeat this until each word is complete, then place each character clearly labelled in a separate word folder as shown.
Step 7
Now use the 3D Tools to rotate/move each character. Be careful not to use the Z axis, as this will move the object towards or away, making it appear larger or smaller.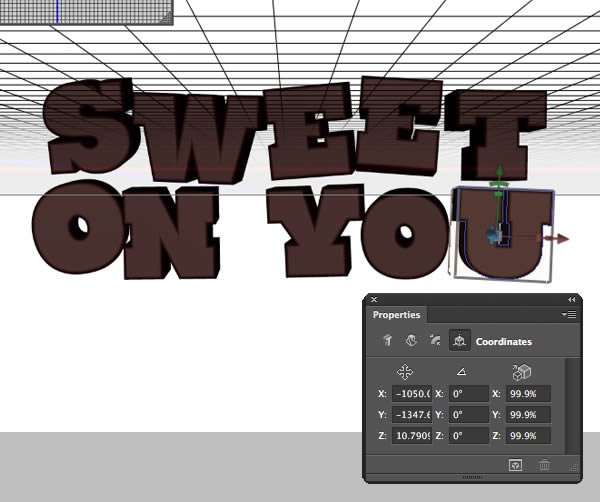
Step 8
When you’re happy with the lettering arrangement, choose 3D > Render, then and sit back while until the render process is complete.
Step 9
At this point I decided I would need a little more space at the top for the hand/strawberry. To do this, press Opt/Alt + Cmd/Ctrl + I to access the Canvas Size window, set the anchor point to bottom centre and increase the Height to 11.85cm.
Step 10
Place a new layer called "Pink solid" above the "Background". Use the Color Picker to set your Foreground color to # e2b4c1, then hit Opt/Alt + delete to fill the layer with pink.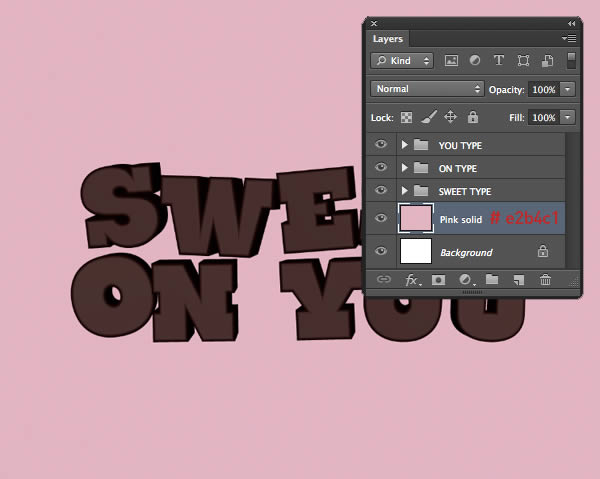
Step 11
Add a new layer called "Floor shadow" above the previous one, change the Blend Mode to Multiply and reduce the Opacity to 94%. Choose the Gradient Tool (G) and set it to Linear and Foreground to Transparent in the Options bar. Set your Foreground to a slightly darker pink of # c18088. Now press Shift and drag as indicated by the length and direction of the arrow.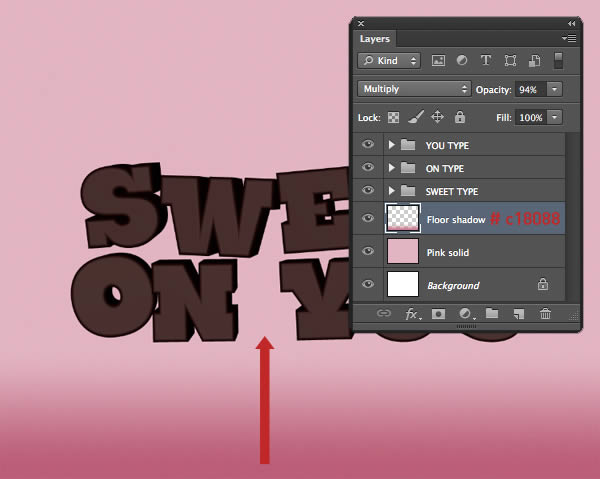
Step 12
Add another layer called "Top shadow". Keep the Blend Mode as default, then set your Foreground color to # e38da4. Shift-drag a short Linear Gradient from the top, then change the Gradient to Radial and add two further gradients from both top corners.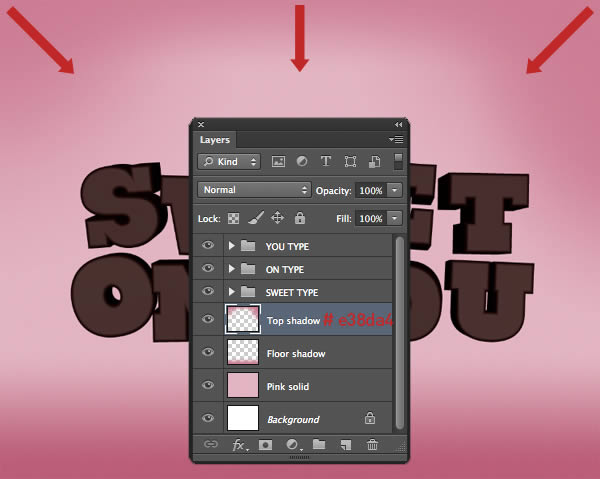
Step 13
Change your Foreground color to # f9f5f7 and add a central Radial Gradient on a new layer called "Inner glow".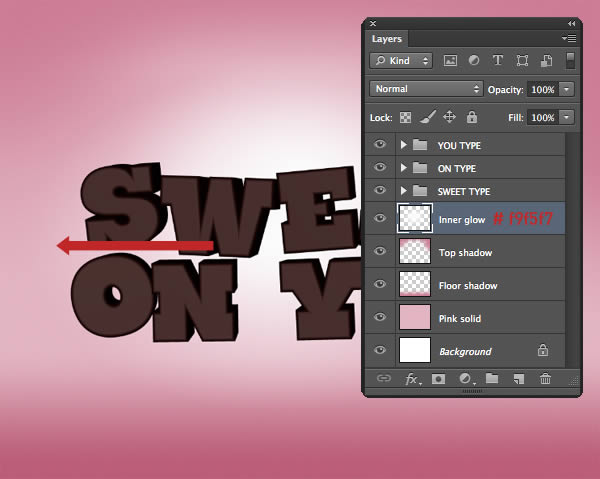
Step 14
Now we’ll add a ground shadow. Grab the Elliptical Marquee Tool and draw a selection below the text as shown. Add a new layer in Multiply Mode above the "Inner glow" and name it "Shadow 1". Set your Foreground color to # d0879c and fill the active selection.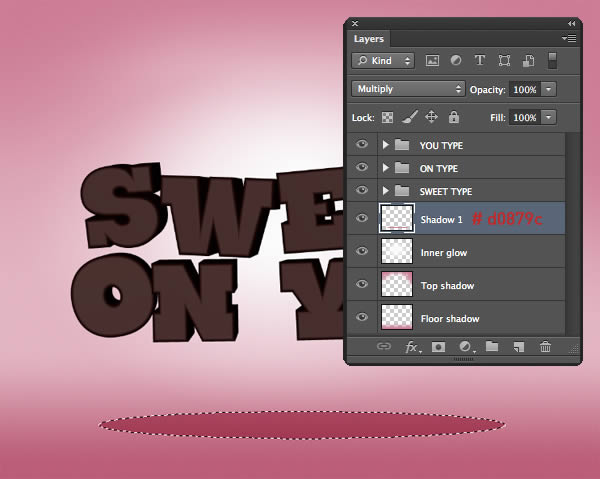
Step 15
Go to Filter > Blur > Motion Blur, set the Angle to 0 degrees and change the Distance to 531px. Next, use the same menu to choose Gaussian Blur and enter a Radius of 15px.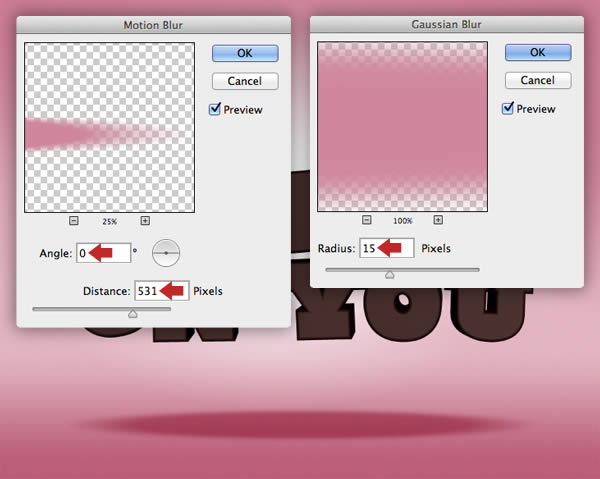
Step 16
Reduce the "Shadow 1" layer to 53% Opacity. Now duplicate and rename it "Shadow 2". Nudge the layer content up slightly, then hit Cmd/Ctrl + T to access Transform and reduce in size as well. Finally, drop the Opacity of this layer to 31%.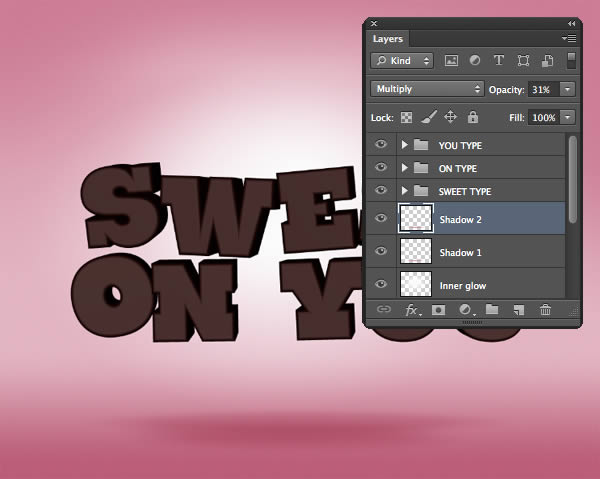
Step 17
To reduce the intensity of the background, add an unclipped Hue/Saturation Adjustment Layer, copy these settings, then reduce the adjustment to 27% Opacity.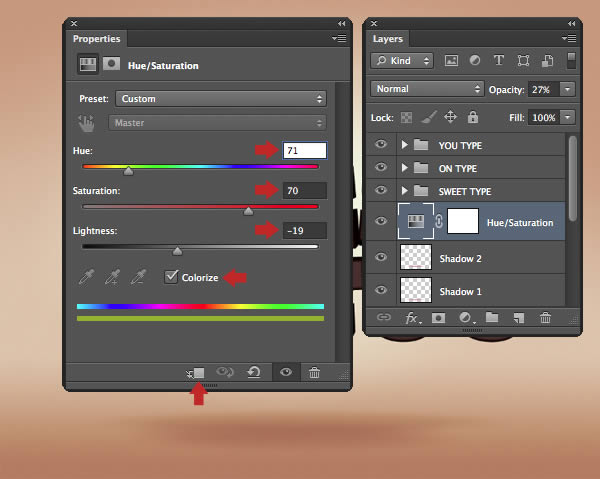
Step 18
To break up the gradient banding and the solid pink, target the "Shadow 2" thumbnail and choose Filter > Noise > Add Noise, enter 3px and activate the Uniform button. Target the remaining layers in turn (as indicated) and hit Cmd/Ctrl + F to reapply the filter. Now place all these layers within a group folder called "BACKGROUND".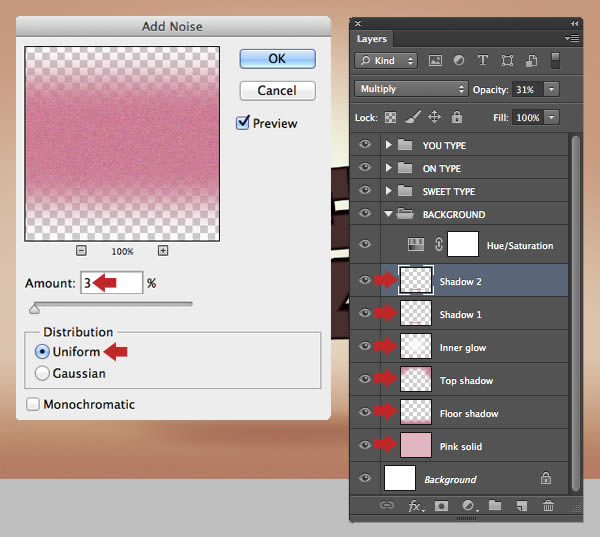
Step 19
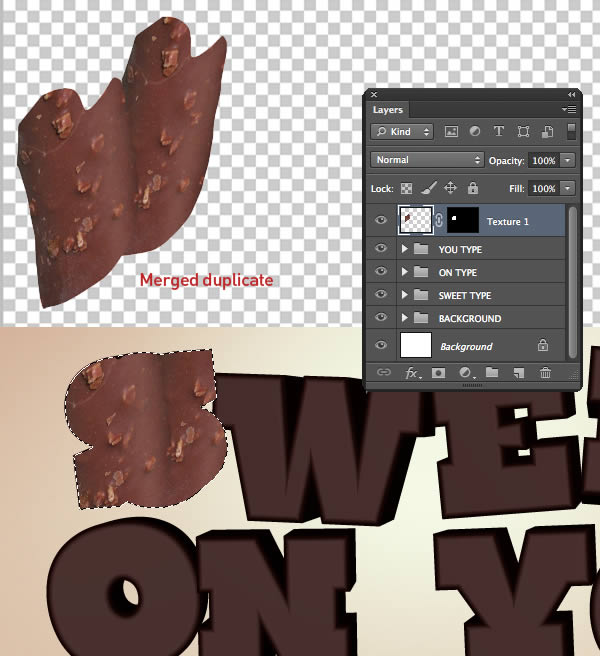
Now we’ll move onto texturing the first letter. Use the Lasso Tool (L) to create a rough selection from this image. Copy > Paste as a new layer above the type folders, then duplicate and reposition next to the original. Use a soft-edged Eraser (E) to blend the hard edge of the duplicate, then hit Cmd/Ctrl + E to Merge Down and name the layer "Texture 1".Transform/position over the letter, then Cmd/Ctrl-click the corresponding text layer to generate a layer-based selection. Ensure your new layer is targeted, then click on the Add layer mask icon located at the foot of the Layers tab.
Step 20
This first layer will appear over the darker extruded areas of the letterform, so add a clipped (to affect this layer only) Levels adjustment and set the whitepoint Output slider to 94.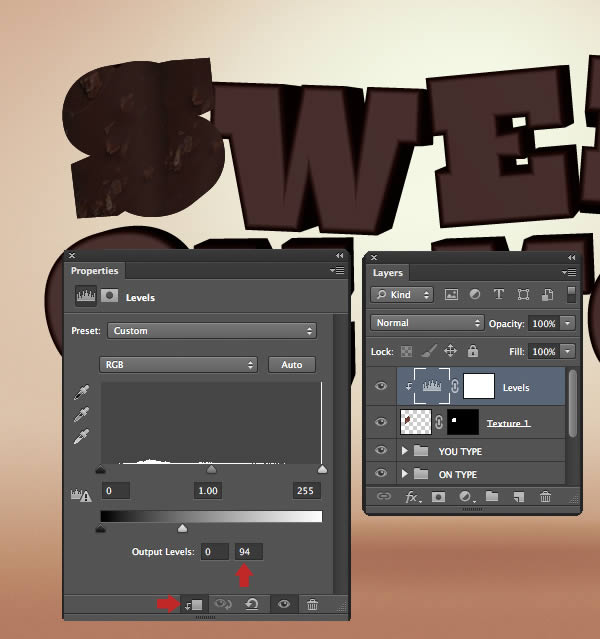
Step 21
Now we’ll add a toffee and chocolate topping. Use the Quick Selection Tool (W) to extract this cookie. Place as a new top layer and transform/position as shown. Add a layer mask, then use an assortment of soft and hard brushes to blend into the top and front face of the letterform. Name this layer "Texture 2".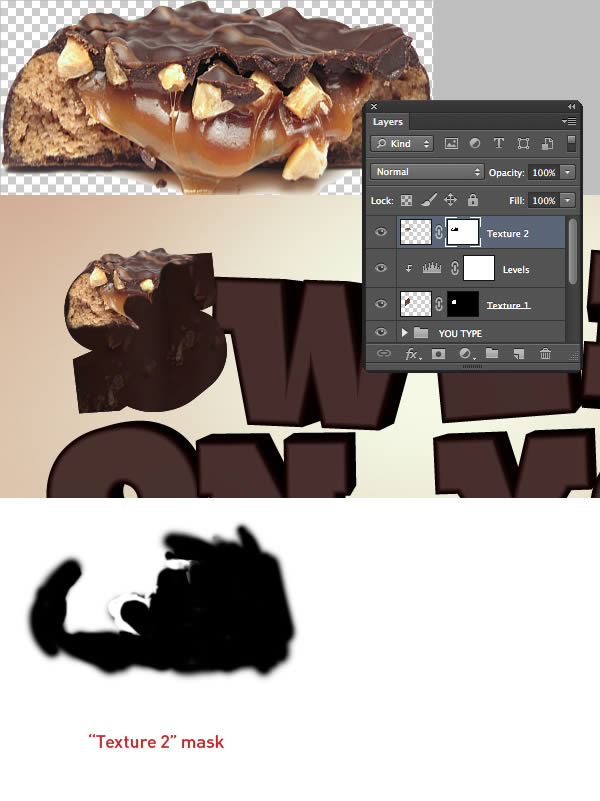
Step 22
Clip a Colour Balance adjustment to "Texture 2" and boost the Reds to +23.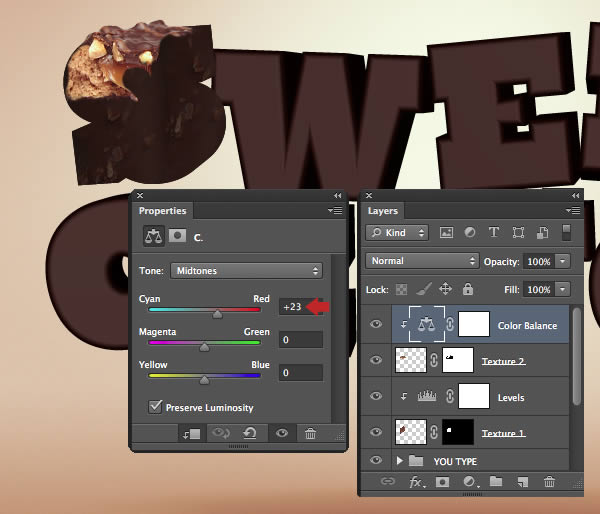
Step 23
Extract the same entire choc ice (as used on Step 19), then rotate, scale and position as a new layer. Name this layer "Texture 3", add a mask, then hit Cmd/Ctrl + I to Invert the mask to black. Now use a selection of white brushes to reinstate the area as shown.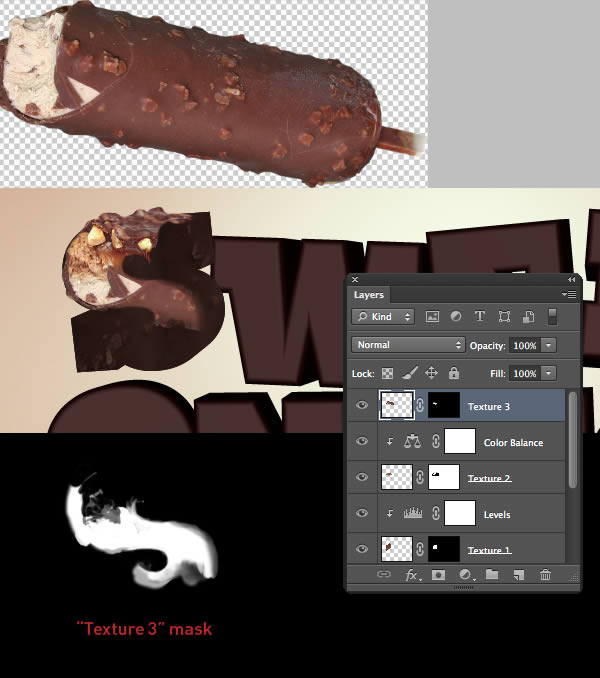
Step 24
Clip a Levels adjustment with these settings to the "Texture 3" layer to darken the midtones.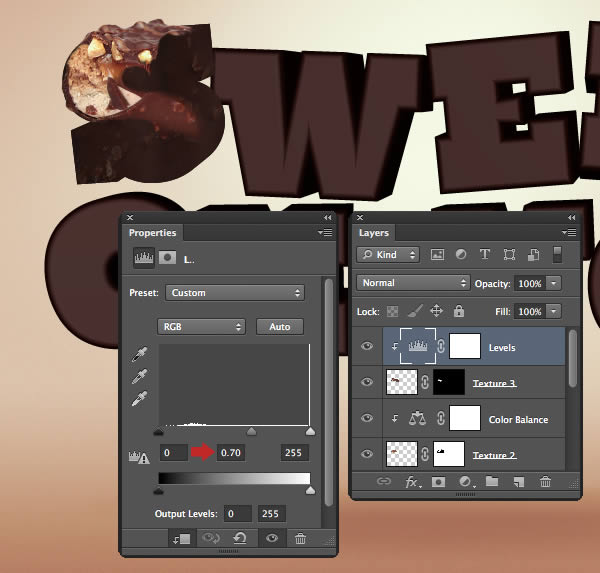
Step 25
Add the same entire choc ice again as a new top layer and label it "Texture 4". Position over the bottom of the letterform, then repeat the masking technique as used the previous layer.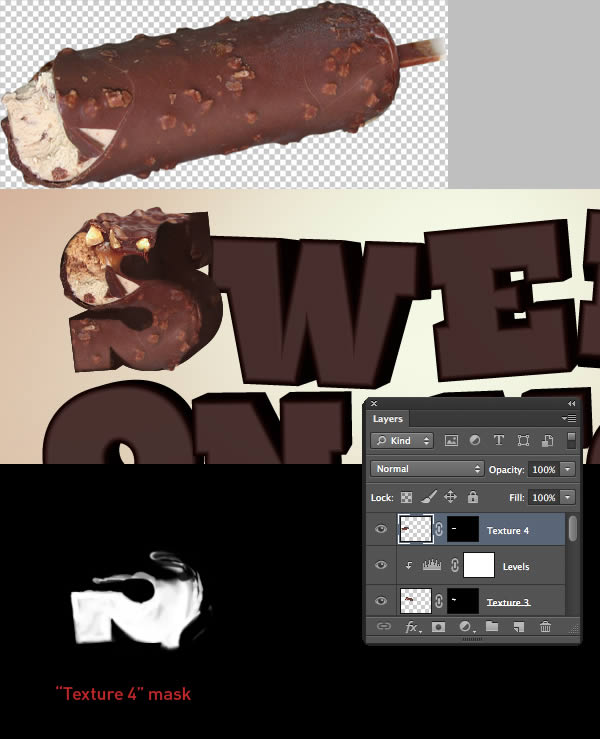
Step 26
Clip another Levels adjustment and increase the midtones on "Texture 4" as well.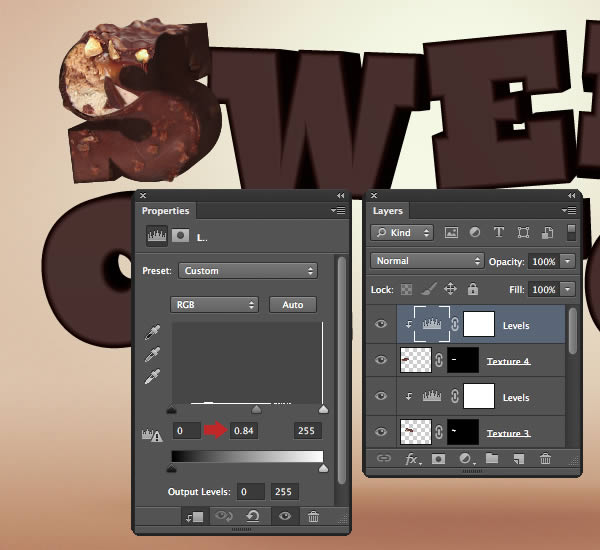
Step 27
Place the same choc ice as a final layer and label it "Texture 5", then mask as shown.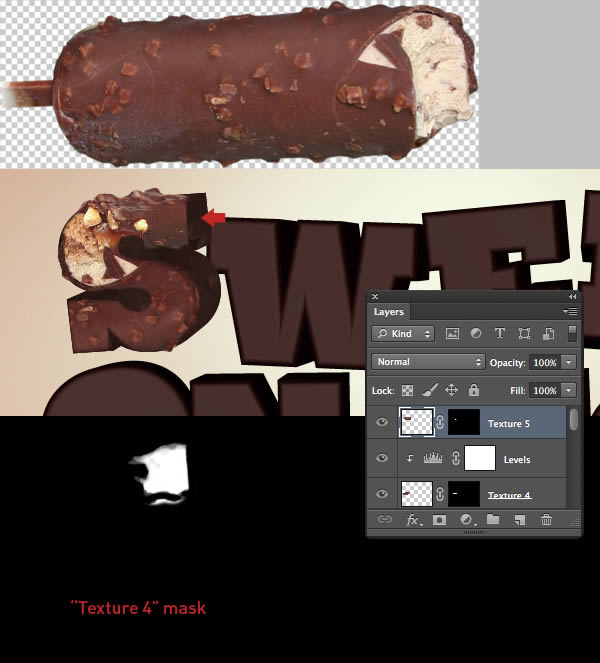
Step 28
Place all these floating layers within a group folder called "LETTER S", then add a mask to the folder. Now paint within a selection from the letter "W" to hide the overlap.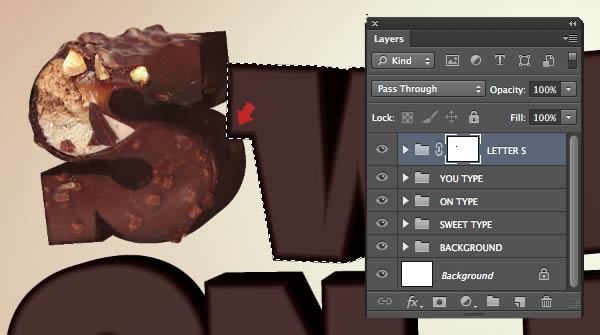
Step 29
Extract this chocolate bar from its background, with the select active, hit Cmd/Ctrl + J to copy as a new layer and disable the visibility of the original layer. Target the new layer, activate the Move Tool (V), then hold Cmd/Ctrl and drag out the top anchor points to remove the perspective.Add this as a top layer called "Texture 1" and resize/position over the second letterform. Reduce the Opacity to 32%, then use a selection from its corresponding type layer to create a mask.
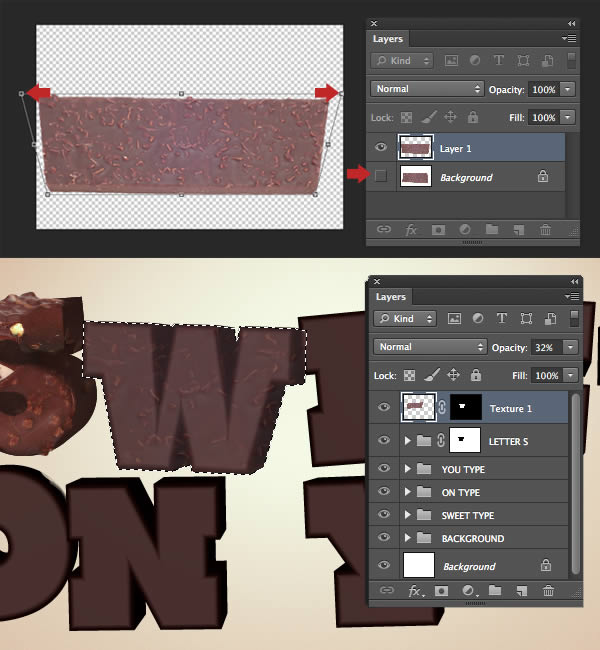
Step 30
Duplicate this layer, rename it "Texture 2" and change the Opacity to 95%. Drag the mask into the trash icon and click Delete in the following window. Temporarily switch off the visibility of both texture layers, then use the Magic Wand (W) to select the front face from the corresponding type layer (shown by the marching ants in the screenshot). Now press Shift + F6 and Feather by 3px, then Select > Modify > Expand By 5px. Finally, click the Add layer mask icon.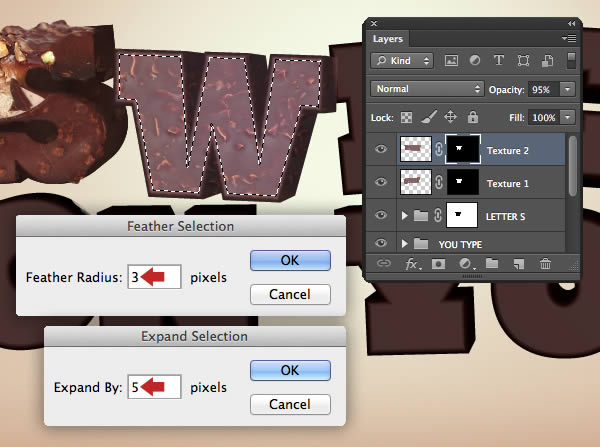
Step 31
Clip a Color Balance adjustment to "Texture 2" and increase the Reds and Yellows.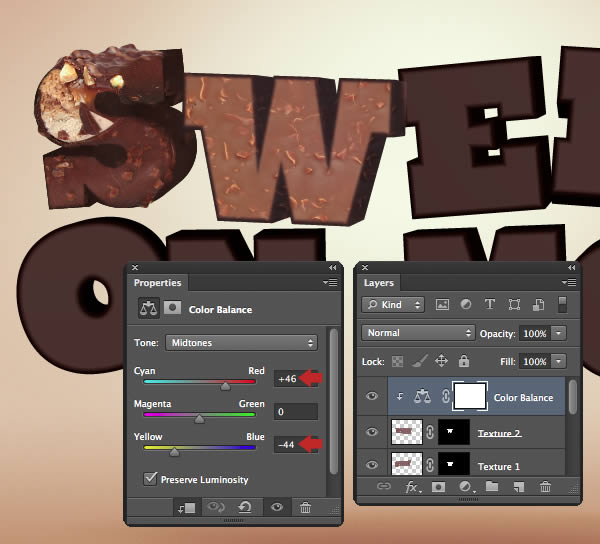
Step 32
Now clip a Levels adjustment to the same layer to boost the contrast.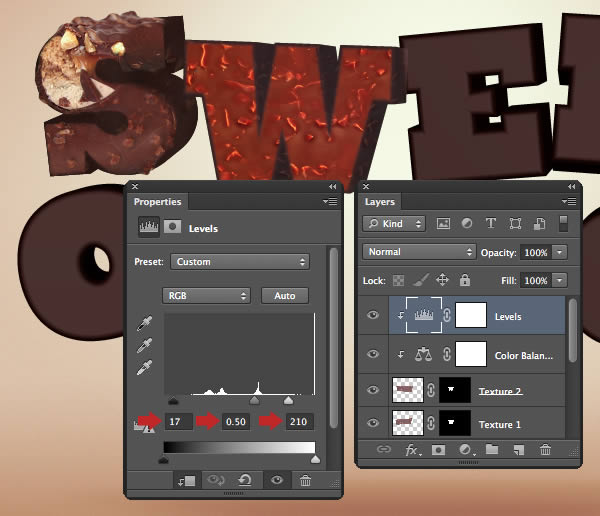
Step 33
Now clip a Hue/Saturation adjustment to the same layer and adjust the Master, then the Reds and Yellows as shown.
Step 34
As a final modification, clip a Selective Color adjustment to the same layer and increase the Blacks to +72. Add all these floating layers into a group folder called "LETTER W"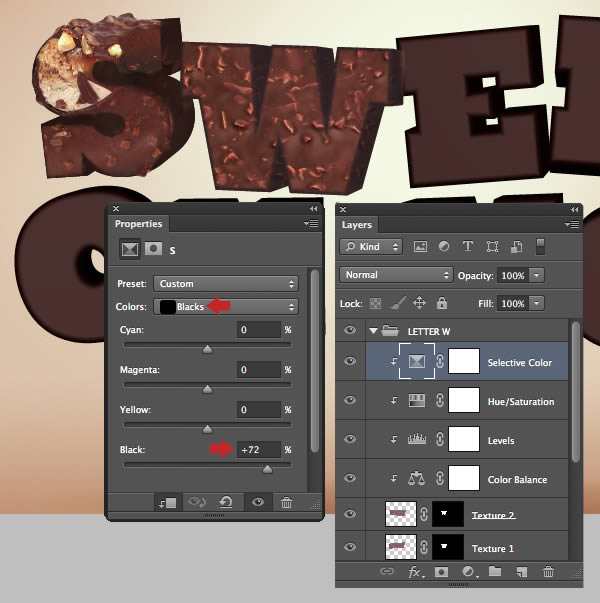
Step 35
Repeat the process as detailed in Step 19 to add and mask this image. This texture only need to cover the extruded areas, so don’t worry if it falls short on the left. Name this layer "Texture 1"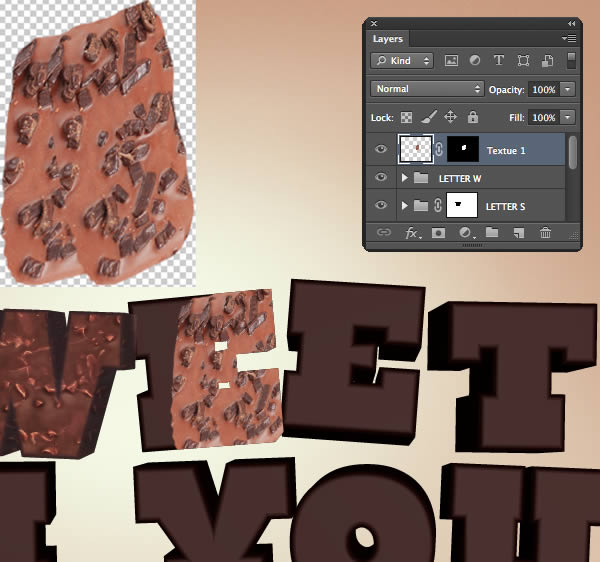
Step 36
Clip a Levels adjustment to the "Texture 1" layer and set the Output whitepoint value to 59 to darken it.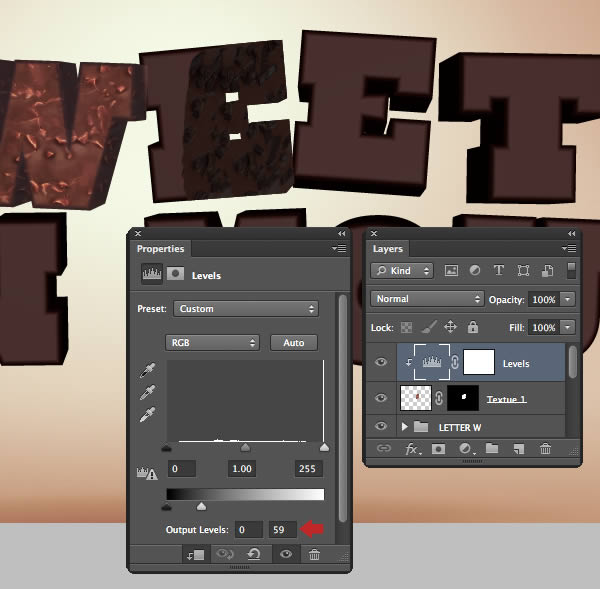
Step 37
Add the same image again and name it "Texture 2". Now apply the same masking technique as detailed in Step 30.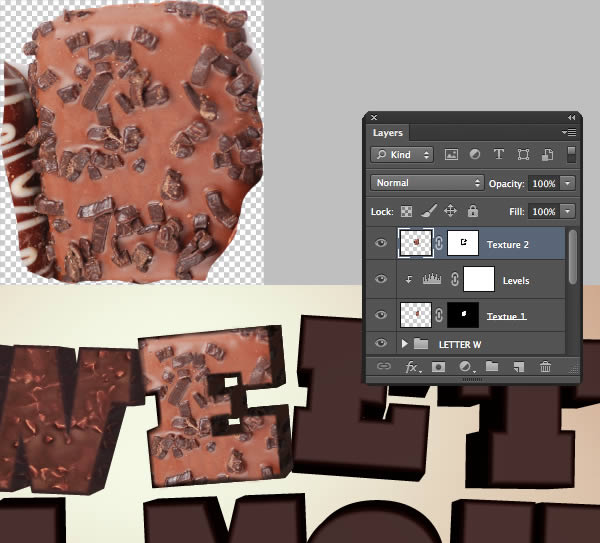
Step 38
Clip a Levels adjustment to "Texture 2" and copy these settings. Place these layers within a group folder called "LETTER E1".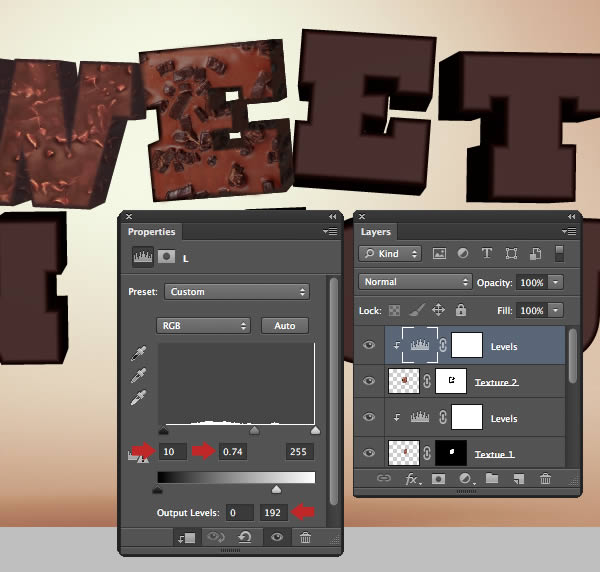
Step 39
Now clip a Hue/Saturation adjustment to the same layer and reduce the Reds Saturation to -15.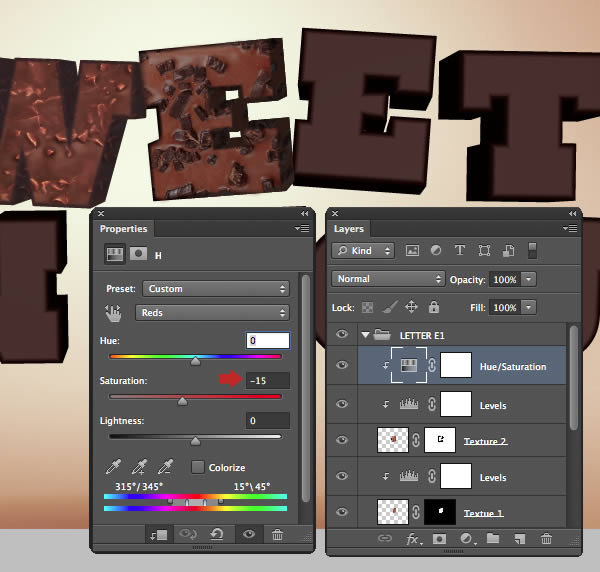
Step 40
Extract and place this image over the next letterform. Mask, then lower the Opacity to 45% and name it "Texture 1".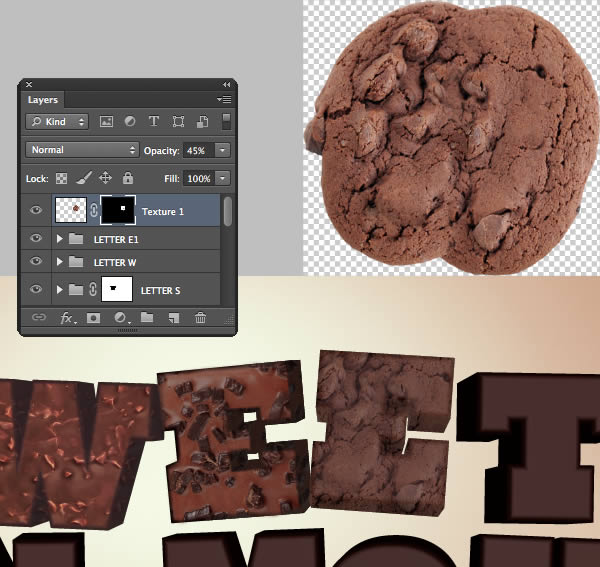
Step 41
Modify the mask with a black-filled selection from the face of the corresponding text layer.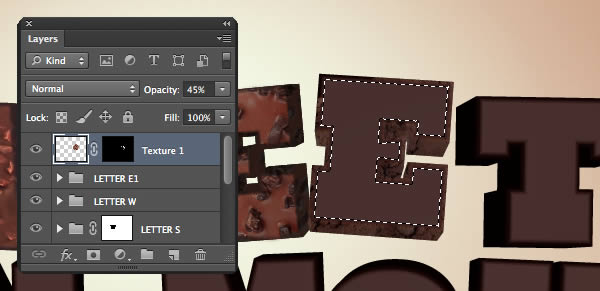
Step 42
Clip a Levels adjustment to the "Texture 1" layer and adjust the midpoint slider to 0.84.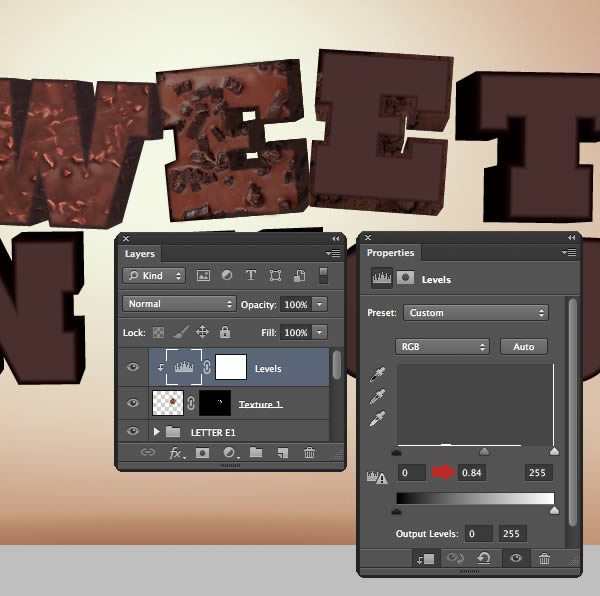
Step 43
Add the same texture as a new layer, label it "Texture 2" and mask as shown, including the top bite mark.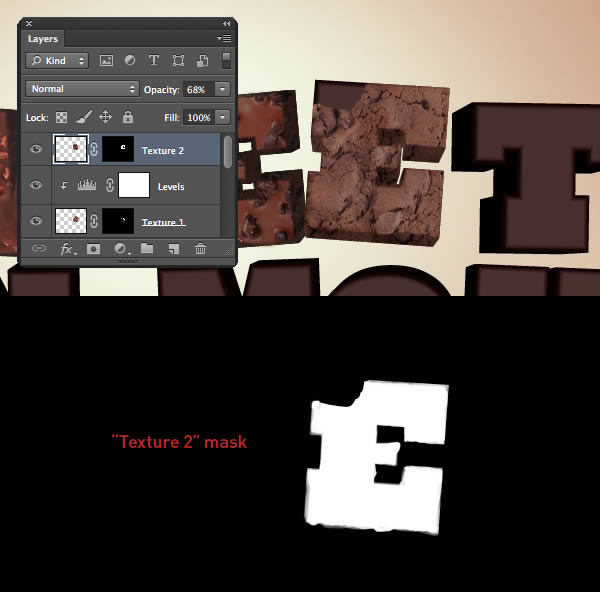
Step 44
Clip a Levels adjustment to the "Texture 2" layer and copy these settings.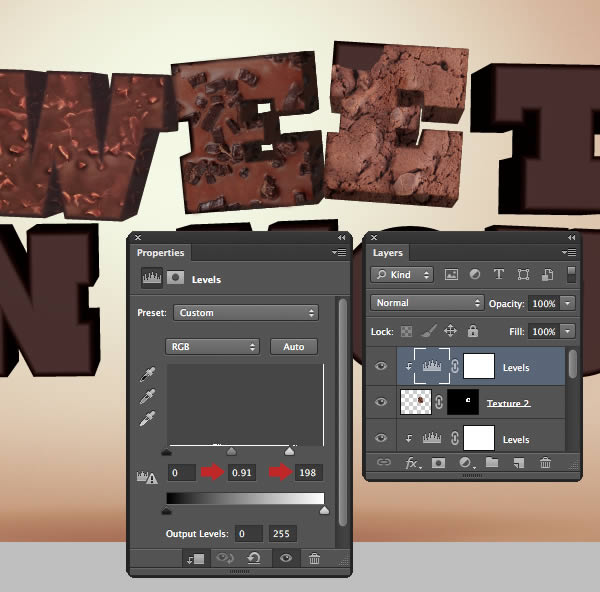
Step 45
Now clip a Color Balance adjustment to the same layer.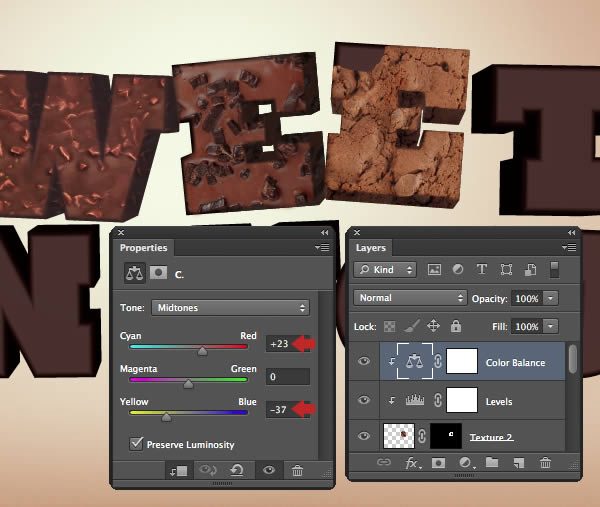
Step 46
Extract the right-hand broken portion from this image. Position over the bite, then access Warp (via the Transform menu) to bend it into shape. Add a mask and gently blend the edges into the underlying texture. Name this layer "Texture 3".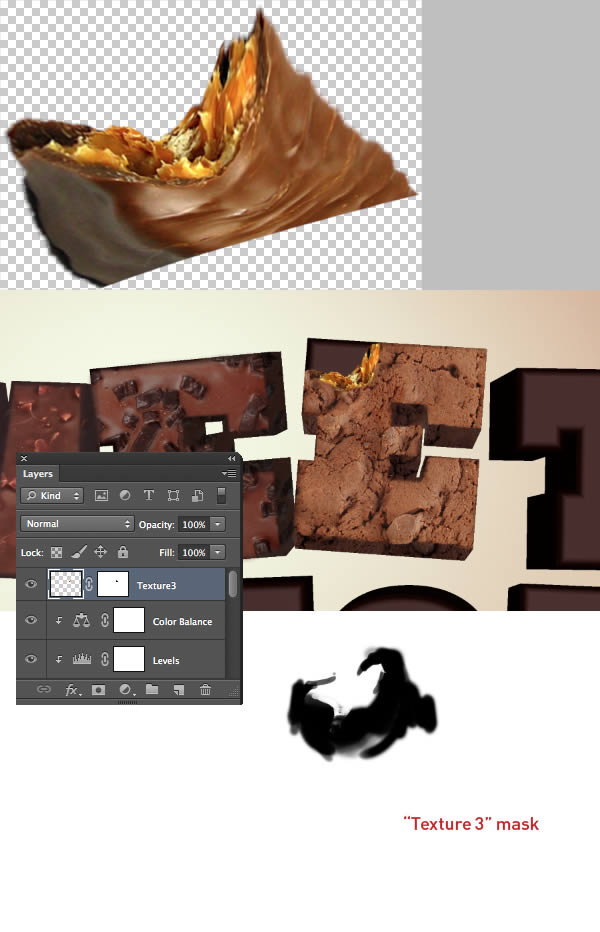
Step 47
Clip a Hue/Saturation adjustment to this layer and modify the Reds and Yellows as shown. Now place all your floating layers into a group folder called "LETTER E2"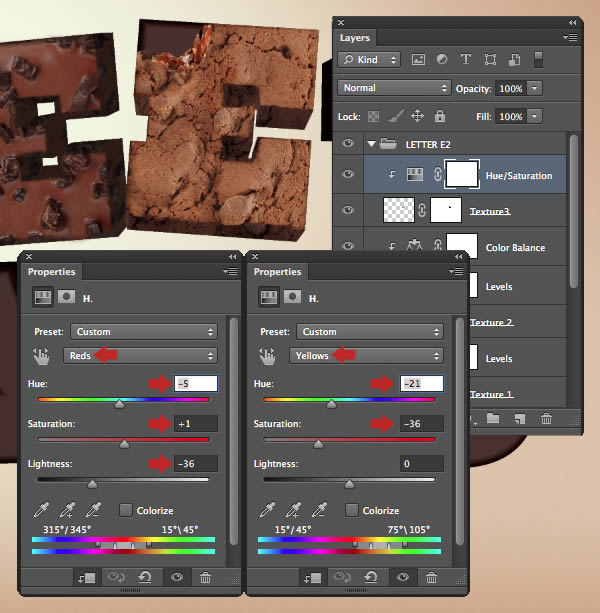
Step 48
Finally, add a mask the original type layer and hide the area interfering with the bite mark.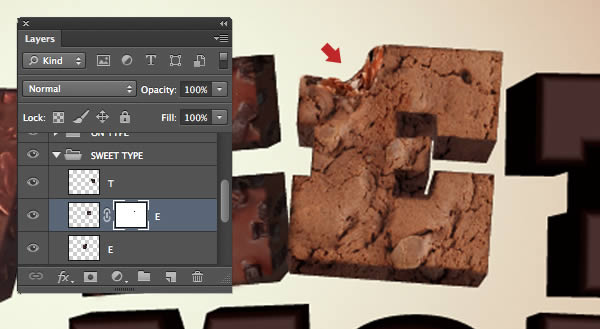
Step 49
Extract and add this image as a new layer and name it "Texture 1". Use the same masking technique so only the extruded areas are visible, then reduce the Opacity to 90%.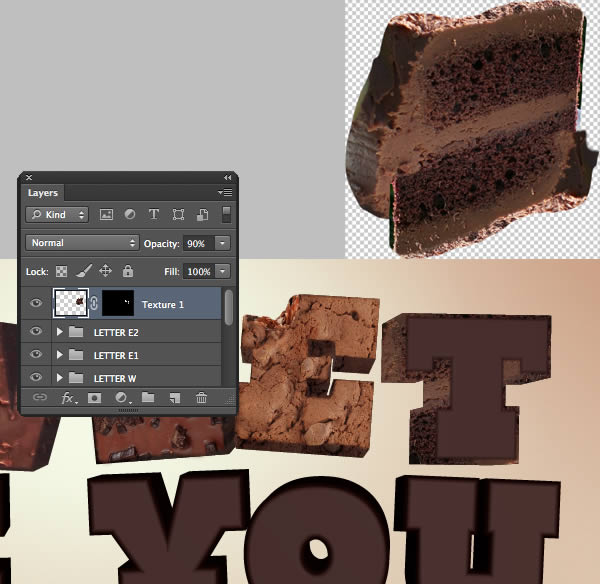
Step 50
Clip a Levels adjustment to this layer and copy these settings.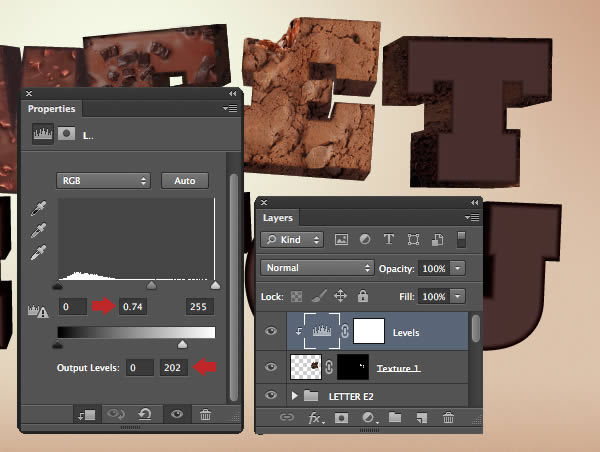
Step 51
Add the same cake texture as another layer and label it "Texture 2". Now mask, so just the front face is visible.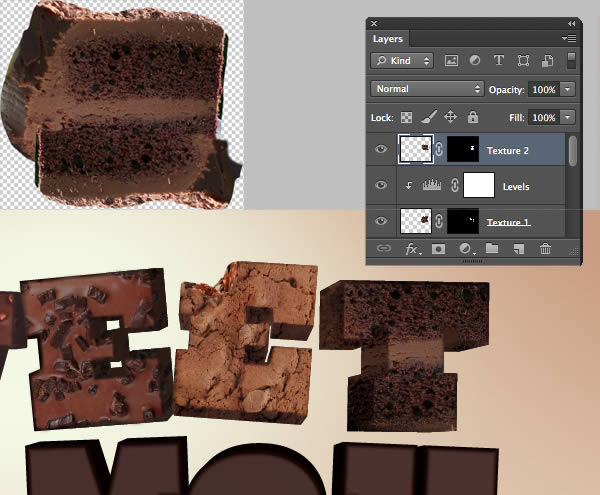
Step 52
Clip a Color Balance adjustment to the "Texture 2" layer and apply the following settings.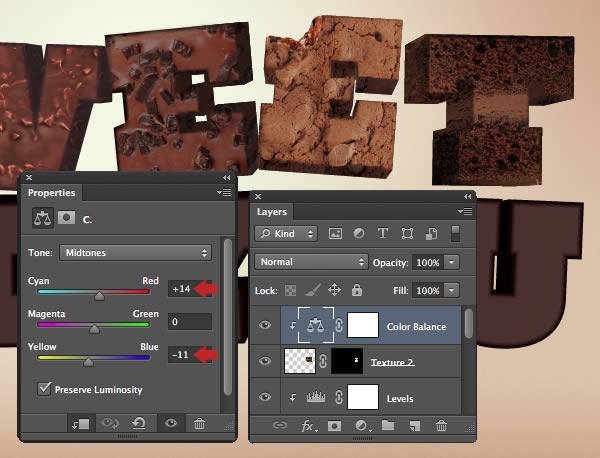
Step 53
Now clip a Levels adjustment to the same layer.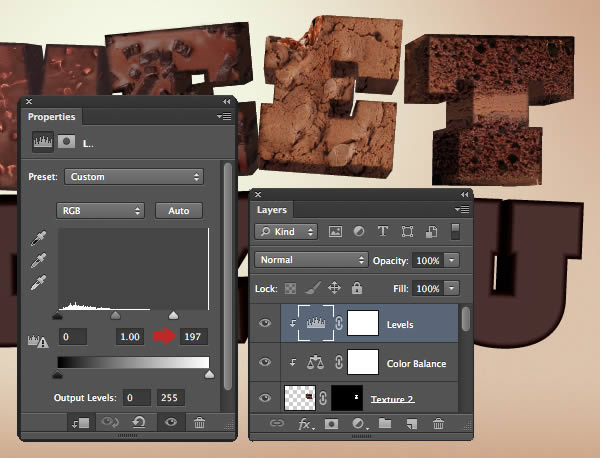
Step 54
Add the same cookie texture as used on the very first letterform and name it "Texture 3". Position as shown, then blend with a mask.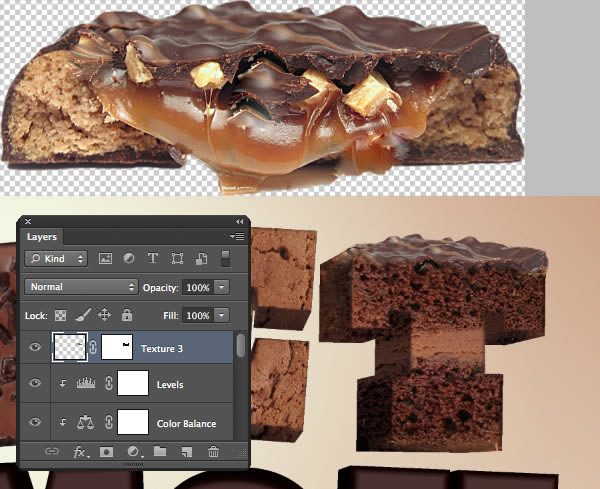
Step 55
Clip a Color Balance adjustment to this layer, then increase the Red to +17 and the Yellow to +7. Now clip a Levels adjustment to the same layer and change the midpoint to 0.67 and the whitepoint to 215. You can now place these layers into a group folder called "LETTER T".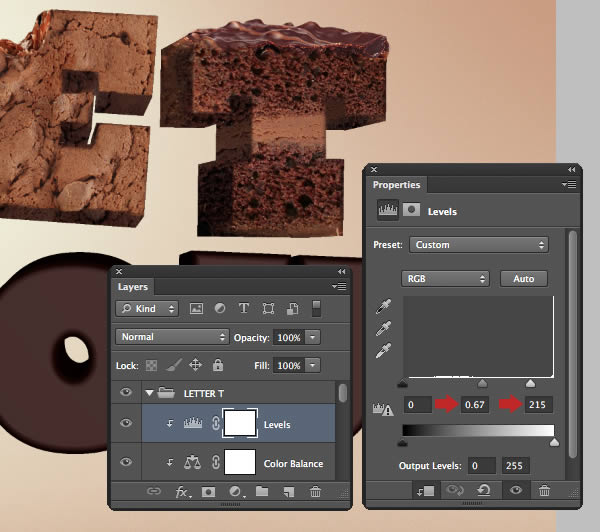
Step 56
The letter "O" will be more straightforward. Extract and place this image as a new layer. Resize to cover the letterform and label it "Texture 1". Use a selection from the corresponding text layer to create a mask, then deselect and carefully paint back areas as required around the outer edge and centre hole.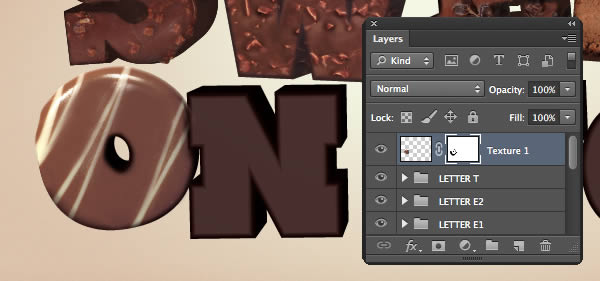
Step 57
Clip a Levels adjustment to this layer and copy these settings to darken the texture. Place these two layers into a group folder called "LETTER O1".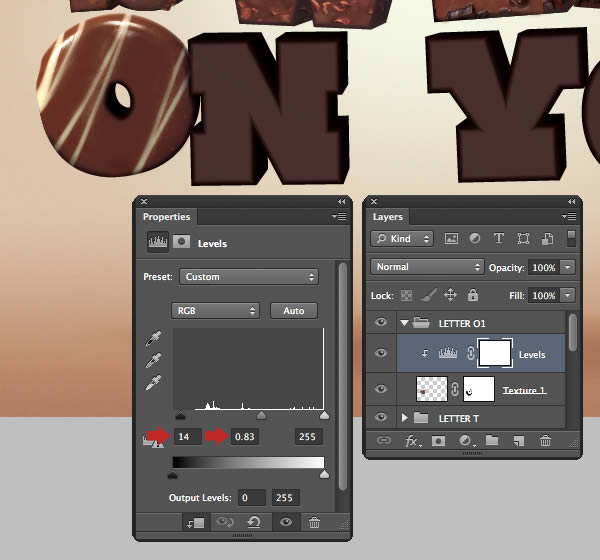
Step 58
Lasso a rough selection from the darker edge of this image. Copy > Paste several times and position over the extruded areas of the next letterform. When you’re happy Merge them and name the layer "Texture 1". Now use the original type layer to create a mask.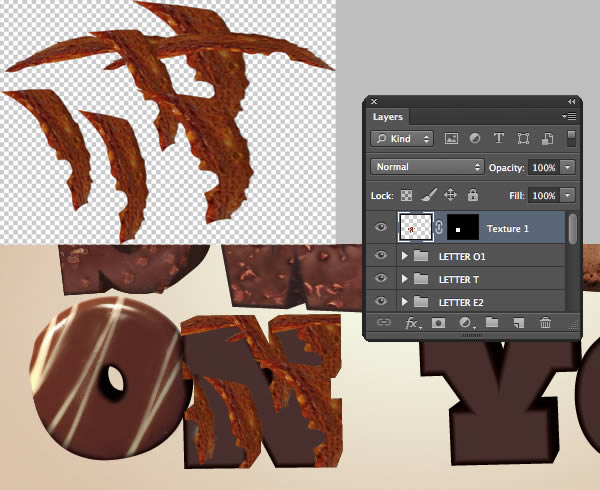
Step 59
Clip a Levels adjustment to the "Texture 1" layer and set the midpoint to 0.86 and the whitepoint to 236. Extract the same cake image from it’s background, then duplicate, offset and merge as you did with the very first letterform texture. Add as a new layer, then position and mask as shown. Name this layer "Texture 2". Place all these layers into a group folder called "LETTER N".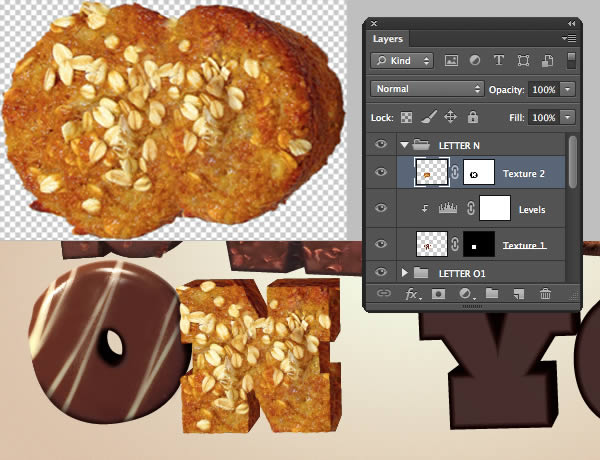
Step 60
Repeat the process to add merged segments from this image as a new layer over the next letterform. Mask as shown, then name this layer "Texture 1".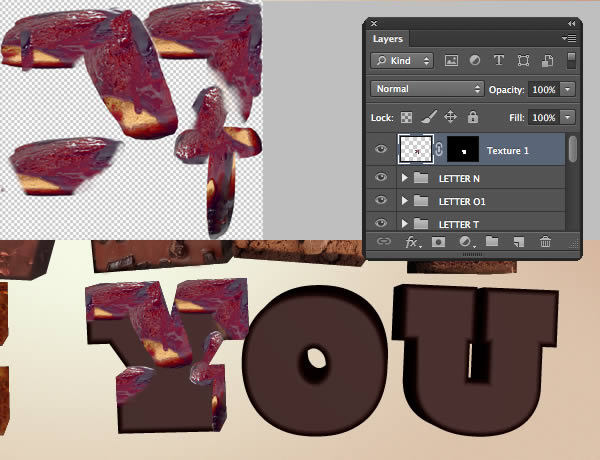
Step 61
Clip a Levels adjustment to this layer and set the whitepoint output slider to 148. Next, clip a Color Balance adjustment to the same layer and copy these settings.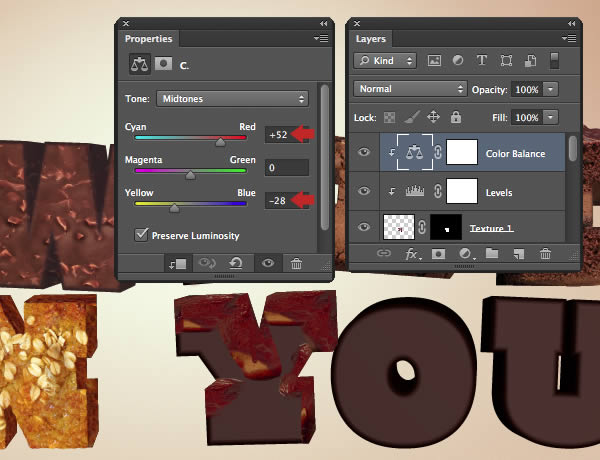
Step 62
Roughly extract the same cake from its background and place as a new layer. Duplicate a feathered central portion and enlarge/stretch as shown. Merge both layers, then mask so only the front face is visible. Name this layer "Texture 2".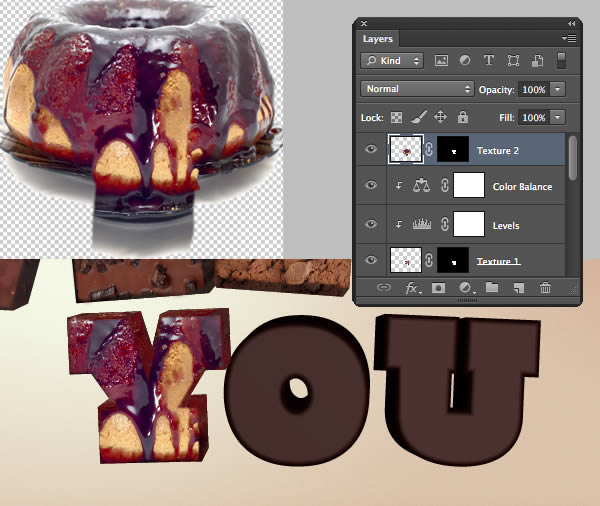
Step 63
Clip a Color Balance adjustment to this layer and apply the following settings. Add these layer into their own group folder called "LETTER Y".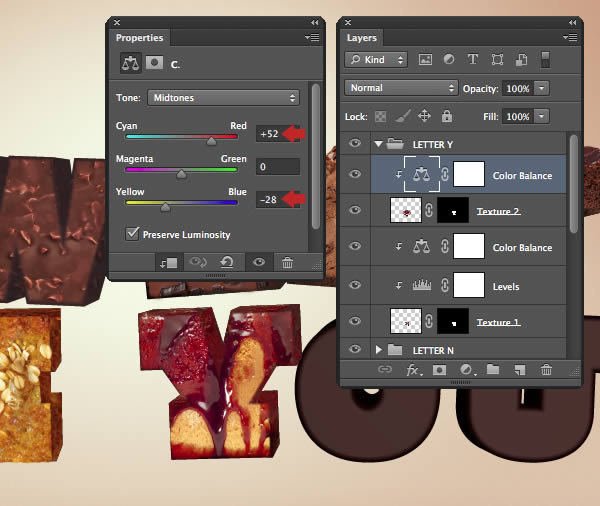
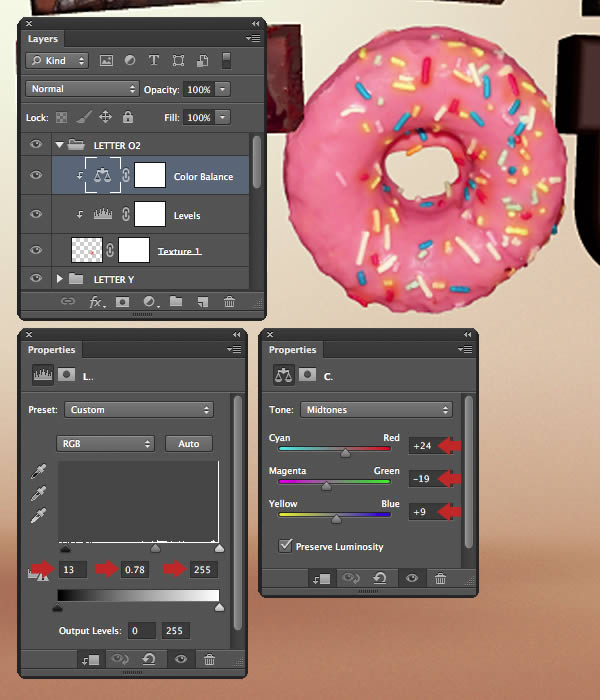
Step 64
The next letterform will be fairly easy to create. Open the "Donut.jpg" from the "source" folder and extract it from its background. Place as a new layer, then Transform to fit. Name this layer "Texture 1", then disable the visibility of the original type layer.Now clip two adjustments to this layer –: Levels and Color Balance with the following settings. Place these layers within a group folder called "LETTER O2".
Step 65
Extract and add this image and position over the final letterform. Transform and mask to reveal the extruded type area, then name the layer "Texture 1".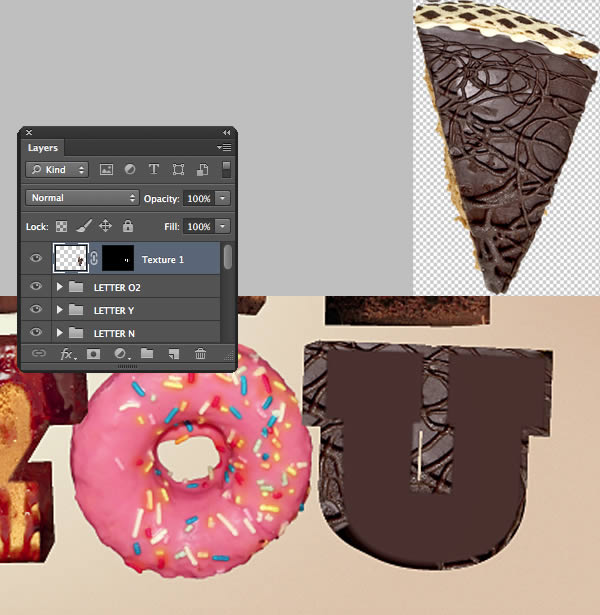
Step 66
Clip a Levels adjustment to this layer and copy these settings to darken it.
Step 67
Place the same cake texture as another layer and label it "Texture 2". Resize and position, then reduce the Opacity to 48%. Now mask so just the front face is visible.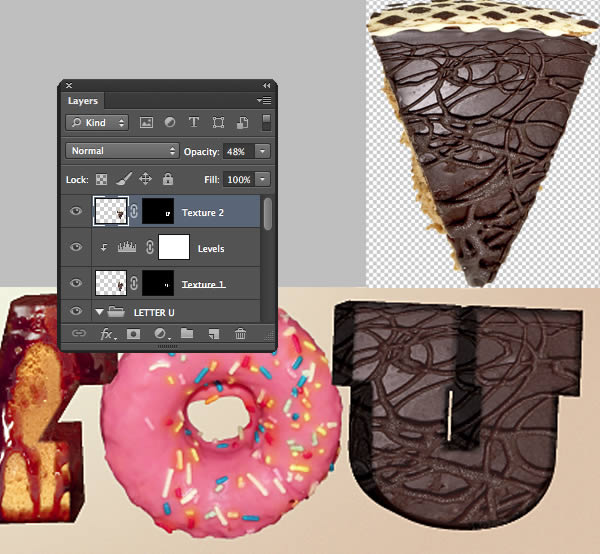
Step 68
Clip a Color Balance adjustment to this layer and copy the following settings.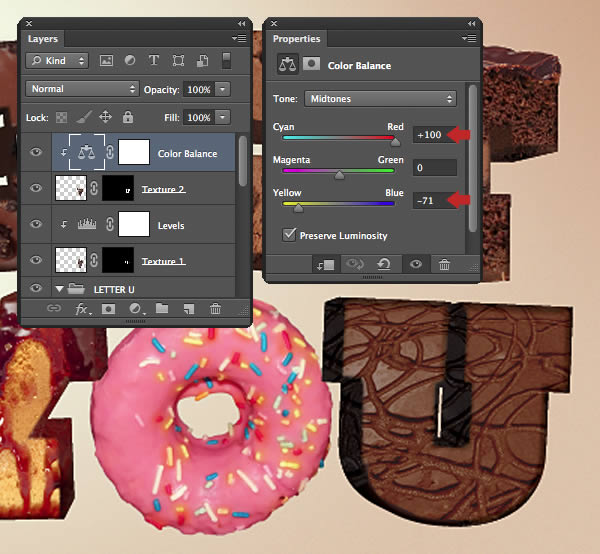
Step 69
Extract and place this image as a new layer and label it "Texture 3". Flip horizontal, rotate, resize and position as shown, then blend with a mask as shown.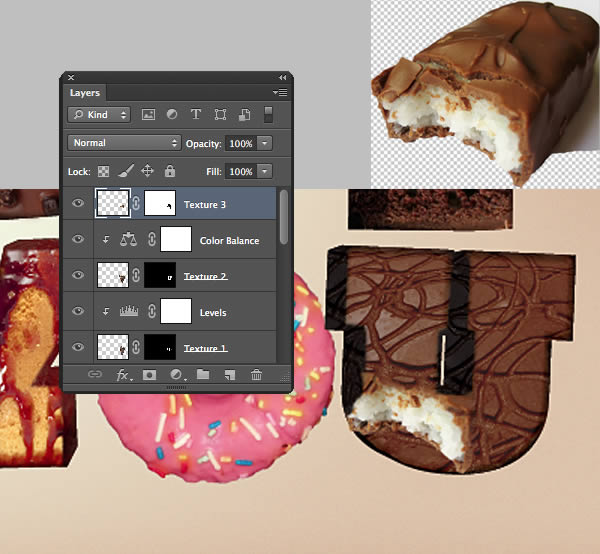
Step 70
Clip a Levels adjustment to this layer and copy these settings to darken it.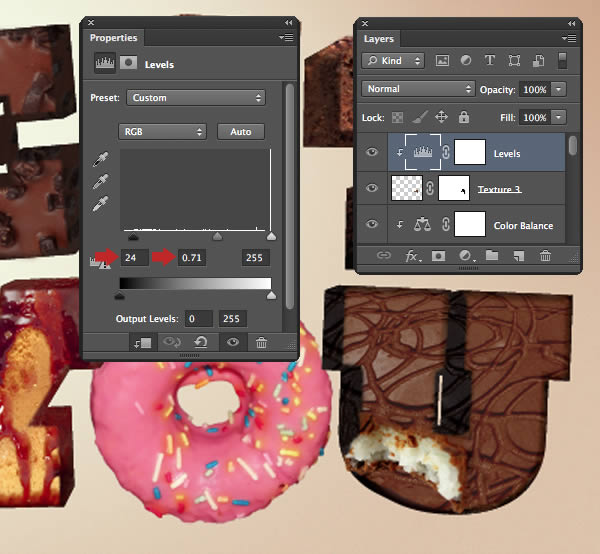
Step 71
Clip a Color Balance adjustment to the same layer, then mask the original type layer to reveal the bite mark. Finally, add all these layers into a group folder called "LETTER U".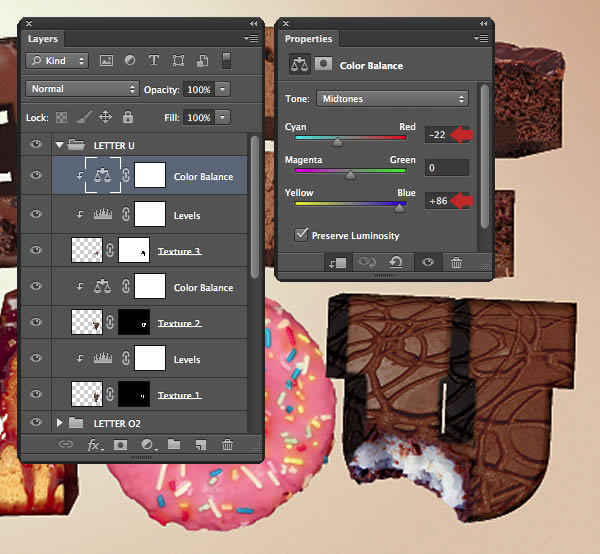
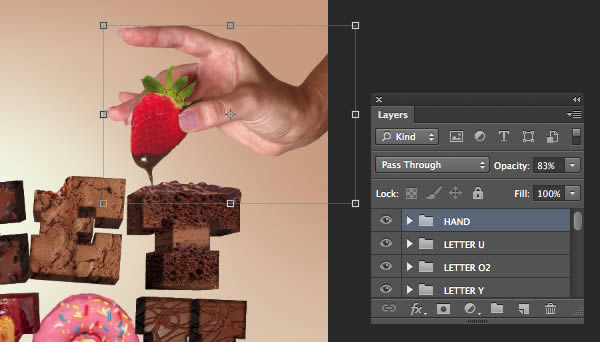
Step 72
Next, we’ll move onto creating the hand/strawberry layered file. Open the hand image and Crop (C) the excess background.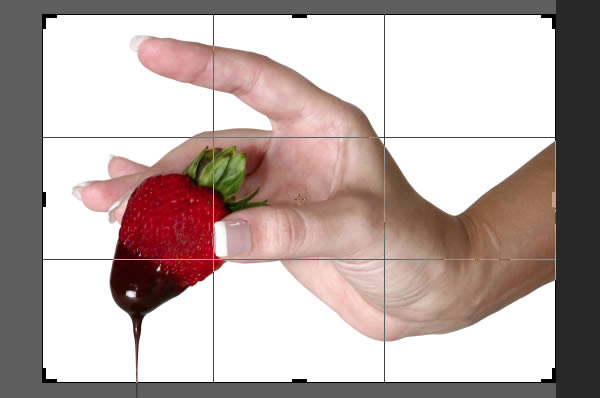
Step 73
For this image we’ll need an accurate selection, so grab the Quick Selection Tool (W) and select the white background.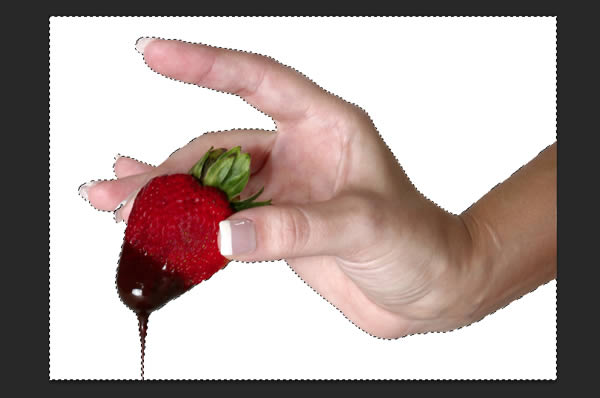
Step 74
Hit Shift + Cmd/Ctrl + I to Inverse your selection, then click the Refine Edge button in the Options bar. In the next window choose On Layers (L) from the View Mode drop-down menu, copy these settings and click OK.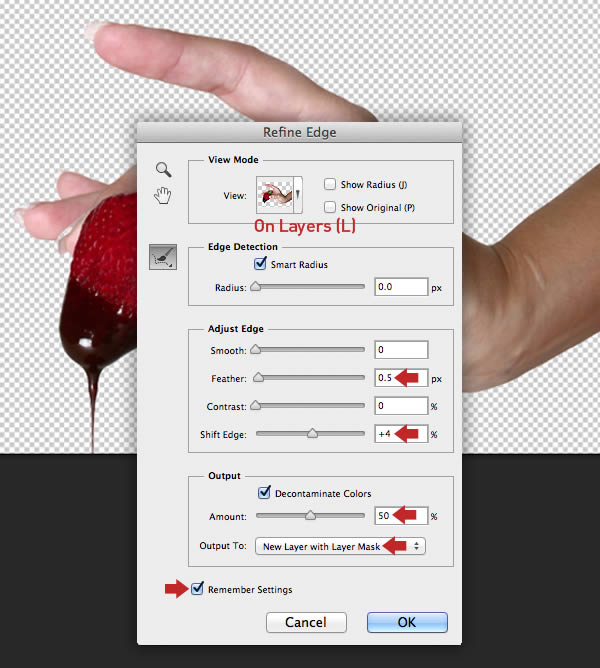
Step 75
You’ll now see a masked duplicate layer appear and the visibility of the original layer disabled. Drag the mask into the trash icon and click Apply in the next window, then delete the original layer.The existing strawberry less than photogenic, luckily this is easy to fix. Open this image and use the same selection/Refine Edge workflow to extract it. Delete/Apply the mask, then add as a new layer and resize, position over the hand.
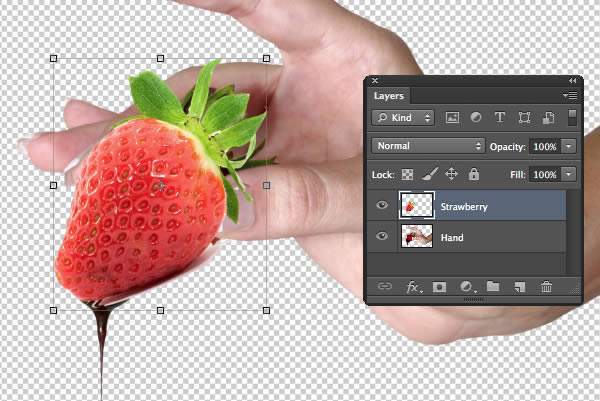
Step 76
Now add a mask and carefully blend the new strawberry into hand.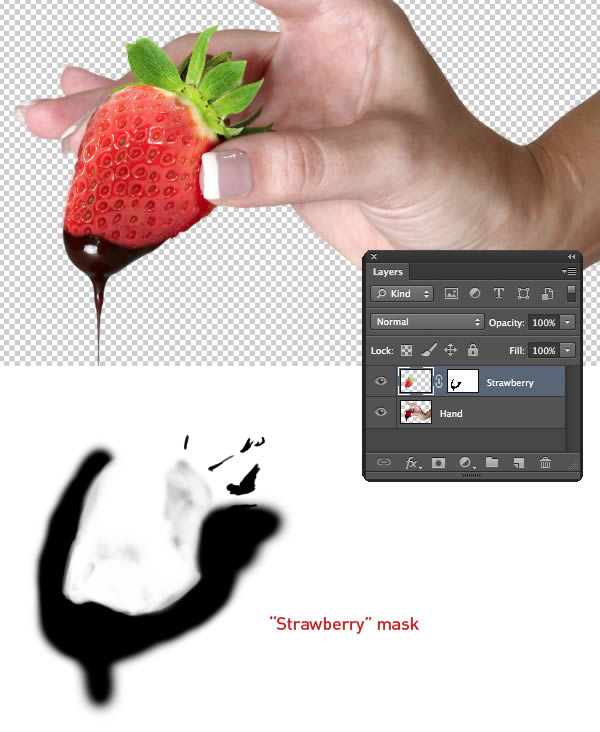
Step 77
Clip a Hue/Saturation adjustment to the "Hand" layer and slightly increase the Saturation levels as shown.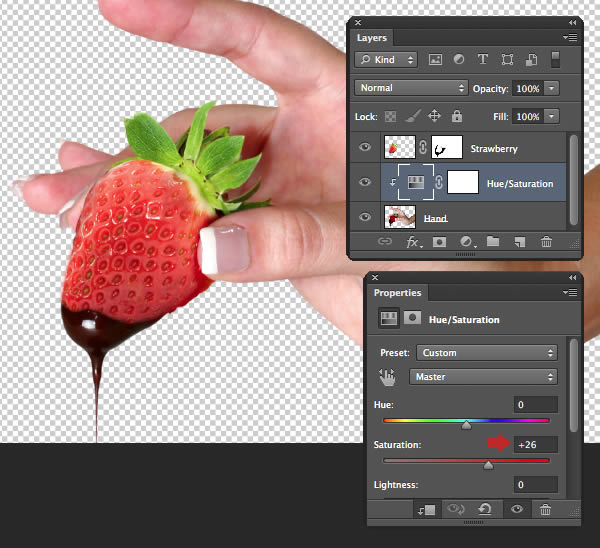
Step 78
Now clip a Levels adjustment to the "Strawberry" layer to increase the contrast.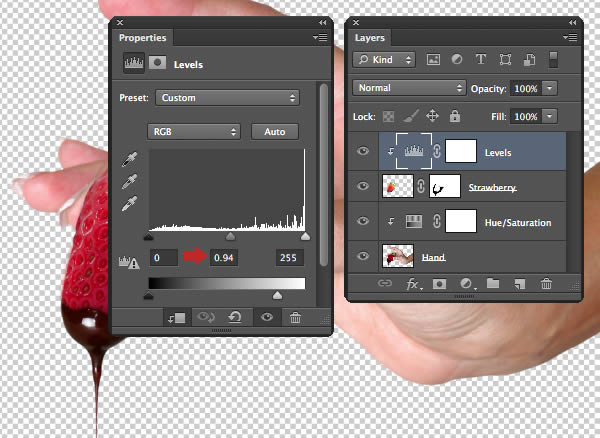
Step 79
Set the Clone Stamp Tool (S) to Current & Below, then fix any minor flaws in the hand on a new layer above the Hue/Saturation adjustment layer.
Step 80
Add another layer in Overlay Mode ("Nails") above the "Hand retouch" layer. Sample a color from the nail varnish (I used # 814564) and paint over the nails to accentuate them. To remove any overpainting, create a layer-based selection from the "Hand", Inverse and hit delete on the new layer.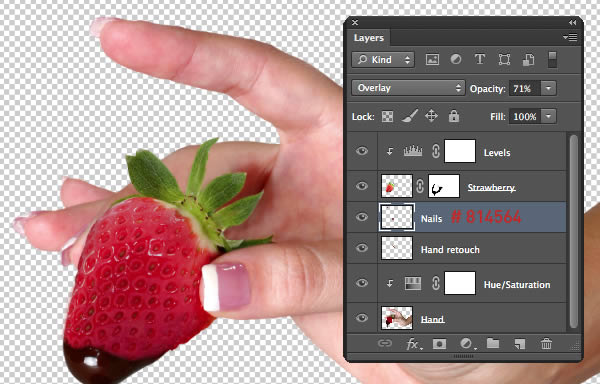
Step 81
Clone over the white edges of the nails as indicated on a new layer ("Nails retouch") and use the same method as the previous step to delete any excess. Now place all these layers into a group folder called "HAND".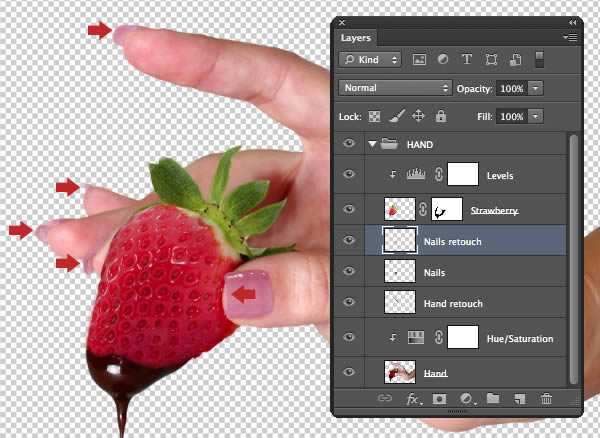
Step 82
Drag the folder thumbnail into your project file and resize/position as shown. If you notice any edge halos on the "Hand" layer, target it and go to Layer > Matting > Defringe and enter a pixel or two.At this stage you may want to clip some more adjustments to the "Hand" and "Strawberry" layers so they sit more comfortably in the composition.
Step 83
Use the selection/Refine Edge extraction workflow on "Choc_1.jpg" and "Choc_2.jpg" (found in the "source" folder) to add some puddles of chocolate. Use the techniques you’ve learnt to clip relevant Adjustment Layers and also recolor some to resemble drops of jelly. Place these layers within a new top folder called "ELEMENTS".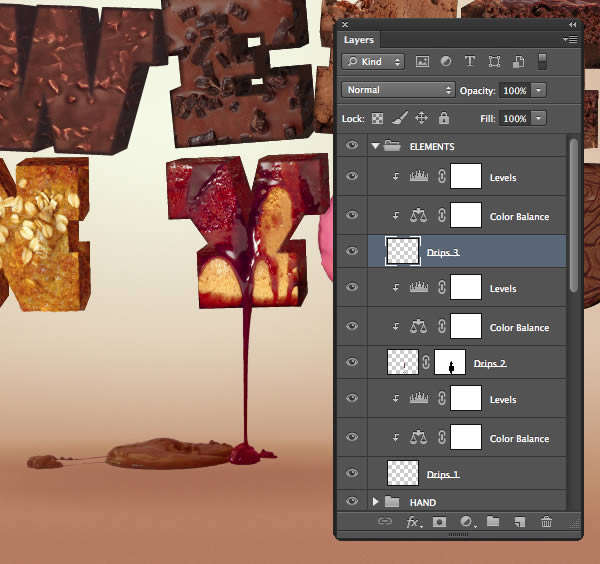
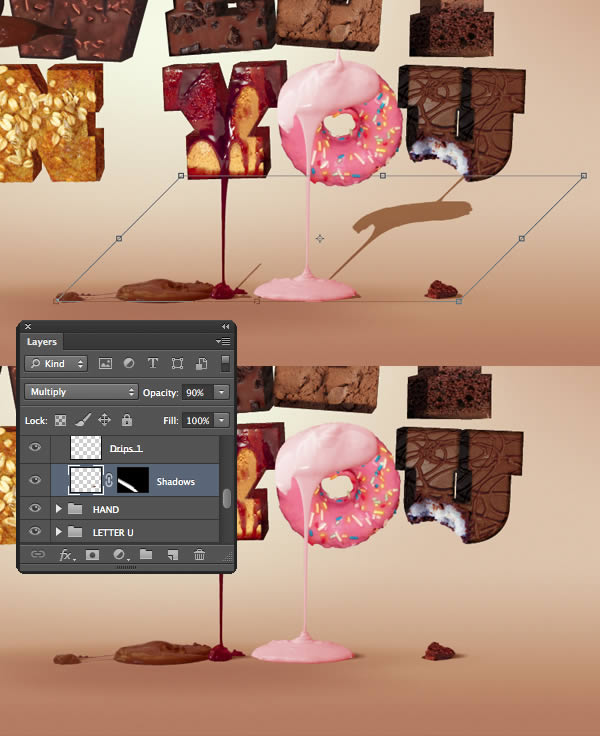
Step 84
Extract and add the "White_choc.jpg", then Warp over the donut and mask accordingly. Clip a Levels adjustment to boost the contrast and a Hue/Saturation adjustment to recolor it pink. Next, select a a small area from this image and place as a small cookie crumb within the "ELEMENTS" folder.Add a blank layer in Multiply Mode at the bottom of the stack within the same folder. Now fill selections from all your drips and crumb with dark brown. Transform as shown, then apply the same blurring and noise as you did at the start of the tutorial for the main shadow. Finally, reduce the Opacity to 90% and mask with some black to transparent gradients.
Step 85
Place a new layer above all the group folders and name it "Retouch". Now Grab the Clone Stamp Tool (S) and use a small brush at around 50% Hardness to clone around the edge of the lettering to make it less uniform.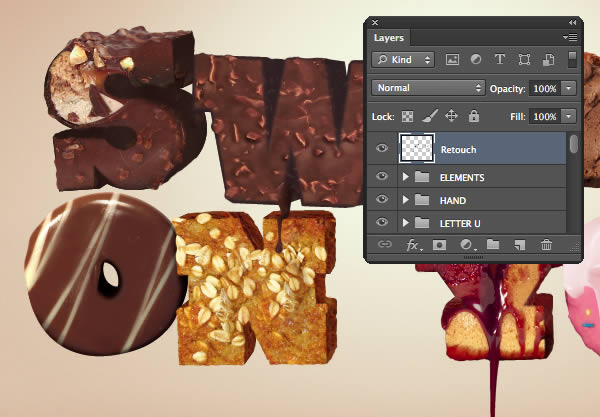
Step 86
To wrap up, we’ll add some overall sharpening. Place an empty layer at the top, then go to Image > Apply Image. Set the Blending to Normal in the following window and hit OK (This command creates a composite from all visible layers). Name this layer "High pass". Choose Filter > Other > High Pass and enter 3px. Change the Blend Mode to Overlay to render the grey invisible, then place both floating layers into a group folder called "FINAL RETOUCH".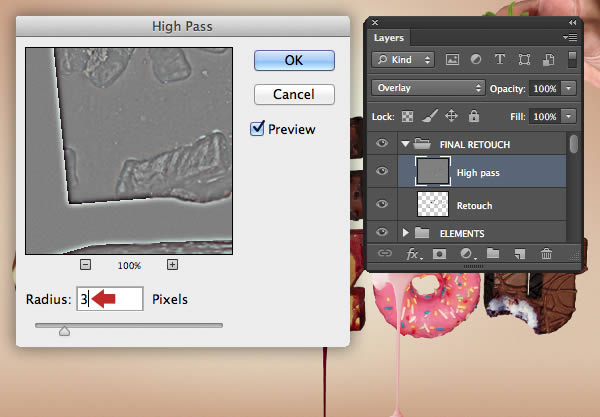
Conclusion and Scope
I hope you’ve enjoyed this tutorial and discovered some new techniques along the way. I also hope it inspires you to create your own 3D typographic illustrations!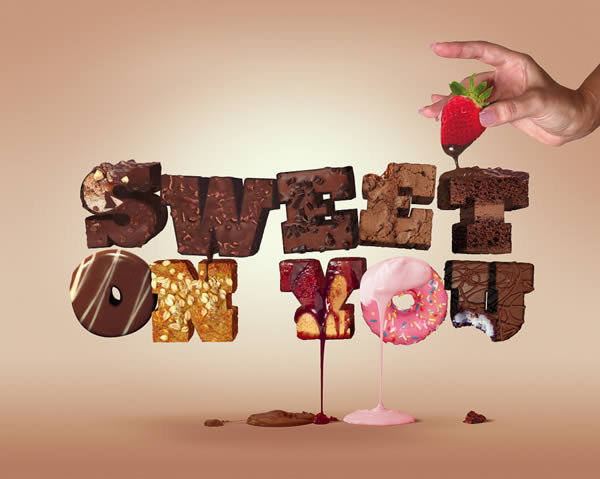
Comments
Post a Comment