In this tutorial, we will create a nice bright colorful light text effect.
The Final Result:
 Notes:
* the software used in this tutorial is Adobe Photoshop CS5 Extended
* the size of the final result image is 1024 * 768
* you might want to check the Basix Page to see some useful topics on dealing with Photoshop basics, such as loading palettes and some shortcuts.
Resources:
* Sparkle Brushes by ~Scully7491.
Step 1:
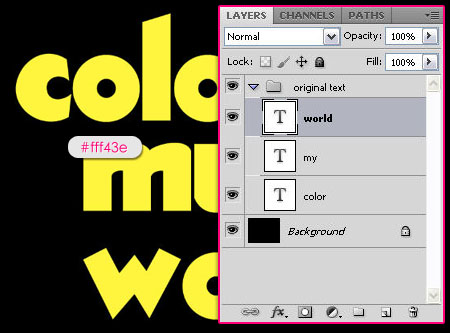
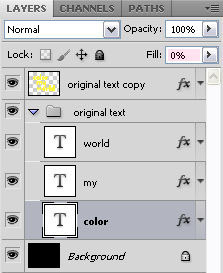
- Fill the Background with Black. Create your text with the color #fff43e. The font used is ThickDeco and the size is 250px. If you want to arrange the words separately, create each one on a separate layer, then group them and call the group “original text”.
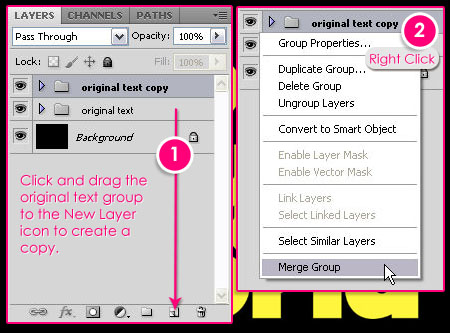
- Now click and drag the group to the “New Layer” icon to duplicate it. Then, right click on the copy, and choose Merge Group.
Step 2:
Go back to the “original text” group, and double click on any of the layers to apply the following styles:
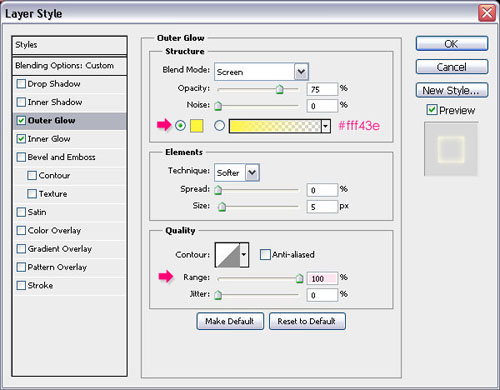
- Outer Glow: Change the color to #fff43e, and increase the Range to 100. This will soften the glow a bit.
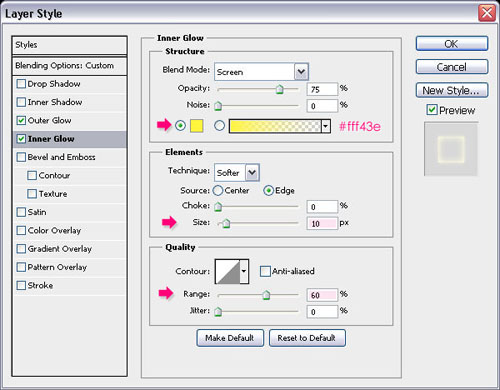
- Inner Glow: Change the color to #fff43e, the Size to 10, and increase the Range to 60.
- Click OK, then change the layer’s Fill value to 0.
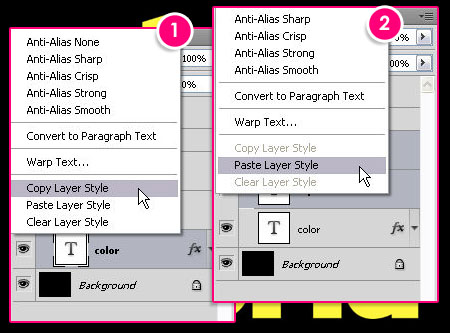
- Now, we want to copy the style to the other layers in the group. So right click on the layer to which you applied the styles, and choose Copy Layer Style. Shift + Click all the remaining layers in the group, then right click on any one of them and choose Paste Layer Style.
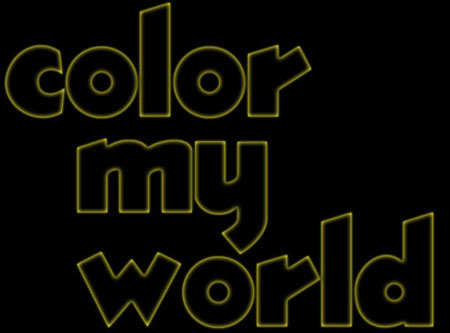
This is what you should get. (You will need to remove the eye icon next to the merged group layer on top of the “original text” group in order to see the changes, but don’t forget to click it back so that it’s visible again.)
Step 3:
Double click on the “original text copy” layer to apply the following styles as well:
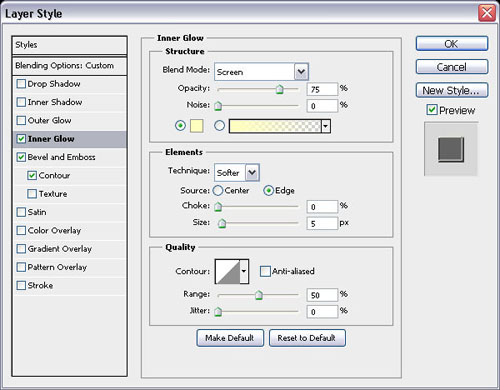
- Inner Glow: Leave the values as they are by default.
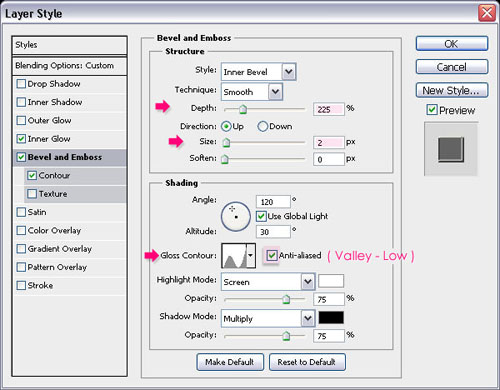
- Bevel and Emboss: Change the Depth to 225, the Size to 2, and the Gloss Contour to Valley – Low. Also, check the Anti – aliased box for a smoother result.
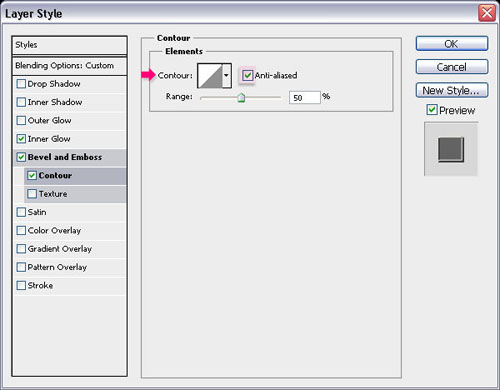
- Contour: Just check the Anti – aliased box.
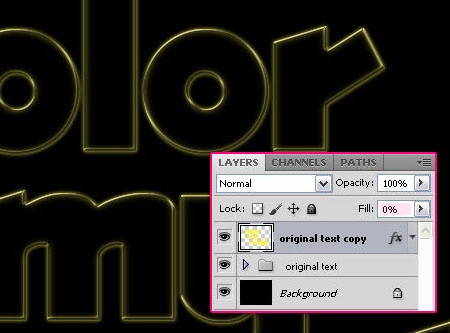
- When you hit OK, change the “original text copy” layer’s Fill value to 0.
Step 4:
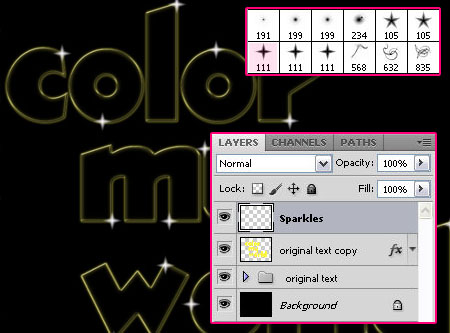
- Set the Foreground color to White, create a new layer and call it “Sparkles”.
Download the Sparkle Brushes by ~Scully7491, and choose the brush shown below. Change the brush Size as you like, here, it is something around 35px. Start drawing some sparkles randomly, but don’t overdo it, keep it simple.
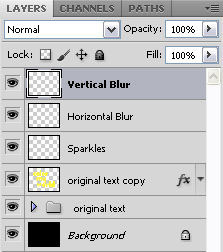
- Once you’re done drawing the sparkles, create two duplicates of the “Sparkles” layer, and rename them to “Vertical Blur”, and “Horizontal blur”.
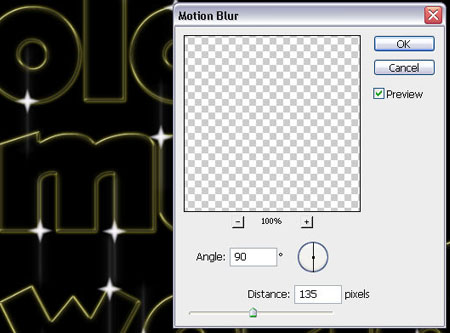
- Select the “Vertical Blur” layer, then go to Filter -> Blur -> Motion Blur, change the Angle to 90, and the Distance to 135px.
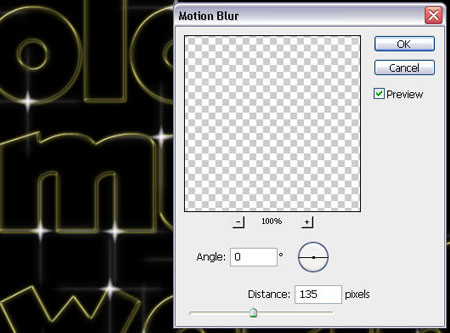
- Now, select the “Horizontal Blur” layer, and again, go to Filter -> Blur -> Motion Blur, but this time, change the Angle to 0, and keep Distance set to 135px.
Step 5:
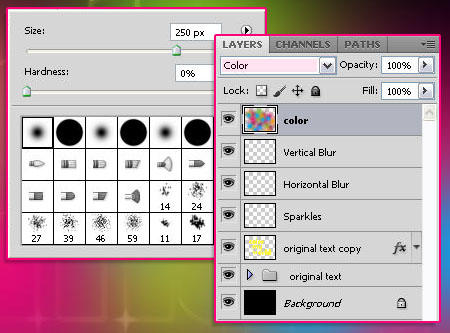
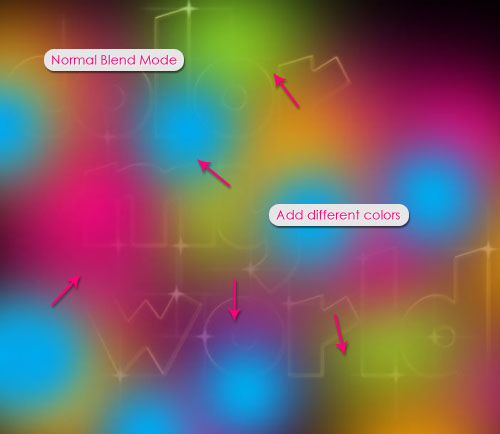
The final step is adding the colors. Create a new layer on top of all layers and call it “color”, and change its Blend Mode to Color. Then, choose a soft brush and change its Size to something around 250px. You can use the ‘[' to increase its size and ']‘ to decrease it while you’re adding the colors if needed.
Pick some bright vivid colors and start clicking inside your document to add different color spots everywhere, until the whole text is covered.
Also, you can switch between the “Normal” and “Color” Blend Modes to see what you’re doing.
Once you’re done coloring, change the Blend Mode to Color, and you’re done!
The Final Result:

* the software used in this tutorial is Adobe Photoshop CS5 Extended
* the size of the final result image is 1024 * 768
* you might want to check the Basix Page to see some useful topics on dealing with Photoshop basics, such as loading palettes and some shortcuts.
Resources:
* Sparkle Brushes by ~Scully7491.
Step 1:
- Fill the Background with Black. Create your text with the color #fff43e. The font used is ThickDeco and the size is 250px. If you want to arrange the words separately, create each one on a separate layer, then group them and call the group “original text”.
- Now click and drag the group to the “New Layer” icon to duplicate it. Then, right click on the copy, and choose Merge Group.
Step 2:
Go back to the “original text” group, and double click on any of the layers to apply the following styles:
- Outer Glow: Change the color to #fff43e, and increase the Range to 100. This will soften the glow a bit.
- Inner Glow: Change the color to #fff43e, the Size to 10, and increase the Range to 60.
- Click OK, then change the layer’s Fill value to 0.
- Now, we want to copy the style to the other layers in the group. So right click on the layer to which you applied the styles, and choose Copy Layer Style. Shift + Click all the remaining layers in the group, then right click on any one of them and choose Paste Layer Style.
This is what you should get. (You will need to remove the eye icon next to the merged group layer on top of the “original text” group in order to see the changes, but don’t forget to click it back so that it’s visible again.)
Step 3:
Double click on the “original text copy” layer to apply the following styles as well:
- Inner Glow: Leave the values as they are by default.
- Bevel and Emboss: Change the Depth to 225, the Size to 2, and the Gloss Contour to Valley – Low. Also, check the Anti – aliased box for a smoother result.
- Contour: Just check the Anti – aliased box.
- When you hit OK, change the “original text copy” layer’s Fill value to 0.
Step 4:
- Set the Foreground color to White, create a new layer and call it “Sparkles”.
Download the Sparkle Brushes by ~Scully7491, and choose the brush shown below. Change the brush Size as you like, here, it is something around 35px. Start drawing some sparkles randomly, but don’t overdo it, keep it simple.
- Once you’re done drawing the sparkles, create two duplicates of the “Sparkles” layer, and rename them to “Vertical Blur”, and “Horizontal blur”.
- Select the “Vertical Blur” layer, then go to Filter -> Blur -> Motion Blur, change the Angle to 90, and the Distance to 135px.
- Now, select the “Horizontal Blur” layer, and again, go to Filter -> Blur -> Motion Blur, but this time, change the Angle to 0, and keep Distance set to 135px.
Step 5:
The final step is adding the colors. Create a new layer on top of all layers and call it “color”, and change its Blend Mode to Color. Then, choose a soft brush and change its Size to something around 250px. You can use the ‘[' to increase its size and ']‘ to decrease it while you’re adding the colors if needed.
Pick some bright vivid colors and start clicking inside your document to add different color spots everywhere, until the whole text is covered.
Also, you can switch between the “Normal” and “Color” Blend Modes to see what you’re doing.
Once you’re done coloring, change the Blend Mode to Color, and you’re done!
Comments
Post a Comment