
Create a Cinematic “Sergeant America” Text Effect in Photoshop

Quick Tip: Create a Cinematic “Sergeant America” Text Effect in Photoshop

Quick Tip: Create a Cinematic “Sergeant America” Text Effect in Photoshop

Tutorial Details
  • Program: Adobe Photoshop CS3+
  • Difficulty: Beginner
  • Estimated Completion Time: 30 Minutes

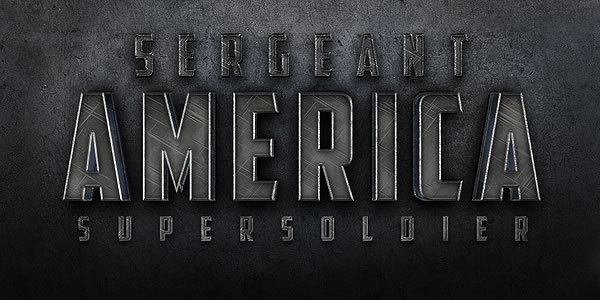
Final Product What You'll Be Creating

Download Source Files
In this quick tip tutorial we will demonstrate how to create a cinematic “Sergeant America” Text Effect using the layer styles. Let’s get started!


Tutorial Assets

The following assets were used during the production of this tutorial.

Step 1

Make a new .PSD document; size 1000 x 500 pixels, RGB color, 100 dpi and grey background (color #33333). Create a new layer and fill it with a grunge metal texture. Now create the text using this font: American Captain. Use the settings shown in the following pictures. Set the character spacing to "80". Now rename this text: "3D Base". Then go in the menu Layer > Layer Styles > Blending Options and use these settings:

Step 2

Duplicate the text and rename it ” 3D Base BEVEL”. Right click on his layer and click to “Clear Layer Style” or in the Styles Palette click on the first style “Default style (None)” (It’s the same thing). In the Blending Options menu on the right set the fill to 20%. Then go in the menu Layer > Layer Style > Blending Options and use these settings:

Step 3

Duplicate again the text and rename it “Text Base”. Right click on his layer and click to “Clear Layer Style” or in the Styles Palette click on the first style “Default style (None)” (It’s the same thing). Now sets the character spacing on “100″ and move it as you wish, in order to create a 3D effect, as shown in the image below. Then go in the menu Layer > Layer Style > Blending Options and use these settings:

Step 4

Duplicate the text ” Text Base”. Right click on his layer and click to “Clear Layer Style”. In the Blending Options menu on the right set the fill to 20%. Now and use these settings in the menu Layer > Layer Style > Blending Options:

Step 5

Your text effect is completed. Now we have to create the other texts. Use the settings shown in the following pictures. Set the character spacing of the text above to "380", and set the spacing of the text below to "800". Then go in the menu Layer > Layer Styles > Blending Options and use these settings shown in the pictures. Finally click on the text below (Super Soldier) right click on "fx" in his layer and set the "Scale Effect Command" to 59%.

Conclusion

Now your text effect is finally completed!

Comments

Popular posts from this blog

Use x-ray techniques in Photoshop to show naked skin through clothing

    Do those new naked body scanners have you freaked out at the airports? As far as the TSA is concerned, those x-ray machines are here to stay, but you might as well take comfort in knowing that airport security guards aren't the only ones looking at your private parts. Practically anyone with a computer can manage to see through your clothes, and it's all thanks to a little program called Photoshop. Thanks, Adobe. With a few tweaks using the tools in Photoshop, you can see those boobs in no time, male or female. The video is in German, but it's not hard to figure our what's going on, especially if you're familiar with Photoshop. First, create a few duplicate layers, then get a handle on some of these tools to make the naked body through the clothes: * Auswahl erstellen (Create Selection) * Tonwertspreizung (Input Levels) * Belichtung (Exposure) You can also do this see-through clothing effect in free design programs, such as  GIMP .

Photoshop Photo Effects Tutorials 2024

  Photoshop Photo Effects Tutorials Everyone loves Photoshop effects. Not only are photo effects fun to create, but they’re a great way to learn Photoshop since they often introduce us to tools, commands or other features we might otherwise never know about! All of our Photoshop effects tutorials are written with beginners in mind, with easy-to-follow, step-by-step instructions. See our complete list below, or download our tutorials as  print-ready PDFs ! Fade an Image to Color in Photoshop Faster with Live Gradients Learn how to fade an image to color with Photoshop the new and easy way using live gradients! How to Add Falling Snow to Photos with Photoshop Learn how to add realistic falling snow to your winter photos with Photoshop. Get Better Color Halftone Effects in Photoshop Learn how to create more realistic color halftone patterns using Photoshop’s Color Halftone filter and this simple trick. How to Create a Halftone Dot Pattern in Photoshop Learn how to turn your photo into a h

Ridiculously Cool Photoshop Text Effect Tutorials

  Easy Photoshop Text Tutorials for Beginners If you’re still learning the fundamentals of design or want some quick-and-easy text ideas to jazz up your print designs, these beginner tutorials will be a big asset. In your lessons you’ll learn how to apply texture and 3D effects, create logos, utilize masks and other simple techniques for enhancing your text. 1.  Using Text As A Container For More Text In Photoshop 2.  Glossy Emblem Text Effects 3.  Create a Realistic Emboss/Deboss Effect 4.  Icy Styles in Photoshop 5.  How To Create a Gold Text Effect in Photoshop 6. Moon Shine Text Effect 7. Simple Styled Text with Stars Effect 8.  Elegant Glossy Gold Text Effect 9.  Hipster Text Effect in Photoshop CS6 10.  The Sugar Bag Effect 11.  Easy Chalk Ornament Typography in Photoshop 12.  Abstract Shining Text Effect with Groovy Font 13.  Easy Plastic Text with Layer Styles In Photoshop 14.  Papercraft Text Effect 15.  Making a Clipping Mask With Text In Photoshop 16.  Simple Bokeh Text Effe