HDR in Photoshop
1
Start with 3 images. One normal exposure, the second underexposed and the third overexposed. In this case I used 2 stop bracketing. As I shoot a lot of city scapes I can get away with 2 stops, because I'm mainly shooting flat surfaces and banding and posterization isn't such a problem. If your shooting rounded and curved surfaces you will want to lower your bracketing to get smoother gradients, although there is a lot of overlap already in the tones as a decent DSLR camera can capture around 11 Stops of exposure.I set the bracketing on my camera to 2 stops. Then I set the shooting mode to burst. When I hold the shutter down, 3 photos will be captured. I shoot in the RAW format for the widest possible dynamic range. You can still create HDR if your camera doesn't support RAW, but bear in mind a jpg is only an 8-bit file.
Make sure you shoot in Aperture Priority or in Manual. You want to bracket the exposure time, not the Aperture. If you change the aperture, the depth of field won't be consistent and you'll get blurring. Also avoid any moving subjects in the photo or you'll get "ghosting" where something is only in one frame and will appear very strange in the final. If you look at the three image that I used here, the middle image has a lot of detail. However, the details in the shadows are lost in the boats and the city lights are too bright and lose detail information. The left image is under exposed to pick up the details in the highlights such as the buildings in the background. The right hand photo is over exposed by 2 stops to pick up the detail in the shadows, such as the hulls of the boats and water reflections.

2
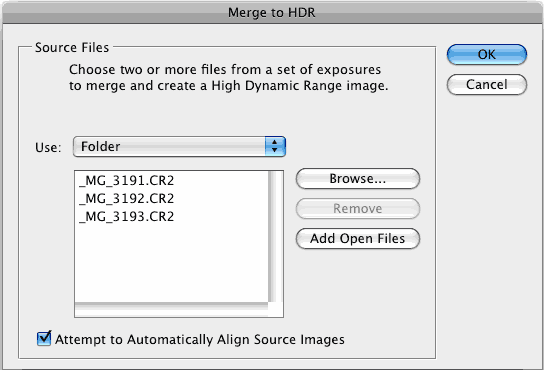
Time to merge the photos together into a single 32 bit image.Choose File>Automate >Merge to HDR Pro. This works on Photoshop CS2 - CS6 (CS2 Doesn't have auto align and it's called "Merge to HDR on versions older than CS5). Choose either images or folder. I organize each set of photos in its own folder so I used the folder option. Select your photos to merge. Turn on Auto Align in Photoshop CS3+. Click OK. (Photoshop uses Auto-align technology that even allows you to create HDR without the use of a tripod!)

3
Your images will now be merged into a single photo. You can turn off individual photos by un checking their boxes on the left filmstrip. If you get some blurring caused by camera shake in the longest exposure, you may want to turn off that photo. If there is ghosting because of movement, click the box: Remove Ghosts.
4
The merged result is a floating-point 32 bit image. Change the mode to 32 bit. You can view the available tones by sliding the White Point slider. Note, this slider doesn't change the image, it is there for you to examine the range of tones, because a monitor is incapable of displaying all the tonal detail in a 32-bit file all at once.
5
You could do your tonemapping right now if you like, but I like to save a 32bit negative. Click OK to merge the photos into a 32 bit image. Now is a good time to save your file. Save as a psd, tif or open EXR.
If you are working with 3D and are wanting HDRI
for IBL lighting, enviroments etc, save as open EXR as Maya and other 3D
packages recognize this format. (you are finished here, photographers
read on).
6
In order to use the photos, you'll need to convert them to 16 or 8 bit images. When we convert them we will create what I call interpretations of the photo. The reason I say this is because we have unlimited ways we can make the photo look. While we have this huge dynamic range available in 32 bit, we will no longer have those options after conversion. Always work from the saved 32 bit version, and then convert and save versions (personal interpretations). Avoid overwriting the 32 bit image, it's our master and we may want to go back to it many times.Choose Image>Mode>16 bit (or 8 bit). Now we get to play with some fun options. You're now at the tone mapping part of the process. This is were all the creativity can ooze.
(If you want to make the adjustments without converting, choose view>32 Bit Preview Options. You can use several of Photoshop's tools in the Image>Adjustments menu. The most important of these is the Exposure control)
You'll see an HDR Toning Dialog box (HDR Conversion for versions before CS5). Exposure and Gamma is the default option. Best way to approach this? Set the gamma first, then adjust the exposure to suit. If you want an image with lots of contrast, lower the gamma. For less contrast raise the gamma. Finally, adjust the exposure to get the desired brightness. If you want more control, read on... otherwise press OK to convert.

7
Change the Method to Local Adaption. (There are 4 available methods, but these are the only 2 with user input).With local Adaption, you get some advanced Tone Mapping sliders and you can adjust the curves. The use of curves is optional as they allow you to fine tune the other settings. Set these like you would normally work in curves, but don't be afraid to clip the histogram a little. You can clip because you're working with a larger dynamic range than you're used to. Bring out the detail in the image, but don't forget to put some shadow in there or it will look washed out and fake.
Edge Glow
Once your happy with the curve, adjust the radius and strength sliders to make sure there are no halos in the photo. (Badly converted HDR images have a glow around the areas of contrast.) The radius controls the mask blur while the strength decides how strong to apply the effect.
Tone and Detail
Gamma: This is where you control the contrast. Extremes are washed out or super punchy.
Exposure: Controls the overall brightness.
Detail:This sharpens or softens the appearance.
Advanced
Shadow: Opens up details in darkest parts of the photograph.
Highlight: Recovers detail in the brightest areas of the photograph.
Vibrance: This makes the photo more colorful without over saturating areas that are already colorful. (It's smart).
Saturation: Increases or decreases the overall amount of color. Be careful not to over saturate the colors as a rule. (Of course all rules can be broken on occasion).
Click ok to convert.

8
Here we have a merged image from HDR. Photoshop is great for producing very realistic HDR images.
9
If your desiring a more surreal result there are different plug-ins that you can use. My favorite is Photomatix pro from HDRsoft. You can just get the tone mapping plug in for Photoshop which works great. Use the coupon code photoshopcafe to save 15%.(code is also good for Photomatix pro)Using photomatix tone mapping plugin allows you to get highly detailed textures in your photographs. You merge in Photoshop as shown in this tutorial. Then choose Filter>Photomatix to apply tone mapping. Convert and save as normal.

10
This image shows an image after tone mapping using Photomatix pro.
11
Here you can see comparisons between a single image, subtle Photoshop HDR and a radical Photomatix effect Whatever result your after, hopefully this tutorial has helped demystify the HDR process.
12
HDR and Lightroom and Camera RAW
A new development in the latest release of Lightroom. 4.2 is the ability to work with 32 bit images. This is wonderful because you can use the adjustment brush to fine tune areas of the photograph while working in a 32 bit enviroment. The image below shows the result of working with the adjustment brush in Lightroom. Notice how I was able to craft the image. (The same is possible with ACR). Read on for instructions...
In order to work with a 32 bit file in Lighroom, you must do the following.
1. Merge to HDR as mentioned earlier in this tutorial.
2. Save as 32 bit file, be careful to save as a TIF, it will only work with a Tiff.
3. Import back into Lightroom, or open in Adobe Camera Raw.
4. Use the adjustments as you would normally, but enjoy a lot more control and larger range of tones than before.
Here are a few more examples of my HDR photography.

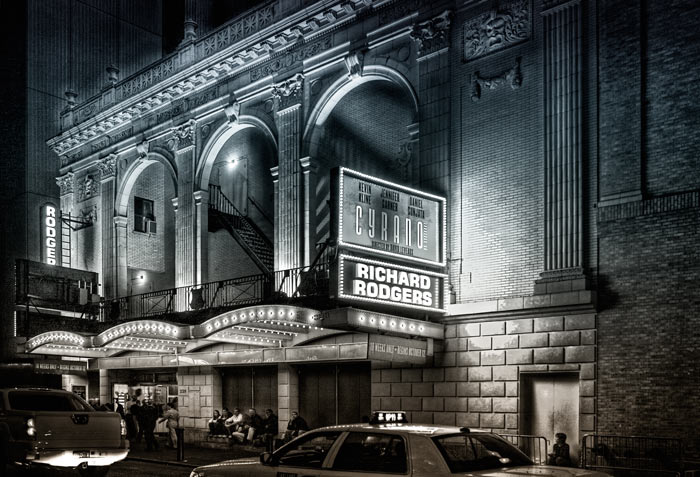
Here is another HDR shot of mine. This is a night scene converted to grayscale.


Comments
Post a Comment