HDR Style Results Using Layers in Photoshop
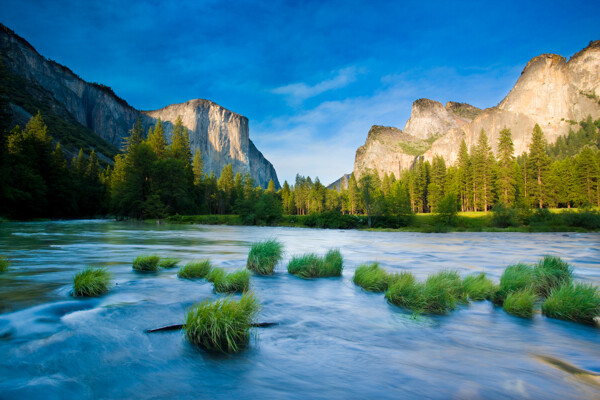
There currently seems to be a lot of interest in HDR or similar processes. What is HDR? Essentially, it’s about collecting a series of shots taken on a tripod at different exposures and allowing über clever software to merge them together to make one supposedly perfectly exposed image. There are various types of software or plug-ins such as Photoshop, Photomatrix or FDR Tools that make producing a HDR image fairly straight forward.
So to begin, you need to a good sturdy tripod. This is a little easier if you have an SLR camera, but it can also be done with a point and shoot if you can manually adjust your exposure. Mount your camera on the tripod and compose your image to your liking. It is important that when you take your images, your camera doesn’t move. A handy tip if you don’t have a remote control is to set your camera to it’s inbuilt timer and shoot with this as when you press the shutter you are shaking the camera ever so slightly and you will get a slightly blurry result. Every situation is different because your subject and light is different, but for the image above, I took a shot exposing for the water which was 4 seconds at f22, I then took another shot exposing for the rock face and the trees which was 1 second at f22 and I then took another exposure for the sky which was 1/4 of a second at f22. Ideally keep your f-stop constant in this process and as you have it on a tripod you can afford to close down your f-stop/aperture to give you maximum depth of field throughout your image.
The following process is using Adobe Photoshop. I am on a Mac using Photoshop CS3, but it doesn’t matter which version you have. As long as it has layers, you are sorted. Download your images from your camera onto your computer. Once you have chosen your exposures you want to use, in my case 3, open them all in Photoshop so you can see them all side by side with your layers palette open on the side like this (click images to open larger versions).
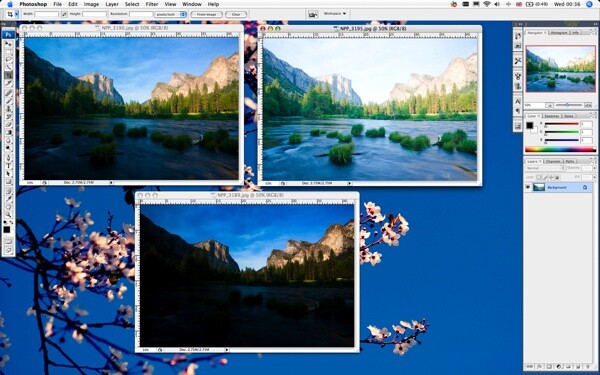
It doesn’t really matter, but I tend to use my darkest layer as my base just because it’s logical. With this in mind, select the middle exposed image. Head over to your layers palette and click and drag your layer icon and drop it on your darkest image. Then select your lighter image and repeat the process. Obviously, you can have as many images/exposures as you like and continue this process till you have dragged all your exposures onto the one image. The more you have, the longer it will take to combine and the more complicated it will become, so choose your number of exposures wisely. You shouldn’t really need any more than 3 or 4 exposures unless your subject is particularly complicated.
Click back on your darker image that you have been dragging the layers on to. You should now have 3 layers in your palette and should look like this. You can close the other 2 images as these are no longer required. What you have left is one image open with your multiple layers, in my case 3, each layer containing exactly the same shot just taken with a different exposure all sandwiched on top of each other.
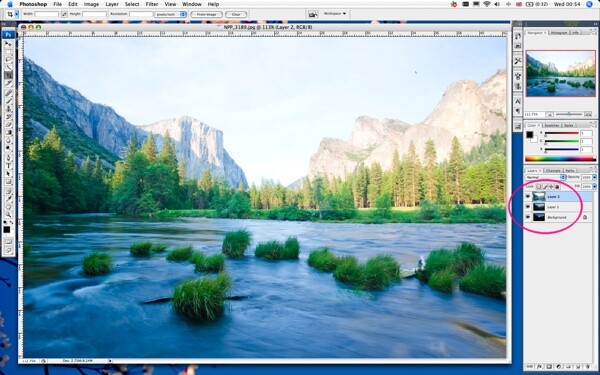
You can’t fully manipulate the bottom layer called ‘Background’, so select this layer, go up to the options at the top of the Layers palette and duplicate the layer. It’s not essential to do this on this particular retouch, but it’s good to get into the habit of duplicating your original layer so you always have an untouched original just in case it all goes pear shaped or you want to refer back to it for some reason. Safety first!
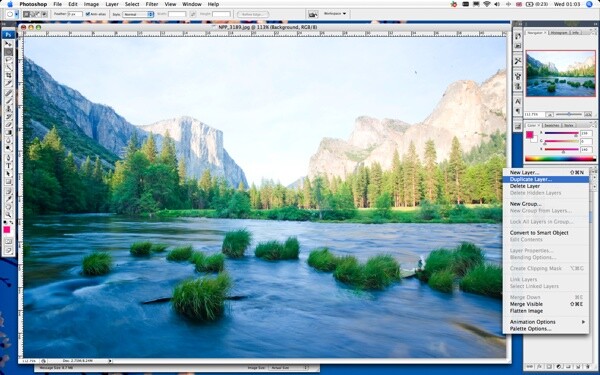
Click on the little eye icon on the left hand side of the ‘Background’ layer so it makes this particular layer invisible. You wont be needing this layer. It’s just there as a back-up. I tend to rename all my layers at this stage so it makes it easier to manage. Again, it’s not essential for this retouch, but getting into the practice of naming your layers appropriately is a good habit to get into. When you work on more complicated retouches that might have dozens of layers, it makes it much quicker when you can see easily which layer is which.
So what are we going to do with these 3 layers? We are going to mask out portions of each layer to allow elements from the layers underneath to show through eventually giving us 1 image formed out of 3. Let’s start with our lightest exposed layer. In my case, I want this layer for the water and reeds only. Most of the trees and the sky are way too overexposed. Over to your Layers palette again, select your top layer (your lightest layer) and we want to add a layer mask to this layer. Go to the Layer menu at the top of your screen and select Layer mask/Reveal All. As a shortcut, you can also simply click on the little icon circled and it will do the same thing.
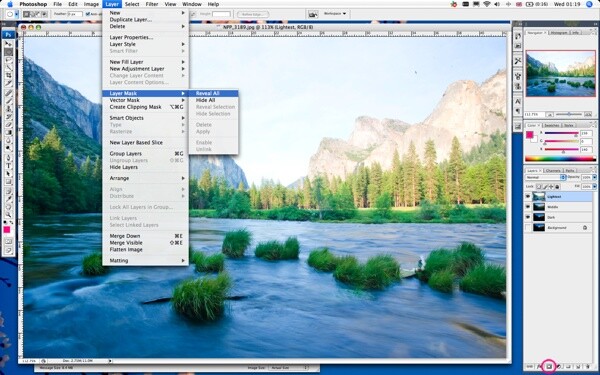
For this particular layer mask I don’t want to create a hard edge so we are going to use the brush tool to manually create our mask. Over to your layers palette again, make sure you have the mask part selected (not the image icon) when you click on the mask, it should have the broken black frame around it indicating that you have selected the mask. Making sure your colour is set to black (if it’s not, click on the top colour square and change this 100% black) and select your brush tool. We are ready to mask!
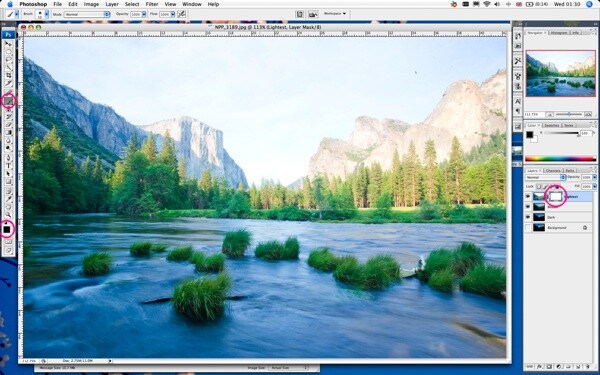
We are now going to paint with this tool creating a mask revealing some of the image below. In this case we want to get rid of the sky, rocks and most of the trees. Make sure the opacity on the brush is at 100%. Use an appropriate sized large brush to get rid of a majority of it and when it comes to going around the water line I used a small brush and zoomed in so I could see a little better as I was masking.
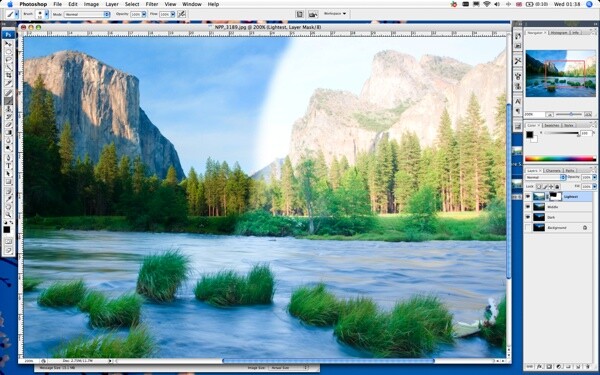
You should be able to see your middle exposure layer below coming through. You will also see your little mask icon on your layers palette will give you a preview of what you have just masked out. Keep going until you are satisfied. I will show you how to do a more accurate mask on the next layer. But this method we have just performed is a great way to do a quick mask. Once you are happy with your mask, select the layer below. Create a new layer mask as before but instead of using our brush tool on it’s own, this time we are going to make a selection first as we want the mask to be a little more defined around the edge of the cliffs. We want to mask out the sky on this middle layer to reveal the nice rich sky on the darkest layer below. To make a selection you can do this a few ways. As there is quite a good difference in colour and tone between the sky and the rocks in my case, so I am going to use the magic wand tool at a tolerance of about 25 and with my shift key on my keyboard held down, select different pieces of the sky till I have an unbroken line of ‘marching ants’ around the cliff face. (Note: Make sure your image icon is selected in your layers palette, not your mask icon otherwise your magic wand will select your whole image). I won’t have every little piece of the sky selected, but I don’t need to worry about that at this stage. The most important thing is that I have an unbroken line around the cliff like this.
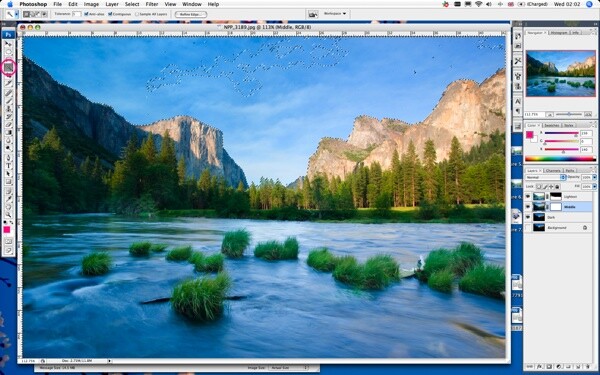
Any easy way to select the rest of the sky is to use the lasso tool and holding down your shift key, quickly go round the parts that aren’t selected so you end up with a lasso selection all around the area we want to mask. In this case I want to put a small feather on the selection before we mask as even though I want a crisp line, it’s very rare that you don’t need at least a small amount of feathering. So go up to your Select menu at the top of your screen and select Modify/Feather. In my case I want to use about 3 pixels of feather. Maybe use this as a starting point for your image, if you find out in a few minutes when we start masking this layer that it is too much or not enough feather, just go back in your history palette to this point and alter your feather amount. Every image is different and the amount of resolution in your image will play a part in your feather amount required.
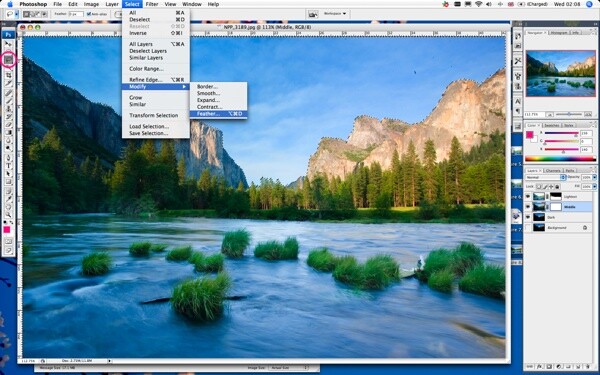
So we now have the marching ants selection around the sky with a 3 pixel feather. Select the mask icon back in your layers palette on the middle layer. There are a number of ways you can go from here, but I like to use my brush tool again as it gives me more control. Select this tool again and we are going to do the same as before, however the selection has made it much easier. Like bowling with the rails out over the gutters! You cant go wrong.
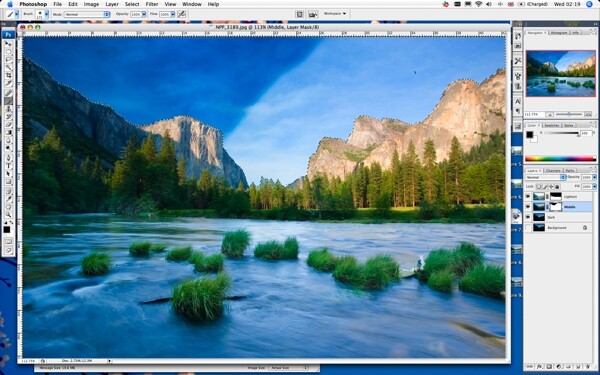
It’s at this point that you can begin to see the whole picture forming with elements from all 3 layers playing their parts in your overall final result. Continue masking until you have filled your entire area selected. As we have a small feather on the lasso selection, if you keep going over certain areas around the edge of your selection with your brush tool it will creep your mask out a little more if you feel your selection didn’t quite go far enough. When you are happy, deselect your marching ants by going back up to your Select menu at the top of your screen and choosing Deselect.
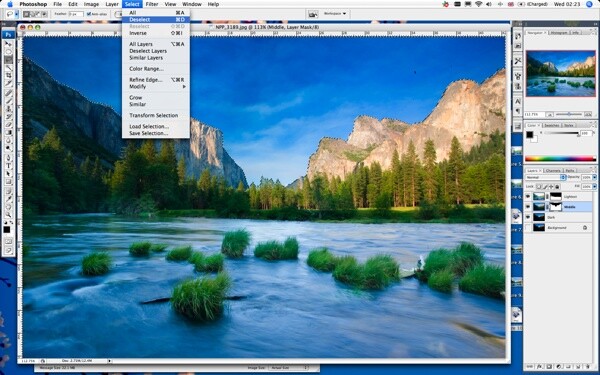
You should now have a pretty much final image visually. You may want to touch up here and there to be completely satisfied. In my case I need to get rid rid of some nasty little sensor marks using my Spot Healing tool on the bottom dark layer. *Note to self – must clean my sensor!* You can alter other things at this stage such as the contrast, hue and saturation. Clone out elements you don’t wish to be there (Cloning is a whole OTHER tutorial on it’s own) in my case, a plastic bag caught in the reeds and using my burn tool, just going over the edges of the cliffs a little for effect.
Once you are completely satisfied, you need to save it. I like to keep a copy of the layered file just incase I decide to alter it slightly in the future, so save it as a .psd or .tif with your layers intact and make it obvious in your filename that it’s the layered file. Save on your computer wherever you wish. Once you have done this, back over to your layers palette for the last time. In your layer options, select Flatten Image.
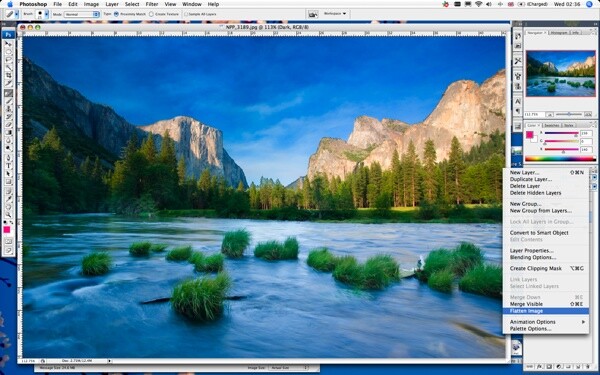
You can now save your final image in whatever format you wish to use. Probably a .jpg to save on hard drive space. You have now completed a manual version of HDR using layers. HURRAH! I hope this was of some use. I encourage any comments on this method. I don’t think anyone knows everything there is to know about Photoshop and as my Grandpa always used to say, “there is more than one way to skin a cat!”. But this is a method that has served me very well over the years in coping with shooting an image that required different exposures to fully recreate what I saw with my own eyes.
Comments
Post a Comment