HOW TO STITCH IN PHOTOGRAPH
This is a tutorial on stitching two images together using Photoshop Elements 5 (or the full version of Photoshop). There are lots of stitching programs out there, but this method offers a lot of flexibility. I first started doing this to extend the Field of View (FoV) of the kit lens that came with the D70, but there are other advantages to doing this as well: increased Depth of Field, better dynamic range, and a larger image than you would normally be able to create.
Start by taking two images, one of mostly the sky, and another of mostly the foreground, remember to have some overlap, and include the horizon on both images. Here's the Sky:
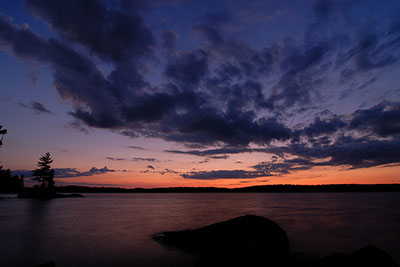
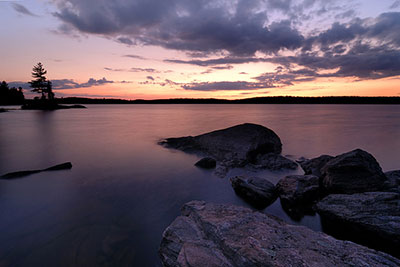
Notice that the tree on the left is leaning significantly, and that I've included the horizon... be careful to make the horizon as level as possible. Here's the Foreground:
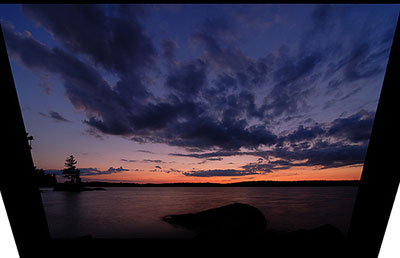
So, to correct the images, first expand the canvas, Image> Resize> Canvas... increase by about 25% (I like to have a black background), flatten layers, then open the (new) camera distortion tool: Filter> Correct Camera Distortion and adjust the vertical perspective and you can adjust the barrel distortion to make sure the horizon is flat since that will be the stitch line. Crop accordingly. Here's the corrected/cropped image of the sky:
And here's the foreground, note that the tree in both images is now vertical:
Make sure that both images are level : View> Grid and Image> Rotate> Custom.
Now choosing one of the images, grow the canvas again (Image> Resize> Canvas Size) so that you can place the other image on top of it and move it into place -- you'll want to grow the canvas significantly, especially vertically.
Copy the other image (Ctrl+A,Ctrl+C) and paste it on to the other image (Ctrl+V). Adjust the opacity (in the layers palette) of the top image to 50% so that you can see through the top image to see the bottom image to line up the stitch. Now use the Move tool to move the top image into place... this is where having expanded the canvas size of the bottom image is important, otherwise you'll be cropping out the top image. At this point you may want to also use the Free Transform tool to further tweak the top image to get it to line up (Image> Transform> Free Transform).
Now you need to use the Erase Tool to erase the part of the top image that you don't want -- so if the top layer is the sky, you'll want to carefully erase (using a hard brush) the parts of the sky image below the dark horizon. When you're finished, adjust the opacity back to 100% and if you're happy with the result, Flatten Layers, and save your project.
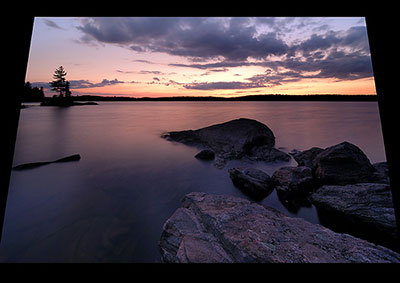
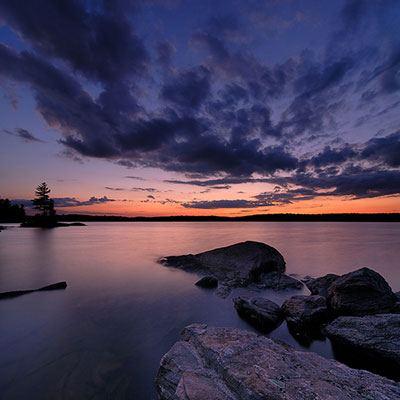
So here's the result:
This is a tutorial on stitching two images together using Photoshop Elements 5 (or the full version of Photoshop). There are lots of stitching programs out there, but this method offers a lot of flexibility. I first started doing this to extend the Field of View (FoV) of the kit lens that came with the D70, but there are other advantages to doing this as well: increased Depth of Field, better dynamic range, and a larger image than you would normally be able to create.
Start by taking two images, one of mostly the sky, and another of mostly the foreground, remember to have some overlap, and include the horizon on both images. Here's the Sky:
Notice that the tree on the left is leaning significantly, and that I've included the horizon... be careful to make the horizon as level as possible. Here's the Foreground:
So, to correct the images, first expand the canvas, Image> Resize> Canvas... increase by about 25% (I like to have a black background), flatten layers, then open the (new) camera distortion tool: Filter> Correct Camera Distortion and adjust the vertical perspective and you can adjust the barrel distortion to make sure the horizon is flat since that will be the stitch line. Crop accordingly. Here's the corrected/cropped image of the sky:
And here's the foreground, note that the tree in both images is now vertical:
Make sure that both images are level : View> Grid and Image> Rotate> Custom.
Now choosing one of the images, grow the canvas again (Image> Resize> Canvas Size) so that you can place the other image on top of it and move it into place -- you'll want to grow the canvas significantly, especially vertically.
Copy the other image (Ctrl+A,Ctrl+C) and paste it on to the other image (Ctrl+V). Adjust the opacity (in the layers palette) of the top image to 50% so that you can see through the top image to see the bottom image to line up the stitch. Now use the Move tool to move the top image into place... this is where having expanded the canvas size of the bottom image is important, otherwise you'll be cropping out the top image. At this point you may want to also use the Free Transform tool to further tweak the top image to get it to line up (Image> Transform> Free Transform).
Now you need to use the Erase Tool to erase the part of the top image that you don't want -- so if the top layer is the sky, you'll want to carefully erase (using a hard brush) the parts of the sky image below the dark horizon. When you're finished, adjust the opacity back to 100% and if you're happy with the result, Flatten Layers, and save your project.
So here's the result:
Comments
Post a Comment