Selecting Hair with Refine Edge in Photoshop CS5
In Photoshop CS3, Adobe introduced the Refine Edge command, offering us a first glimpse of how much easier it could be to select hair, fur and other fine details in an image. But in Photoshop CS5, Adobe gave the Refine Edge command a major overhaul, with enough improvements and new features to make selecting hair in a photo easy enough for anyone to do! Hairs… I mean, here’s, how to do it!
Download our tutorials as print-ready PDFs! Learning Photoshop has never been easier!
Here’s the photo I’ll be starting with. Notice all the curly strands of hair sticking out in front of the gray background: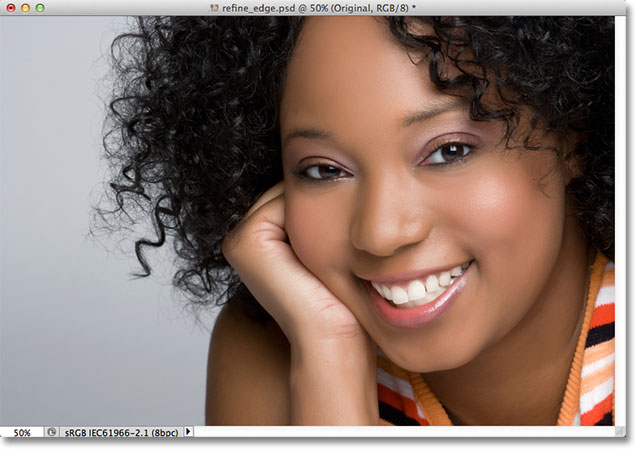
The original photo.
What I want to do is replace that original gray background with a different image. If we look in my Layers panel, we see that I have another photo sitting on a layer below the original photo. I’ll click on the original photo’s visibility icon to temporarily turn the top layer off so we can see the image on the layer below it: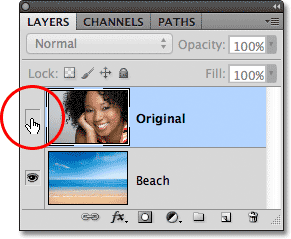
Clicking on the top layer’s visibility icon.
With the top layer temporarily hidden from view in the document, we can see the image I’ll be replacing the background with: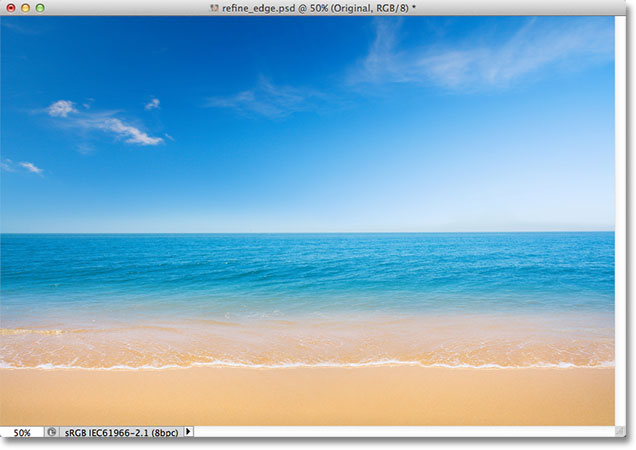
The replacement background photo.
And here’s what the final result will look like thanks to the power of Photoshop CS5′s Refine Edge command: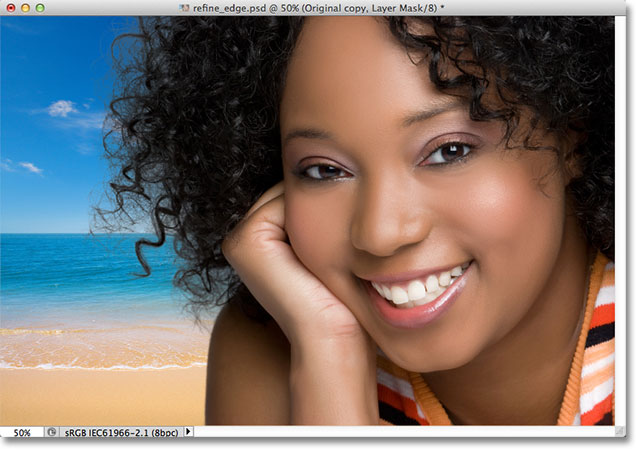
The final result.
Let’s get started!Step 1: Draw A Rough Selection Outline Around Your Subject
I’m going to begin by drawing a fairly rough selection outline around the woman in the photo. There’s no need for any fancy or advanced selection tools here. Photoshop’s standard Lasso Tool will work fine, and the Polygonal Lasso Tool will work even better because it’s faster and easier to use. I’ll grab the Polygonal Lasso Tool from the Tools panel by clicking and holding on the Lasso Tool, then selecting the Polygonal Lasso Tool from the fly-out menu: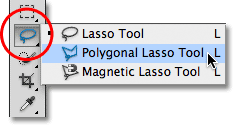
Selecting the Polygonal Lasso Tool.
With the Polygonal Lasso Tool in hand, I’ll begin by clicking around
the woman’s arm and shoulder in the bottom center area of the photo to
lay down points for my selection outline. Notice that I’m keeping my
selection along the inner edge of her arm. The Refine Edge command
tends to work best if you keep your initial selection just inside the
edge of your subject: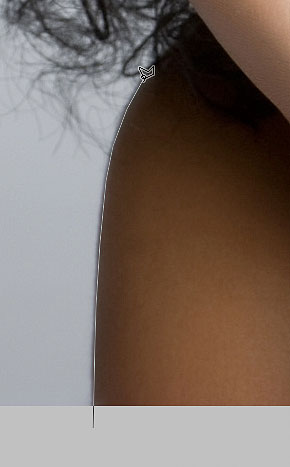
Clicking with the Polygonal Lasso Tool along the inner edge of her arm and shoulder.
As I move up into the woman’s hair, I’ll again stay close to the edge
but I’ll make sure to avoid any areas where the gray background is
showing through her hair. I just want to select the main area of hair
for now, and I’ll let the Refine Edge command worry about the tough
stuff in front of the background: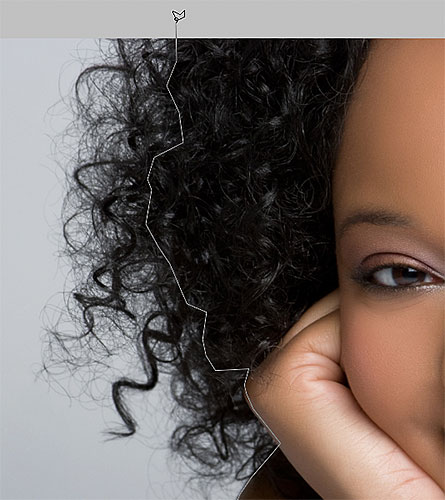
Keeping the selection outline away from areas where the background is showing through the hair.
Finally, I’ll quickly click in the pasteboard area around the image,
then back on my original click point below her arm to complete my
selection: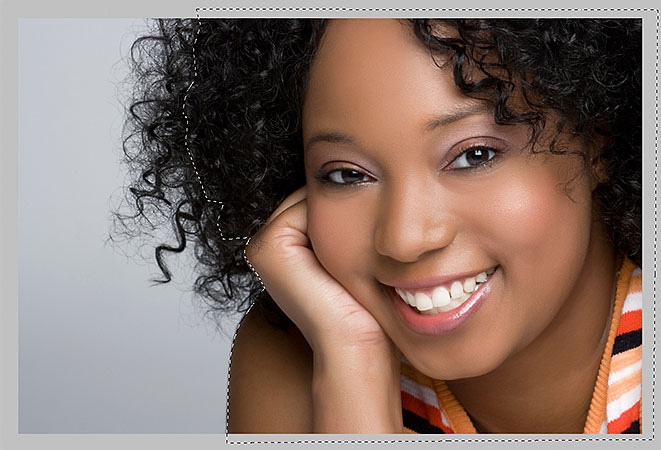
A rough selection outline now appears around the woman in the photo.
Step 2: Select The Refine Edge Command
With my initial selection in place, before I do anything else, I’ll make sure I have the correct layer selected in the Layers panel. In my case, it’s the top layer which contains the original photo: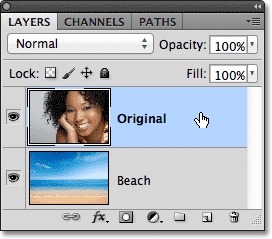
Making sure the correct layer is active (highlighted in blue).
Then, I’ll bring up Photoshop’s Refine Edge command either by going up to the Select menu in the Menu Bar along the top of the screen and choosing Refine Edge from the menu choices, or, since I still have the Polygonal Lasso Tool selected, I can simply click on the Refine Edge button in the Options Bar (you need to have a selection tool active for the Refine Edge button to appear in the Options Bar):
Clicking on the Refine Edge button in the Options Bar (with a selection tool active).
This opens the Refine Edge dialog box, but before we look at it,
let’s take a quick look at my image in the document window where we see
that the area I selected is now sitting in front of a solid white
background: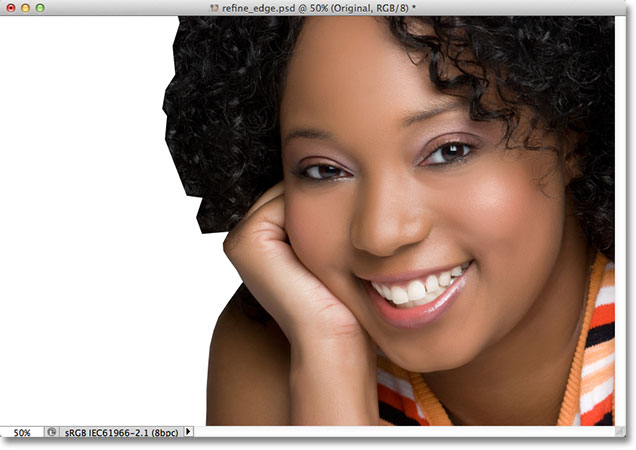
The document window showing the selection in front of a white background.
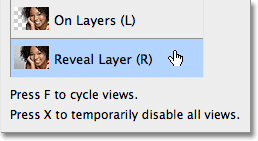
The View Options
You may actually be seeing something different with your image. Your selection may be appearing in front of a white background as mine is, or it may be in front of a solid black background. Or, you may still be seeing the standard “marching ants” selection outline, or several other possible views. It all depends on which View Mode is currently selected at the top of the Refine Edge dialog box. You can see a small thumbnail preview of the current view mode to the right of the word "View":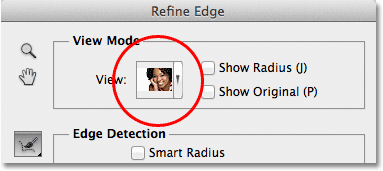
A small preview thumbnail shows the current view mode.
If you click either on the thumbnail or on the small arrow to the
right of the thumbnail, you’ll open a list of the different view modes
you can choose from. I currently have the On White mode chosen, which is why my selection is appearing against a white background. I’ll choose the On Black view mode directly above it: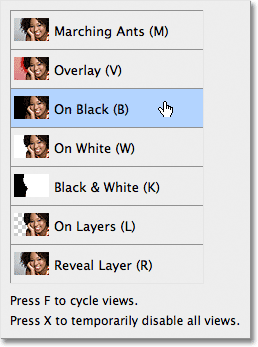
Choosing the On Black view mode from the list.
And now my selection appears against a solid black background: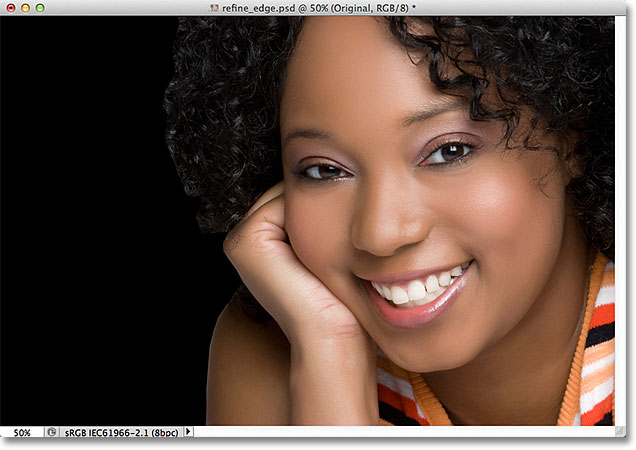
The selection now appears against black after choosing the On Black view mode.
If I select the Black & White view mode from the list: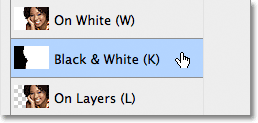
Choosing the Black & White view mode.
The image in the document window appears as if I was looking at a layer mask.
White represents the area that’s currently selected, while black
represents the area not currently selected. Any gray in the image would
represent partially selected areas: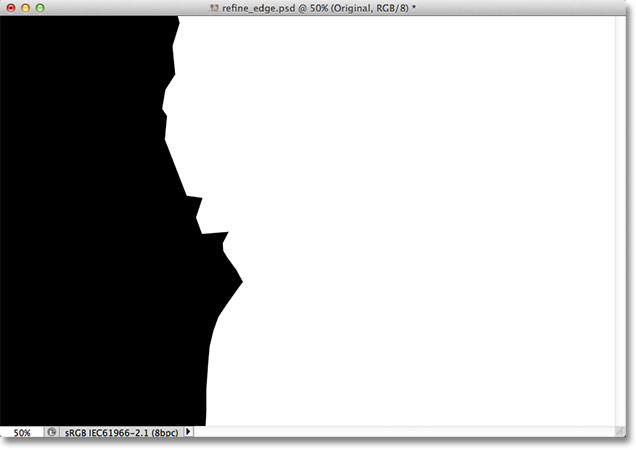
The Black & White view mode shows the image as it would appear as a layer mask.
Finally, I’ll select the On Layers view mode: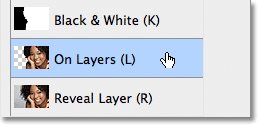
Choosing the On Layers view mode from the list.
This mode shows the current selection as it actually appears in front
of the other layer(s) in the document, which can be very useful when
compositing images since it makes it easy to judge the result. In my
case, since I have a second photo on a layer below the main image, we
can see the second photo behind my selection. If you’re working on a
single-layer document with no other layers below your photo, the
non-selected area will be filled with a checkerboard pattern which is
Photoshop’s way of representing transparency: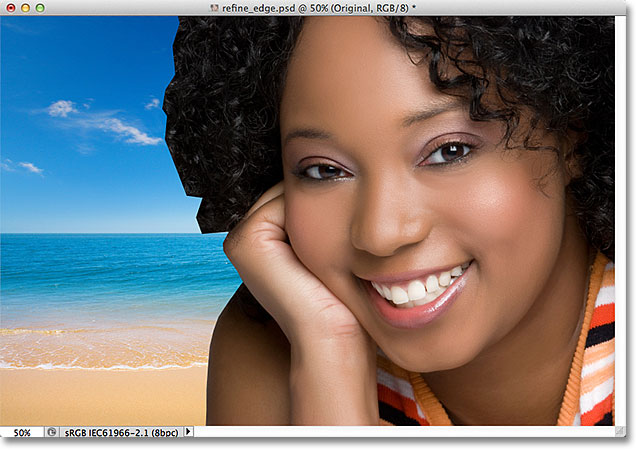
The image with the On Layers view mode selected.
I purposely skipped over the first two view modes – Marching Ants and Overlay
– because neither of them is all that useful. The Marching Ants mode
will show the standard selection outline, while the Overlay mode will
display the non-selected area as a translucent red overlay similar to
how the selection would appear in Quick Mask mode. We’ll look at the
last view mode in the list – Reveal Layer – a bit later.The purpose of these different view modes is to make it easier for us to judge our selection as we’re refining it. With some images, the selection may be easier to see against white, others against black, and so on. Often, we’ll need to jump between view modes as we’re working, which is why you may have noticed that each of the view modes in the list has a letter to the right of its name. The letter is the keyboard shortcut for quickly switching between view modes, and they’re handy to know. For example, you can switch to the On White mode by pressing the letter W on your keyboard, the On Black mode by pressing the letter B, the On Layers mode by pressing the letter L, and so on. You can also press the letter F repeatedly to cycle between the view modes.
If you prefer to select your view modes from the list rather than with keyboard shortcuts, make sure you double-click on the name of the mode. This will select the view mode, then close out of the list.
Step 3: Increase The Radius Value
Directly below the View Mode option in the Refine Edge dialog box is a section called Edge Detection. This, as they say, is where the magic happens. To add more of the hair to your selection, click on the Radius slider and begin dragging it towards the right: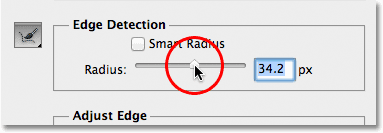
Click and drag the Radius slider towards the right.
As you drag the slider, you’ll see some of the hair that was outside
of your initial selection beginning to appear. I’m using the On Layers
view mode to make it easier to see the hair as it will actually appear
in front of my background image. You may be using a different view mode: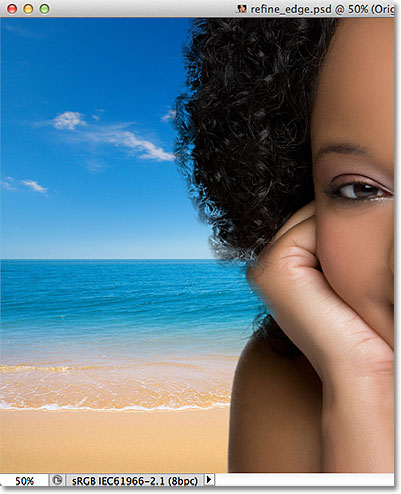
Some of the hair outside the initial selection is now visible.
If I continue dragging the slider to the right to increase the Radius value:
Dragging the Radius slider even further.
Then hair even further away from my initial selection begins to appear: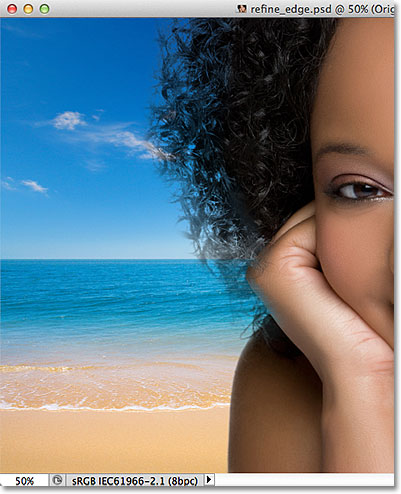
The image after increasing the Radius value.
So what exactly is happening here? What does this Radius value have
to do with selecting hair? If you look to the right of the View Mode
preview thumbnail at the top of the dialog box, you’ll see an option
called Show Radius which by default is turned off. Click inside its checkbox to turn it on: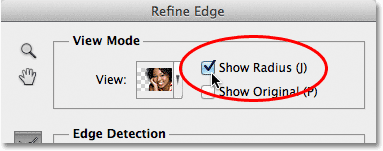
Selecting the Show Radius option.
With this option enabled, we can actually see the radius in the
document window. The way the Refine Edge command works is that it looks
around the edge of our initial selection to decide what else needs to be
included in the selection, and the Radius value controls how far away
from our initial selection edge that Photoshop will look. It doesn’t
look across the entire image. It only looks within the distance we
specify. That’s why the Radius value is measured in pixels (px). If we
set the Radius value to, say, 50 pixels, Photoshop will look 50 pixels
in either direction of our initial selection edge to determine if
there’s anything else within this area that should be included in our
selection.If we look in my document window, we can see the radius as that visible zone between the two areas of solid black. The solid black represents areas that Photoshop is ignoring as it looks for additional pixels to add to our selection (with the On White view mode, the areas being ignored appear in white, not black). Only pixels within the radius zone are being analyzed:
The Radius appears between the areas of solid black.
To make it easier to see, I’ll press the letter K on my keyboard to quickly jump from the On Layers view mode to the Black & White view mode, and now the radius zone appears as solid white between the black areas: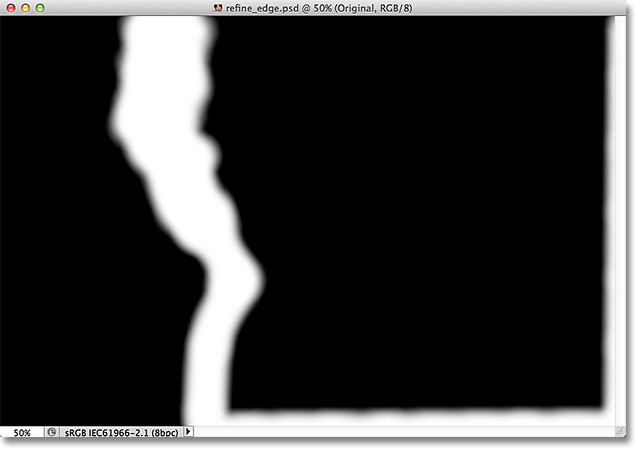
Viewing the radius using the Black & White view mode.
I’ll switch back to the On Layers view mode by pressing the letter L on my keyboard.Smart Radius
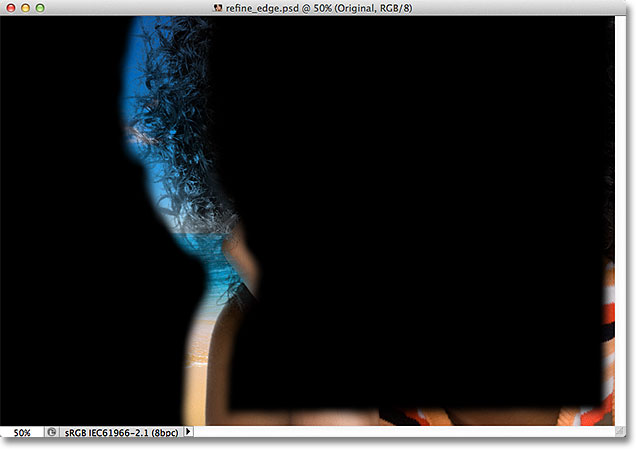
Increasing the Radius value has allowed me to fit more of the woman’s hair into the zone that Photoshop is analyzing, which is great, except that at the same time, it’s not so great because it’s causing potential problems in other areas. The radius is now too wide around the woman’s arm and shoulder, and it’s also appearing around the bottom and right edge of the image where I don’t need it at all: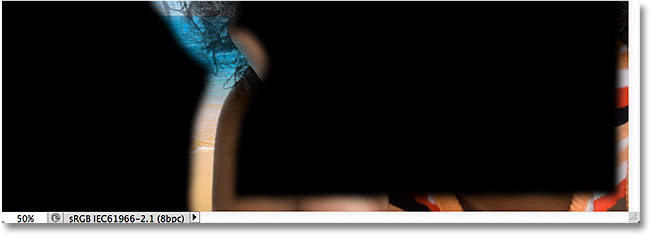
The hair needs a wide radius, but other areas do not.
This is where the Smart Radius option comes in.
You’ll find it directly above the main Radius slider. By default, Smart
Radius is turned off. I’ll click inside its checkbox to turn it on: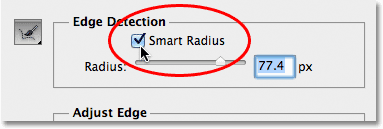
Turning on Smart Radius.
With Smart Radius enabled, Photoshop looks more closely along the
edge of the initial selection and tries to tighten up the radius size
wherever possible. In other words, with my image, the edge along the
woman’s arm and shoulder is smooth, so Photoshop will (hopefully,
anyway) reduce the width of the radius in that area while still leaving a
wider radius for the hair. If we look in my document window, we see
that Photoshop has done exactly that. I still have a wide radius around
the hair, but the radius along the arm and shoulder is much more narrow.
There’s still a bit of unwanted radius along the bottom of the image,
but we’ll see how to clean that up in a moment: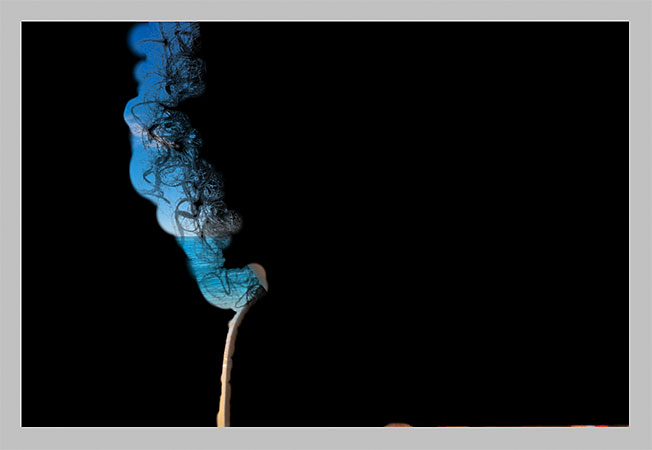
With Smart Radius turned on, Photoshop can adjust the width of the radius in different areas.
A quick note about Smart Radius before we continue. Depending on your
image and the type of edge you’re working with, Smart Radius can help
or it can make things worse. A general guideline with Smart Radius is
that it tends to help with selections that contain different types of
edges, as in my case here. If, on the other hand, you’re only selecting
hair and nothing else, or only selecting smooth edges and nothing else,
you’ll probably find that you’re better off leaving Smart Radius
disabled. Of course, it’s easy to select it and then decide if things
look better or worse, but don’t think you need to use the option just
because it’s there and it has “Smart” in the name. There are other ways
to adjust the size of the radius, as we’re about to see!Step 4: Manually Adjust The Radius With The Refinement Brushes
Once we’ve done all we can with the Radius slider and the Smart Radius option, we can then manually refine our radius using a couple of brushes that come with the Refine Edge command. If you look to the left of the Radius and Smart Radius options, you’ll see a brush icon. If you click and hold on the brush icon, a menu will appear where you can select the brush you need. The two brushes we have to choose from are the Refine Radius Tool and the Erase Refinements Tool: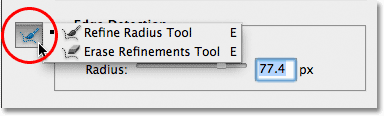
Click and hold on the brush icon to access the radius refinement tools (brushes).
The names can be a bit confusing, so you may find it helpful to think of the Refine Radius Tool as the Add to Radius brush and the Erase Refinements Tool as the Subtract from Radius brush.
Adobe calls them "Tools" but they behave exactly like brushes, allowing
us to simply paint over the areas in the image where we need to add to,
or subtract from, the existing radius.By default, the Refine Radius Tool is already selected for us because that’s the one we use the most, so there’s no need to actually select it from the list. There’s also no need to select the Erase Refinements Tool from the list because at any time, we can temporarily switch from the Refine Radius Tool to the Erase Refinements Tool simply by pressing and holding the Alt (Win) / Option (Mac) key on the keyboard. When you release the Alt / Option key, you’ll switch back to the Refine Radius Tool. In other words, you’ll never need to select either tool from the dialog box, so you can safely forget all about that brush icon.
Before I try to add more of the woman’s hair to my selection, I’m first going to use the Erase Refinements Tool to remove the unwanted radius area from the bottom of my image. Keep in mind as you use these tools that unlike Photoshop’s other selection tools, we’re not adding to, or subtracting from, the actual selection itself with these tools. We’re simply adjusting the size of the area that Photoshop is analyzing. Photoshop determines which pixels to select and which to ignore. We’re just telling it where to look and where not to look.
I’ll hold down my Alt (Win) / Option (Mac) key to temporarily switch from the Refine Radius Tool to the Erase Refinements Tool. It’s a bit hard to see in the screenshot, but a small minus sign (-) appears in the center of the brush cursor when the Erase Refinements Tool is active (a plus sign (+) appears when the Refine Radius Tool is active). Then I’ll simply click and drag over the unwanted radius areas to erase them. Since I still have the Show Radius option selected at the top of the dialog box, we can see that the area along the bottom of the image is now filled with solid black, which means Photoshop will now ignore that area:
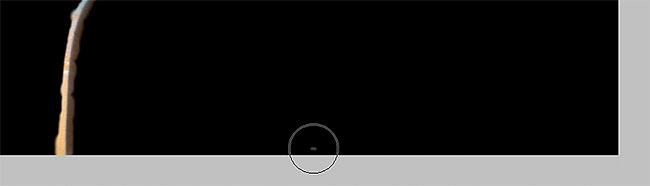
Holding down Alt (Win) / Option (Mac) and painting along the bottom of the image.
I’ll release my Alt (Win) / Option (Mac) key to switch back to the
Refine Radius Tool so I can start adding more of the woman’s hair to my
selection. I’m going to uncheck the Show Radius option at the top of the
dialog box so we can again see the actual photo in front of the
background image (using the On Layers view mode):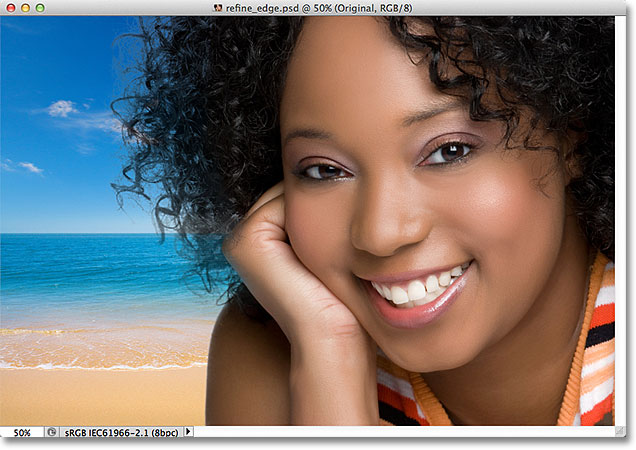
With Show Radius turned off, we switch back to seeing the image in the document window.
To add more of the woman’s hair, I just need to paint with the Refine
Radius Tool over the area where her hair should be. But how do I know
where to paint when I can’t actually see the rest of her hair because
it’s not currently part of the selection? It would be helpful if there
was some way to temporarily view the entire original image so I can see
exactly where I should be painting. Thankfully, another of the Refine
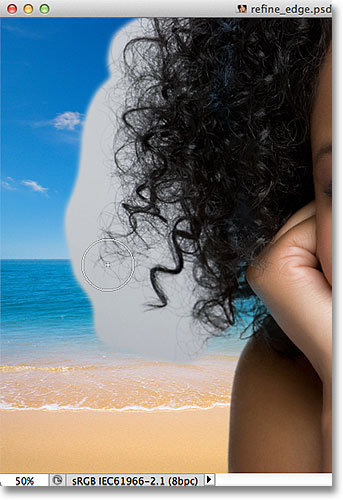
Edge view modes – Reveal Layer – let’s us do exactly that!I’ll click on the view mode thumbnail at the top of the dialog box, then I’ll double-click on Reveal Layer at the bottom of the list to select it. I could also quickly select the Reveal Layer mode by pressing the letter R on my keyboard:
Choosing Reveal Layer from the bottom of the list of view modes.
With the Reveal Layer view mode active, the original image returns in
the document window, making it easy to see where I need to paint with
the Refine Radius Tool:
Reveal Layer shows the original image without any selections.
Now that I know where to paint, I’ll press the letter L on my keyboard to switch back to the On Layers
view mode, then I’ll begin painting with the Refine Radius Tool to
reveal more of the woman’s hair. Just like any of Photoshop’s other
brushes, we can change the size of both the Refine Radius Tool and the
Erase Refinements Tool directly from the keyboard. Pressing the left bracket key ( [ ) will make the brush smaller, while the right bracket key ( ] ) will make it larger.As you’re painting over the area with your mouse button held down, you’ll see the original image appearing inside the area where you’ve painted, which helps us to see that we’re painting in the right spot:
The gray background from the original image is visible while my mouse button is held down.
When you release your mouse button, the original image disappears and
we see the result, with more of the hair added to the selection. You
can continue painting over the hair with the Refine Radius Tool to add
more of it to the selection, or, if you make a mistake, press and hold
the Alt (Win) / Option (Mac) key to switch to the Erase Refinements Tool
and paint to remove that area from the radius zone: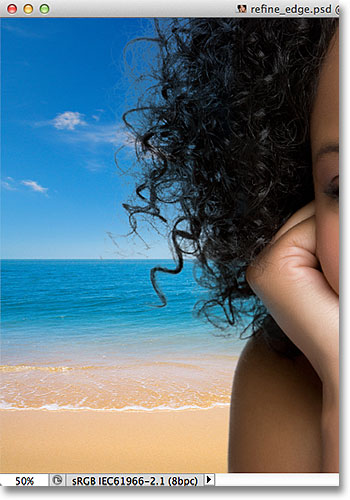
More of the woman’s hair now appears in front of the new background after painting with the Refine Radius Tool.
The Adjust Edge Options
Below the Edge Detection options in the Refine Edge dialog box are the Adjust Edge options – Smooth, Feather, Contrast, and Shift Edge. All four of these options are set to 0 by default and when using the Refine Edge command for selecting hair, it’s usually best to leave at least the first three options (Smooth, Feather and Contrast) set to 0. The Smooth option is used for smoothing out jagged selection edges, but it usually causes problems when selecting hair. The Feather option will blur the selection edge which just makes things look soft, blurry and unprofessional. And the Contrast option will attempt to sharpen up selection edges by boosting contrast, again not something that usually works well with hair.The only option you should try is the fourth one, Shift Edge. Dragging the slider to the right of center will expand your selection edges outward, which may help to add more hair to the selection, while dragging the slider to the left of center will contract the selection edges inward, tightening up the selection. If neither direction helps to improve your results, simply drag the slider back to center. In my case, I’m going to drag the slider to the right to increase the Shift Edge value to +20%:
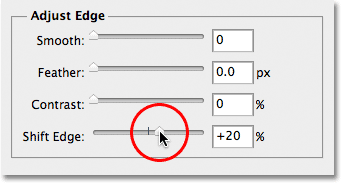
Increasing the Shift Edge value to expand the selection edge outward.
This expands my selection edges outward and I now see more fine hair
detail being added to the selection, although much of it looks very
faded at the moment, but we’ll fix that next:
Increasing the Shift Edge option added additional hair detail to the image.
Step 5: Remove Any Fringing By Decontaminating The Colors
Things are looking good except for one remaining problem. We’re seeing a lot of fringing around the hair, which is remaining color from the original background. We can remove the fringing using the Decontaminate Colors option, found in the Output section at the bottom of the dialog box. By default, Decontaminate Colors is turned off. I’ll click inside its checkbox to turn it on: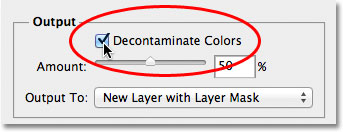
Selecting the Decontaminate Colors option.
I can now clean up the fringing by dragging the Amount
slider towards the right. The default Amount value is 50%. As you drag
the slider further to the right, Photoshop removes the fringing by
physically changing the color of the pixels around the hair so that they
match the color of the hair itself rather than the original background
color. I’ll increase my Amount value to 75%: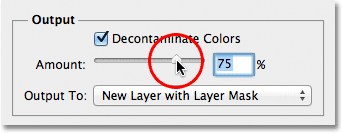
Increase the Decontaminate Colors amount to remove fringing around the hair.
The hair now appears darker, especially the finer strands that were originally light gray, and the fringing has been removed: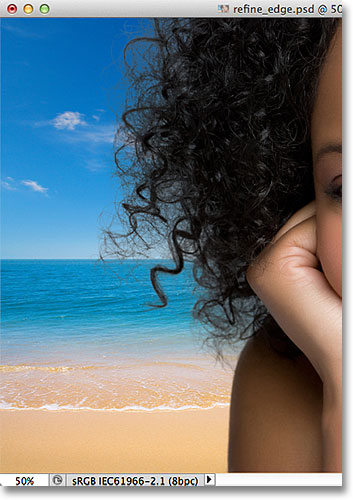
The image after removing the fringing with the Decontaminate Colors option.
Step 6: Output The Selection
Now that we’re done selecting the hair, we need to output our selection, and the best way to do that is to have Photoshop convert our selection into a layer mask so that we’re not actually deleting any pixels from the original image. Set the Output To option, which you’ll find directly below the Decontaminate Colors option, to New Layer with Layer Mask if it isn’t set to that already: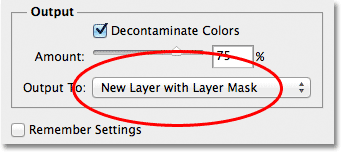
Selecting “New Layer with Layer Mask” for the Output To option.
Click OK in the bottom right corner of the Refine Edge dialog box to
close out of it. If we look in my Layers panel, we see that Photoshop
has made a copy of my original image and converted my selection into a
layer mask on the new layer. The original layer below it has been turned
off so it’s no longer visible in the document window: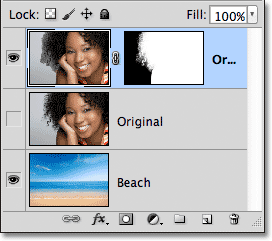
The Layers panel showing the layer mask on a copy of the original image.
Step 7: Clean Up The Layer Mask If Needed
Since we focused so much on selecting the hair in the image, there may be some other parts of the selection that need a bit of cleaning up. To inspect the layer mask for any problem areas, press and hold your Alt (Win) / Option (Mac) key on your keyboard and click directly on the layer mask thumbnail in the Layers panel: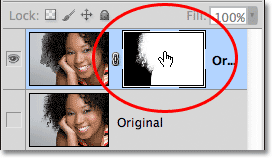
Hold down Alt (Win) / Option (Mac) and click on the layer mask thumbnail.
This both selects the layer mask and makes it visible in the document
window. If you notice any areas that need to be touched up, grab
Photoshop’s standard Brush Tool from the Tools panel and paint over the areas with either white or black as needed: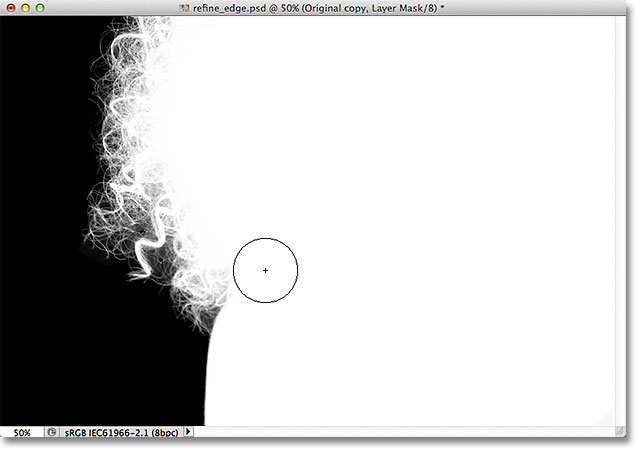
Painting with white (using the standard Brush Tool) to clean up a few areas of the mask.
When you’re done, switch back to the normal image view in the document window by clicking on the layer’s preview thumbnail in the Layers panel: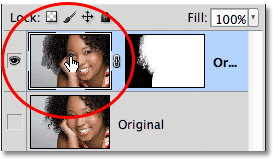
Clicking on the preview thumbnail to the left of the mask thumbnail.
And here, after a quick touch up of the layer mask, is my final result:
The final result.
And there we have it! That’s how to select hair in a photo using the powerful Refine Edge command in Photoshop CS5!
Comments
Post a Comment