SHARPENING: UNSHARP MASK
An "unsharp mask" is actually used to sharpen an image, contrary to what its name might lead you to believe. Sharpening can help you emphasize texture and detail, and is critical when post-processing most digital images. Unsharp masks are probably the most common type of sharpening, and can be performed with nearly any image editing software (such as Photoshop). An unsharp mask cannot create additional detail, but it can greatly enhance the appearance of detail by increasing small-scale acutance.CONCEPT
The sharpening process works by utilizing a slightly blurred version of the original image. This is then subtracted away from the original to detect the presence of edges, creating the unsharp mask (effectively a high-pass filter). Contrast is then selectively increased along these edges using this mask — leaving behind a sharper final image.| Step 1: Detect Edges and Create Mask | Step 2: Increase Contrast at Edges |
| Original | Higher Contrast Original | |||||
| - | Blurred Copy | Unsharp Mask | ||||
| Original | ||||||
| = | Unsharp Mask | = | Sharpened Final Image | |||
Note: The "mask overlay" is when image information from
the layer above the unsharp mask passes through and replaces the layer
below in a way which is proportional to the brightness in that region of
the mask. The upper image does not contribute to the final for regions
where the mask is black, while it completely replaces the layer below in
regions where the unsharp mask is white.
If the resolution in the above image is not increasing, then why is
the final text so much sharper? We can better see how it works if we
magnify and examine the edge of one of these letters as follows: |
 |
 |
 |
 |
 |
||
| Original | Sharpened |
Note: Unsharp masks are not new to photography. They were traditionally performed with film by utilizing a softer, slightly out of focus image (which would act as the unsharp mask). The positive of the unsharp mask was then sandwiched with the negative of the original image and made into a print. This was used more to enhance local contrast than small-scale detail.
BIOLOGICAL MOTIVATION
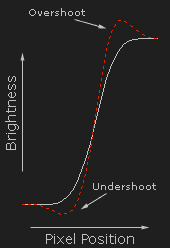
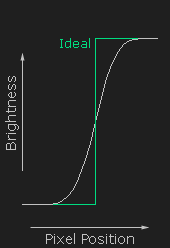
Why are these light and dark over/undershoots so effective at increasing sharpness? It turns out that an unsharp mask is actually utilizing a trick performed by our own human visual system. The human eye sees what are called "Mach bands" at the edges of sharp transitions, named after their discovery by physicist Ernst Mach in the 1860's. These enhance our ability to discern detail at an edge. Move your mouse on and off of the following image to see the mach band effect:
(Alternating with a smooth gradient enhances the mach band effect)
IN PRACTICE
Fortunately, sharpening with an unsharp mask in Photoshop and other image editing programs is quick and easy. It can be accessed in Adobe Photoshop by clicking on the following drop-down menus: Filter > Sharpen > Unsharp Mask. Using the unsharp mask requires understanding its three settings: "Amount," "Radius," and "Threshold."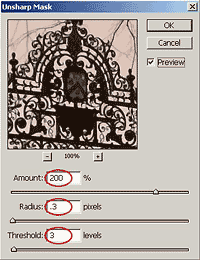
Radius controls the amount to blur the original for creating the mask, shown by "blurred copy" in the TEXT illustration above. This affects the size of the edges you wish to enhance, so a smaller radius enhances smaller-scale detail.
Threshold sets the minimum brightness change that will be sharpened. This is equivalent to clipping off the darkest non-black pixel levels in the unsharp mask. The threshold setting can be used to sharpen pronounced edges, while leaving subtle edges untouched. This is especially useful to avoid amplifying noise, or to sharpen an eye lash without also roughening skin texture.
COMPLICATIONS
Unsharp masks are wonderful at sharpening images, however too much sharpening can also introduce "halo artifacts." These are visible as light/dark outlines or halos near edges. Halos artifacts become a problem when the light and dark over and undershoots become so large that they are clearly visible at the intended viewing distance. Soft Original
 Mild Sharpening
 Over Sharpening
Another complication of using an unsharp mask is that it can introduce subtle color shifts. Normal unsharp masks increase the over and undershoot of the RGB pixel values similarly, as opposed to only increasing the over and undershoots of luminance. In situations where very fine color texture exists, this can selectively increase some colors while decreasing others. Consider the following example:
(Visible Cyan Outline)
Remedies: Color shifts can be avoided entirely by performing the unsharp mask within the "lightness" channel in LAB mode. A better technique, which avoids converting between color spaces and minimizes posterization, is to:
- Create a duplicate layer
- Sharpen this layer like normal using the unsharp mask
- Blend sharpened layer with the original using "luminosity" mode in the layers window
REAL-WORLD EXAMPLE
Move your mouse over unsharp mask and sharpened to see how the sharpened image compares with the softer original image. The difference can often be quite striking. |
||
| Original | Unsharp Mask | Sharpened |
(Unsharp mask brightened slightly to increase visibility)
Comments
Post a Comment