
Lens Correctios Filter in photos

1


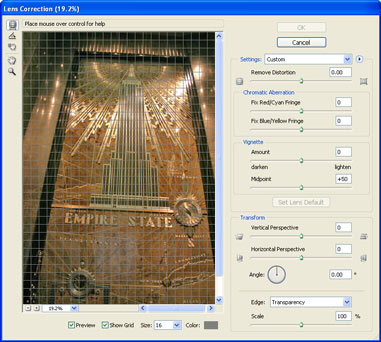
Open an affected image and choose Filter: Distort: Lens Correction Figure 1 shows the filter’s dialogue box. Notice the grid that assists us in lining things up.


2


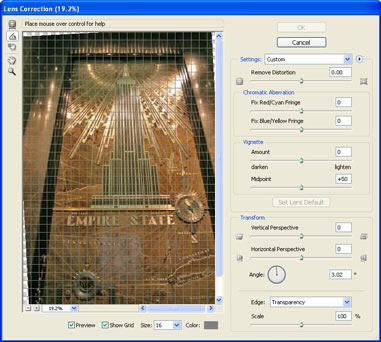
The first job is to straighten the image. It's impossible to fix all the other angles if the image is not straight first.
Choose the straighten tool for the left side of the dialogue box as shown in Figure 2.
Click-&-drag across the image to define the new horizon, Try to follow a horizontal line in the image if there is one.


3

The 
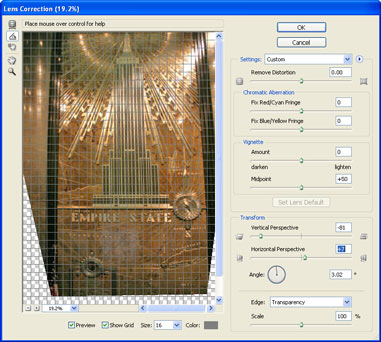
image suffers from keystoning – it's narrower at the bottom than the top – so we'll adjusting the Vertical Perspective to make the top and bottom the same width.
Adjusting the Horizontal perspective appears to rotate the image through 3D space. What's really happening is that we're making one side narrower than the other to combat perspective problems. You can also change the Angle to counter a diagonal distortion Figure 3 shows the perspective repaired.


4


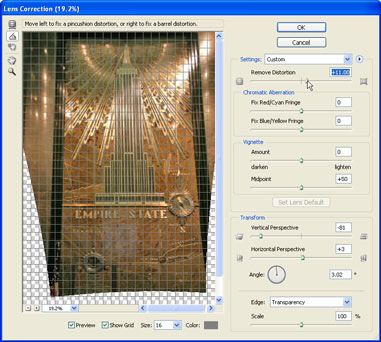
Notice how the image appears to bulge. Move the Remove Distortion slider to the left to 'bulge out' and move to the right to 'pinch in'. This also works by choosing the Remove Distortion tool, which is the topmost tool icon on the left of the Lens Correction window. Once the tool is selected you can drag in the image, although I find that the sliders give you more control.
After adjusting the distortion, you may need to go back and again tweak the perspective. The Vertical Perspective has been readjusted to compensate. (see Figure 4).


5


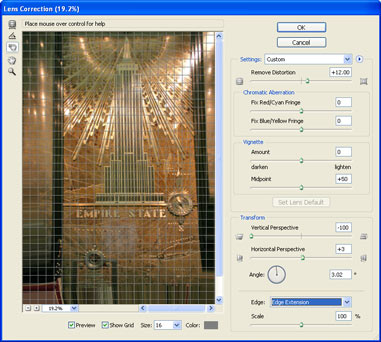
Finally, choose an edge option:
Transparency: Produces transparent pixels outside of the distorted rectangle
Background Color: Fill the empty pixels with the current background colour
Edge Extension: Stretches edge pixels to fill the background (see Figure 5).
Click OK to apply


6

The before-&-after Figure 6 shows the power of the Lens Correction filter. To finish off the effect, crop the image to suit your needs. As you can see this really is a great tool for fixing distorted images.


Comments

Popular posts from this blog

Use x-ray techniques in Photoshop to show naked skin through clothing

    Do those new naked body scanners have you freaked out at the airports? As far as the TSA is concerned, those x-ray machines are here to stay, but you might as well take comfort in knowing that airport security guards aren't the only ones looking at your private parts. Practically anyone with a computer can manage to see through your clothes, and it's all thanks to a little program called Photoshop. Thanks, Adobe. With a few tweaks using the tools in Photoshop, you can see those boobs in no time, male or female. The video is in German, but it's not hard to figure our what's going on, especially if you're familiar with Photoshop. First, create a few duplicate layers, then get a handle on some of these tools to make the naked body through the clothes: * Auswahl erstellen (Create Selection) * Tonwertspreizung (Input Levels) * Belichtung (Exposure) You can also do this see-through clothing effect in free design programs, such as  GIMP .

Photoshop Photo Effects Tutorials 2024

  Photoshop Photo Effects Tutorials Everyone loves Photoshop effects. Not only are photo effects fun to create, but they’re a great way to learn Photoshop since they often introduce us to tools, commands or other features we might otherwise never know about! All of our Photoshop effects tutorials are written with beginners in mind, with easy-to-follow, step-by-step instructions. See our complete list below, or download our tutorials as  print-ready PDFs ! Fade an Image to Color in Photoshop Faster with Live Gradients Learn how to fade an image to color with Photoshop the new and easy way using live gradients! How to Add Falling Snow to Photos with Photoshop Learn how to add realistic falling snow to your winter photos with Photoshop. Get Better Color Halftone Effects in Photoshop Learn how to create more realistic color halftone patterns using Photoshop’s Color Halftone filter and this simple trick. How to Create a Halftone Dot Pattern in Photoshop Learn how to turn your photo into a h

Ridiculously Cool Photoshop Text Effect Tutorials

  Easy Photoshop Text Tutorials for Beginners If you’re still learning the fundamentals of design or want some quick-and-easy text ideas to jazz up your print designs, these beginner tutorials will be a big asset. In your lessons you’ll learn how to apply texture and 3D effects, create logos, utilize masks and other simple techniques for enhancing your text. 1.  Using Text As A Container For More Text In Photoshop 2.  Glossy Emblem Text Effects 3.  Create a Realistic Emboss/Deboss Effect 4.  Icy Styles in Photoshop 5.  How To Create a Gold Text Effect in Photoshop 6. Moon Shine Text Effect 7. Simple Styled Text with Stars Effect 8.  Elegant Glossy Gold Text Effect 9.  Hipster Text Effect in Photoshop CS6 10.  The Sugar Bag Effect 11.  Easy Chalk Ornament Typography in Photoshop 12.  Abstract Shining Text Effect with Groovy Font 13.  Easy Plastic Text with Layer Styles In Photoshop 14.  Papercraft Text Effect 15.  Making a Clipping Mask With Text In Photoshop 16.  Simple Bokeh Text Effe