An Easy Way To Set Your Type Size In Photoshop
This tutorial assumes you already have a basic understanding of how to add type to a Photoshop document. If you need a refresher on the basics, you’ll want to check out our Photoshop Type Essentials tutorial first.
Download our tutorials as print-ready PDFs! Learning Photoshop has never been easier!
Here’s a document that I currently have open on my screen (the photo is from the Fotolia image library): 
The original document.
I want to add some text along the bottom of the document, so I’ll select my Type Tool from the Tools panel: 
Selecting the Type Tool.
With the Type Tool selected, I’ll choose a font and font style from the Options Bar: 
The font (left) and font style (right) options.
To change my type color, I’ll click on the color swatch in the
Options Bar. At the moment, my type is set to its default color of
black: 
Clicking on the color swatch to change the type color.
Clicking the color swatch opens Photoshop’s Color Picker,
but instead of choosing a color from the Color Picker, I’m going to
sample a color directly from the image. To do that, with the Color
Picker still open, I’ll move my mouse cursor over the photo, which
temporarily switches me to the Eyedropper Tool. I’ll
move the eyedropper over an area of the image that contains the color I
want for my text, then I’ll click on that area to sample the color: 
Sampling a color from the image to use as the type color.
With my color sampled, I’ll click OK to close out of the Color
Picker. The color swatch in the Options Bar now displays the new color: 
The new type color appears in the color swatch.
All I need to do now is choose a size for my type, but this is where
we run into a bit of a problem. Normally, to set the font size, we use
the Font Size option in the Options Bar. We can either
enter a value manually into the input box or we can click on the small
arrow to the right of the input box and choose from a list of common
preset sizes. That’s great if I happen to know the exact font size I
need, but in this case, as in most cases, I don’t, which means I have to
guess, usually with little to no chance of getting it right. Since I
have to pick something, I’ll choose a preset size of 48 pt. That seems
like a good choice: 
Choosing one of the preset type sizes.
With my font size chosen and all of my other type options set, I’ll
click inside the document with the Type Tool in roughly the spot where I
want my type to begin, then I’ll add my text. When I’m done, I’ll press
Ctrl+Enter (Win) / Command+Return (Mac) on my keyboard to accept the text. Here’s what my first attempt looks like with my type set to 48 pt: 
The initial font size was too small.
Looks like my first guess at a font size was way off. The text is
much too small, but I still don’t know the specific size I need. All I
know so far is that it needs to be larger than 48 pt. This leaves me
with a few options. I could try choosing a different, larger size from
the list of preset sizes (although the largest preset size is only 72 pt
which still may not be large enough), or I could try entering my own
value manually into the Font Size input box, but what should that value
be? This “trial and error” approach to setting the font size in the
Options Bar can get frustrating very quickly. There must be an easier
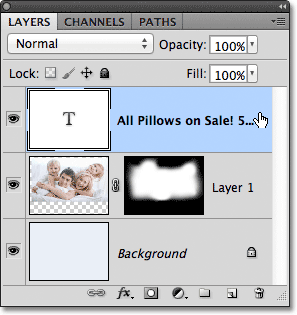
way to do this. As it turns out, there is, but it doesn’t involve the Font Size option in the Options Bar. Instead, I’m going to use Photoshop’s Free Transform command. To access the Free Transform command, first make sure your Type layer is selected in the Layers panel:

Make sure your Type layer is selected (highlighted in blue) in the Layers panel.
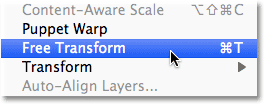
With the Type layer active, go up to the Edit menu in the Menu Bar along the top of the screen and choose Free Transform. You can also press Ctrl+T (Win) / Command+T (Mac) to quickly select Free Transform with the keyboard shortcut: 
Go to Edit > Free Transform.
This places the Free Transform bounding box and handles around the
text, and we can now scale the text to any size we need simply by
dragging the handles! This will also give us a live preview of the
results as we’re resizing the text, which means we can easily scale it
to the correct size with no guess work needed. Since type in Photoshop
is made from vectors, not pixels, we’re free to scale it as much as we want without any loss of image quality. To scale the text, hold down the Shift key on your keyboard, then click and drag any of the four corner handles (the little squares). Holding the Shift key down as you drag the handles tells Photoshop to keep the original aspect ratio of the type intact so you don’t stretch and distort the shapes of the letters. When you’re done scaling the text, release your mouse button, then release your Shift key (make sure you release your mouse button before releasing the Shift key, otherwise you may still end up distorting the text):

Hold Shift while clicking and dragging any of the corner handles to scale the text.
You can also move the text into position while Free Transform is
active. Simply click anywhere inside the Free Transform bounding box
and, with your mouse button still held down, drag the type to its new
location. There’s no need to hold the Shift key down when moving the
text. Here, I’m centering my text in the document: 
Click and drag anywhere inside the Free Transform bounding box to move and reposition the text.
When you’re happy with the size and position of your type, press Enter (Win) / Return
(Mac) on your keyboard to accept the change and exit out of Free
Transform mode. The bounding box around the type will disappear: 
Press Enter (Win) / Return (Mac) to exit out of Free Transform when you’re done.
If we look back up in the Options Bar, we see that Photoshop has
automatically updated the Font Size option with our new type size: 
The new type size is displayed in the Font Size option in the Options Bar.
And there we have it! That’s how easy it is to set the size of your
type in Photoshop! Simply add your text using any random font size to
begin with, then use Free Transform to scale and move the text to the
exact size and location you need.
Comments
Post a Comment