How To Sharpen An Image In Photoshop — Advanced Photoshop Sharpening Techniques
Adapted from "Photoshop CS2: Essential Skills" by Mark Galer and Philip Andrews
Most if not all digital images require sharpening, even if shot on a state of the art digital megaresolution SLR with pin-sharp focusing. Most cameras or scanners can sharpen as the image is captured but the highest quality sharpening is to be found in the image editing software.
Sharpening in Adobe Photoshop CS2 will allow you to select the precise amount of sharpening and the areas of the image that require sharpening most. If sharpening for screen it is very much a case of “what you see is what you get.” For images destined for print however, the monitor preview is just that - a preview. The actual amount of sharpening required for optimum image quality is usually a little more than looks comfortable on screen—especially when using a TFT monitor (flat panel).
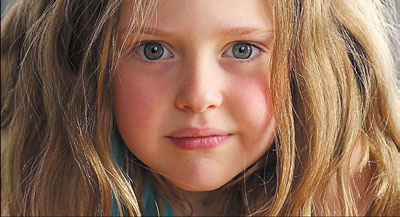
The best sharpening techniques prioritize certain areas; in this case, sharpening the eyes of a portrait but avoiding the skin texture.
The basic concept of sharpening is to send the Unsharp Mask filter or Smart Sharpen filter on a “seek and manipulate” mission. These filters are programmed to make the pixels on the lighter side of any edge it finds lighter still, and the pixels on the darker side of the edge darker. Think of it as a localized contrast control. Too much and people in your images start to look radioactive (they glow), not enough and the viewers of your images start reaching for the reading glasses they don't own.
The best sharpening techniques are those that prioritize the important areas for sharpening and leave the smoother areas of the image well alone, e.g. sharpening the eyes of a portrait but avoiding the skin texture. These advanced techniques are essential when sharpening images that have been scanned from film or have excessive noise, neither of which needs accentuating by the Unsharp Mask. So let the project begin.
Note: If you have any sharpening options in your capture device it is important to switch them off or set them to minimum or low (if using camera RAW set the sharpening amount to 0). The sharpening features found in most capture devices are often very crude when compared to the following technique.
It is also not advisable to sharpen images that have been saved as JPEG files using high compression/low quality settings. The sharpening process that follows should also come at the end of the editing process, i.e. adjust the color and tonality of the image before starting this advanced sharpening technique. Reduce the levels of sharpening later if it proves too much.
Technique one: High Pass
Step 1
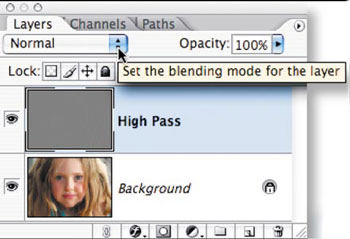
Duplicate the background layer and set the blend mode to Overlay. Select 'Overlay' from the blend modes menu in the layers palette.
Step 2
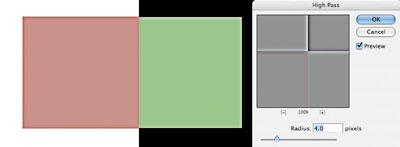
Choose Filter > Other > High Pass. Increase the pixel radius until you achieve the correct amount of sharpening. A pixel radius of 1.0 if printing to Gloss paper and 3.0 if printing to Matte paper would be about normal.

Choose Overlay from the blend modes menu in the Layers palette and then choose Filter > Other > High Pass.
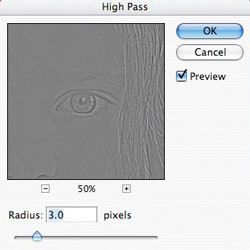
Increase the pixel radius in the High Pass dialog box until you achieve the correct amount of sharpening.
Note: To adjust the level of sharpening later you can either adjust the opacity of the High Pass layer or set the blend mode of the 'High Pass' layer to 'Soft Light' or 'Hard Light' to increase or decrease the level of sharpening.
Step 3
Click on the Foreground color swatch in the Tools palette to open the Color Picker. Enter 0 in the Hue and Saturation fields and 50% in the Brightness field to choose a midtone grey. Select OK. Paint the High Pass layer to remove any sharpening that is not required, e.g. skin tones, skies etc. This technique is especially useful for limiting the visual appearance of noise or film grain.
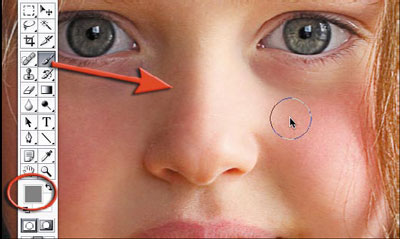
Click the Foreground color swatch in the Tools palette to open the Color Picker.
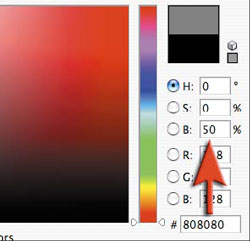
Type 0 in the Hue and Saturation fields and 50% in the Brightness field of the Color Picker.
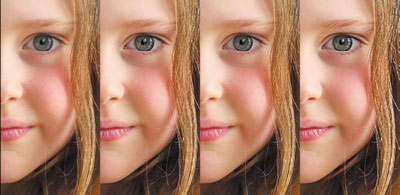
Detail from a portrait captured on a Nikon D1x. The RAW image was processed with 15% sharpening. First test has no subsequent sharpening. Second test uses a High Pass layer (3 pixel radius) in Soft Light mode. Third test has had the blend mode of the High Pass layer changed to Overlay mode. Fourth test has sharpening via a localized Unsharp Mask (100%) in Luminosity mode. The opacity slider could be used to fine-tune the preferred sharpening routine.
Step 4
Remember at this point the settings you have selected are being viewed on a monitor as a preview of the actual print. To complete the process it is important to print the image and then decide whether the image could stand additional sharpening or whether the amount used was excessive. If the settings are excessive you can choose to lower the opacity of the 'High Pass' layer. You can alternatively switch the blend mode of the 'High Pass' layer to 'Soft Light' to reduce the sharpness or 'Hard Light' to increase the sharpness.
Saturation and sharpening
Most techniques to increase the contrast of an image will also have a knock-on effect of increasing color saturation. As the High Pass and Unsharp Mask filters both increase local contrast there is an extended technique if this increased color saturation becomes problematic. You may not notice this in general image editing but if you become aware of color fringing after applying the High Pass technique you should consider the following technique to limit its effects.
Be aware of color fringing after you apply the High Pass technique.
Technique two: Unsharp mask/Smart Sharpen
The second technique is a continuation of the first technique and is intended to address the issues of increased saturation leading to the effect of color fringing. If a merged layer is used as the sharpening layer and this layer is then changed to Luminosity blend mode the effects of saturation are removed from the contrast equation. This second technique looks how the benefits of localized sharpening and Luminosity sharpening can be combined.
Step 1
Change the Blend mode of the High Pass layer back to Normal mode. Then apply a Threshold adjustment to the High Pass layer. Go to Image > Adjustments > Threshold.
Choose Normal from the blend modes menu in the Layers palette.
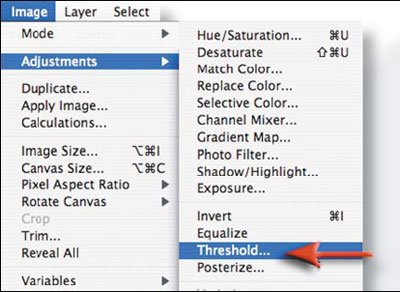
Choose Image > Adjustments > Threshold to apply a Threshold adjustment to the layer.
Step 2
Drag the slider just below the histogram to isolate the edges that require sharpening. The aim of moving these sliders is to render all of those areas you do not want to sharpen white. Select 'OK' when you are done. Paint out any areas that were not rendered white by the Threshold adjustment that you do not what to be sharpened, e.g. in the portrait used in this example any pixels remaining in the skin away from the eyes mouth and nose were painted over using the paintbrush tool with white selected as the foreground color.
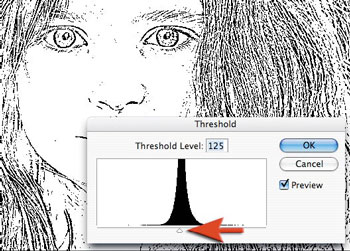
Drag the histogram slider to isolate the edges that require sharpening.
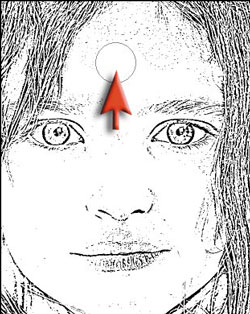
Remaining pixels in the skin away from the eyes mouth and nose were painted over using the paintbrush tool with white selected as the foreground color.
Step 3
Go to the Channels palette and either Ctrl-click (Windows) or Command-click (Mac OS) the RGB thumbnail or click on the 'Load channel as selection' icon from the base of the channels palette to load the edge detail as a selection. Return to the layers palette and drag the Background layer to the new layer icon to make a background copy layer. Drag this background copy layer to the top of the layers stack.
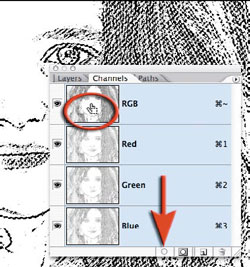
Drag the Background layer to the New Layer icon to duplicate it.
Drag the background copy layer to the top of the layers stack.
Step 4
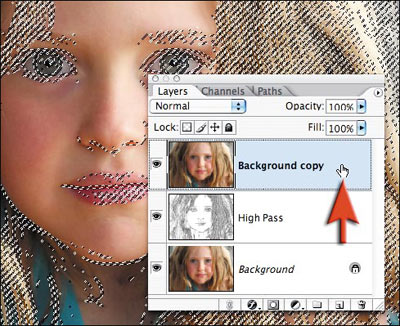
Switch off the visibility of the High Pass layer. Hold down the Alt or Option key and click on the 'Add layer mask' icon in the layers palette. Make sure the layer mask thumbnail is the active part of the layer and then go to Filter > Blur > Gaussian Blur. Apply a 1.5 pixel radius blue to the mask.

Switch off visibility for the High Pass layer and add a layer mask.
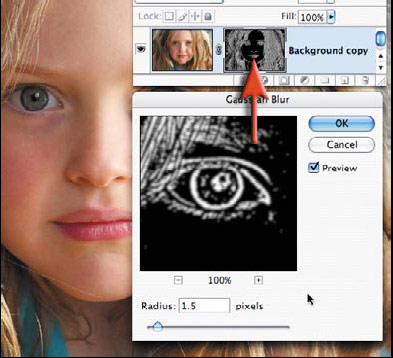
Apply a 1.5 pixel radius blue in the Gaussian Blur dialog box.
Step 5
Now click on the image thumbnail on the background copy layer. Ensure the image is zoomed in to 100% for a small image or 50% for a larger print resolution image (200ppi - 300ppi). Go to Filter > Sharpen > Smart Sharpen or Unsharp Mask. Adjust the Amount slider to between 80 and 150%. This controls how much darker or lighter the pixels at the edges are rendered. Choose an amount slightly more than looks comfortable on screen if the image is destined for print rather than screen.
Note: See Capture and Enhance for basic settings of the Unsharp Mask filter. The exact Threshold and Radius settings are not so critical for this advanced technique.
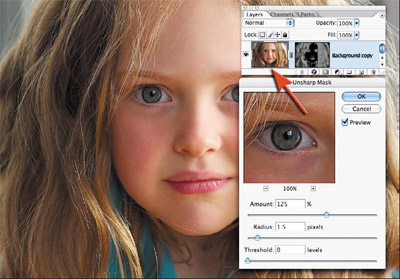
Adjust the values in the Unsharp Mask dialog box.
Step 6
Change the blend mode of the sharpening layer (the uppermost layer) to Luminosity mode. Luminosity mode will restrict the contrast changes to brightness only, and will remove any changes in saturation that have occurred due to the use of the Unsharp Mask. The changes are often very subtle so this technique is only recommended when you become aware of the problems of color fringing due to increased saturation.
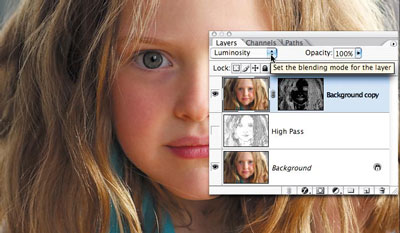
If you become aware of the problems of color fringing, change the blend mode of the sharpening layer to Luminosity mode.
The illustration below is a magnified view of the effects of changing the blend to Luminosity. These two cutting edge techniques are capable of producing razor sharp images that will really put the finishing touches to a folio quality image.
Adapted from "Photoshop CS2: Essential Skills" by Mark Galer and Philip Andrews
Most if not all digital images require sharpening, even if shot on a state of the art digital megaresolution SLR with pin-sharp focusing. Most cameras or scanners can sharpen as the image is captured but the highest quality sharpening is to be found in the image editing software.
Sharpening in Adobe Photoshop CS2 will allow you to select the precise amount of sharpening and the areas of the image that require sharpening most. If sharpening for screen it is very much a case of “what you see is what you get.” For images destined for print however, the monitor preview is just that - a preview. The actual amount of sharpening required for optimum image quality is usually a little more than looks comfortable on screen—especially when using a TFT monitor (flat panel).
The best sharpening techniques prioritize certain areas; in this case, sharpening the eyes of a portrait but avoiding the skin texture.
The basic concept of sharpening is to send the Unsharp Mask filter or Smart Sharpen filter on a “seek and manipulate” mission. These filters are programmed to make the pixels on the lighter side of any edge it finds lighter still, and the pixels on the darker side of the edge darker. Think of it as a localized contrast control. Too much and people in your images start to look radioactive (they glow), not enough and the viewers of your images start reaching for the reading glasses they don't own.
The best sharpening techniques are those that prioritize the important areas for sharpening and leave the smoother areas of the image well alone, e.g. sharpening the eyes of a portrait but avoiding the skin texture. These advanced techniques are essential when sharpening images that have been scanned from film or have excessive noise, neither of which needs accentuating by the Unsharp Mask. So let the project begin.
Note: If you have any sharpening options in your capture device it is important to switch them off or set them to minimum or low (if using camera RAW set the sharpening amount to 0). The sharpening features found in most capture devices are often very crude when compared to the following technique.
It is also not advisable to sharpen images that have been saved as JPEG files using high compression/low quality settings. The sharpening process that follows should also come at the end of the editing process, i.e. adjust the color and tonality of the image before starting this advanced sharpening technique. Reduce the levels of sharpening later if it proves too much.
Technique one: High Pass
Step 1
Duplicate the background layer and set the blend mode to Overlay. Select 'Overlay' from the blend modes menu in the layers palette.
Step 2
Choose Filter > Other > High Pass. Increase the pixel radius until you achieve the correct amount of sharpening. A pixel radius of 1.0 if printing to Gloss paper and 3.0 if printing to Matte paper would be about normal.
Choose Overlay from the blend modes menu in the Layers palette and then choose Filter > Other > High Pass.
Increase the pixel radius in the High Pass dialog box until you achieve the correct amount of sharpening.
Note: To adjust the level of sharpening later you can either adjust the opacity of the High Pass layer or set the blend mode of the 'High Pass' layer to 'Soft Light' or 'Hard Light' to increase or decrease the level of sharpening.
Step 3
Click on the Foreground color swatch in the Tools palette to open the Color Picker. Enter 0 in the Hue and Saturation fields and 50% in the Brightness field to choose a midtone grey. Select OK. Paint the High Pass layer to remove any sharpening that is not required, e.g. skin tones, skies etc. This technique is especially useful for limiting the visual appearance of noise or film grain.
Click the Foreground color swatch in the Tools palette to open the Color Picker.
Type 0 in the Hue and Saturation fields and 50% in the Brightness field of the Color Picker.
Detail from a portrait captured on a Nikon D1x. The RAW image was processed with 15% sharpening. First test has no subsequent sharpening. Second test uses a High Pass layer (3 pixel radius) in Soft Light mode. Third test has had the blend mode of the High Pass layer changed to Overlay mode. Fourth test has sharpening via a localized Unsharp Mask (100%) in Luminosity mode. The opacity slider could be used to fine-tune the preferred sharpening routine.
Step 4
Remember at this point the settings you have selected are being viewed on a monitor as a preview of the actual print. To complete the process it is important to print the image and then decide whether the image could stand additional sharpening or whether the amount used was excessive. If the settings are excessive you can choose to lower the opacity of the 'High Pass' layer. You can alternatively switch the blend mode of the 'High Pass' layer to 'Soft Light' to reduce the sharpness or 'Hard Light' to increase the sharpness.
Saturation and sharpening
Most techniques to increase the contrast of an image will also have a knock-on effect of increasing color saturation. As the High Pass and Unsharp Mask filters both increase local contrast there is an extended technique if this increased color saturation becomes problematic. You may not notice this in general image editing but if you become aware of color fringing after applying the High Pass technique you should consider the following technique to limit its effects.
Be aware of color fringing after you apply the High Pass technique.
Technique two: Unsharp mask/Smart Sharpen
The second technique is a continuation of the first technique and is intended to address the issues of increased saturation leading to the effect of color fringing. If a merged layer is used as the sharpening layer and this layer is then changed to Luminosity blend mode the effects of saturation are removed from the contrast equation. This second technique looks how the benefits of localized sharpening and Luminosity sharpening can be combined.
Step 1
Change the Blend mode of the High Pass layer back to Normal mode. Then apply a Threshold adjustment to the High Pass layer. Go to Image > Adjustments > Threshold.
Choose Normal from the blend modes menu in the Layers palette.
Choose Image > Adjustments > Threshold to apply a Threshold adjustment to the layer.
Step 2
Drag the slider just below the histogram to isolate the edges that require sharpening. The aim of moving these sliders is to render all of those areas you do not want to sharpen white. Select 'OK' when you are done. Paint out any areas that were not rendered white by the Threshold adjustment that you do not what to be sharpened, e.g. in the portrait used in this example any pixels remaining in the skin away from the eyes mouth and nose were painted over using the paintbrush tool with white selected as the foreground color.
Drag the histogram slider to isolate the edges that require sharpening.
Remaining pixels in the skin away from the eyes mouth and nose were painted over using the paintbrush tool with white selected as the foreground color.
Step 3
Go to the Channels palette and either Ctrl-click (Windows) or Command-click (Mac OS) the RGB thumbnail or click on the 'Load channel as selection' icon from the base of the channels palette to load the edge detail as a selection. Return to the layers palette and drag the Background layer to the new layer icon to make a background copy layer. Drag this background copy layer to the top of the layers stack.
Drag the Background layer to the New Layer icon to duplicate it.
Drag the background copy layer to the top of the layers stack.
Step 4
Switch off the visibility of the High Pass layer. Hold down the Alt or Option key and click on the 'Add layer mask' icon in the layers palette. Make sure the layer mask thumbnail is the active part of the layer and then go to Filter > Blur > Gaussian Blur. Apply a 1.5 pixel radius blue to the mask.
Switch off visibility for the High Pass layer and add a layer mask.
Apply a 1.5 pixel radius blue in the Gaussian Blur dialog box.
Step 5
Now click on the image thumbnail on the background copy layer. Ensure the image is zoomed in to 100% for a small image or 50% for a larger print resolution image (200ppi - 300ppi). Go to Filter > Sharpen > Smart Sharpen or Unsharp Mask. Adjust the Amount slider to between 80 and 150%. This controls how much darker or lighter the pixels at the edges are rendered. Choose an amount slightly more than looks comfortable on screen if the image is destined for print rather than screen.
Note: See Capture and Enhance for basic settings of the Unsharp Mask filter. The exact Threshold and Radius settings are not so critical for this advanced technique.
Adjust the values in the Unsharp Mask dialog box.
Step 6
Change the blend mode of the sharpening layer (the uppermost layer) to Luminosity mode. Luminosity mode will restrict the contrast changes to brightness only, and will remove any changes in saturation that have occurred due to the use of the Unsharp Mask. The changes are often very subtle so this technique is only recommended when you become aware of the problems of color fringing due to increased saturation.
If you become aware of the problems of color fringing, change the blend mode of the sharpening layer to Luminosity mode.
The illustration below is a magnified view of the effects of changing the blend to Luminosity. These two cutting edge techniques are capable of producing razor sharp images that will really put the finishing touches to a folio quality image.
Comments
Post a Comment