Final Image
Here is a preview of the image that we are going to be creating: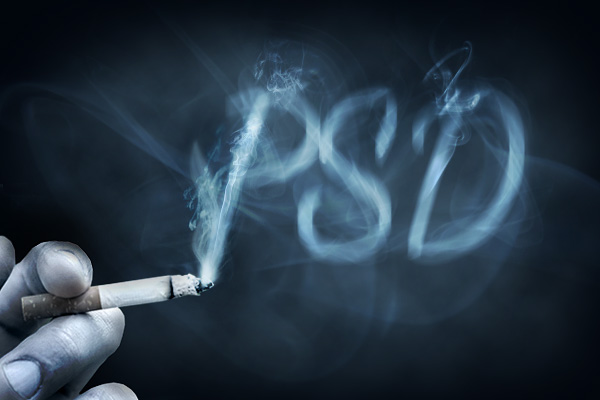
Step 1
Create a new document (600X400px).Create a new layer called ‘background’ and fill this layer with black.

Step 2
Create a new layer called ‘clouds’.Set your toolbar foreground color to 49667a and your background color to 1b2934.
Select your lasso selection tool and make it’s feather amount ’30px’. Then create a rough selection around the center of your canvas:

With your selection in place, go to filter>convert for smart filters.
Go to filter>render>clouds. Because your selection edge was feathered, your cloud area should have a nice soft edge:

Reduce this layer’s opacity to 40% to make the clouds more subtle:

Step 3
Type out some text in the right-center of your canvas.I used the free font Dancing Script,.
Font Settings:
Font Face: Dancing Script
Font Size: 200pt
Kerning: -50
Color: ffffff

Change this text layer’s blend mode to ‘overlay’:

Now go to filter>convert for smart filters.
Then go to filter>blur>motion blur.
Motion Blur Settings:
Angle: 90
Distance: 20 pixels
This starts to give a bit of a smokey appearance:

Duplicate your text layer, reducing the opacity of the duplicate layer to 15%, otherwise it will be too bright:

Step 4
Download one of the smoke images from the resources for this tutorial and paste it into your document, positioning it over your first letter:
Apply a hue/saturation adjustment layer, being sure to give this a clipping mask, so it only effects your underlying smoke layer.
Hue/Saturation Adjustment Layer Settings:
Hue: 0
Saturation: -100
Lightness: 0
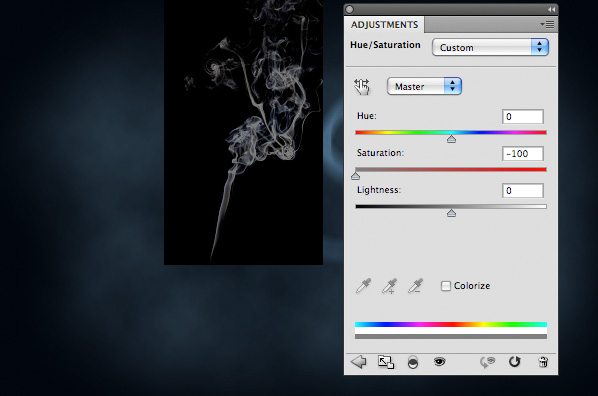
Change your smoke layer’s blend mode to ‘color dodge’ and it’s opacity to 80%:

Now apply a layer mask to this layer and mask off areas of smoke that go outside your lettering too much. Use a soft, black paintbrush for this masking process:

Step 5
Use the technique used in step 4 to add further smoke to your other letters using the smoke images from the resources section for this tutorial:
Step 6
Download the FanExtra smoke brush set from the resources section for this tutorial.Apply several of the brushes from the set using a white paintbrush. Resize and angle the brushes to fit roughly to the shape of your lettering:

Change this layer’s blend mode to ‘overlay’ and reduce it’s opacity to 60%:

Step 7
Download the photo of a hand holding a cigarette from the resources section for this tutorial.Paste it in and position/rotate as necessary:

Apply a layer mask and use a black paintbrush to mask off the background of the photo:

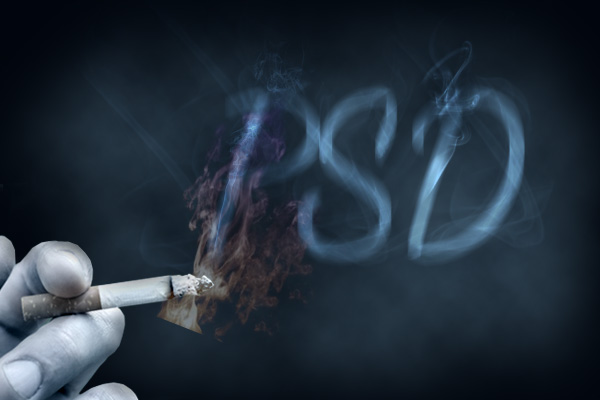
Step 8
Now apply three adjustment layers, giving each a clipping mask so that your adjustments only effect your underlying hand layer.Hue/Saturation Adjustment Layer Settings:
Hue: 0
Saturation: -80
Lightness: 0
Color Balance Adjustment Layer Settings:
Highlights: -9 / 0 / +8
Midtones: -36 / -6 / +21
Shadows: -8 / 0 / 0
Also: Select the layer mask that is created for this adjustment layer, and mask off the area over the cigarette. This means that your color adjustments will effect the rest of your hand photo, but not your cigarette, as we want this to retain it’s original color more.
Levels Adjustment Layer Settings:
15 / 1.12 / 233

Here is the result:

Step 9
Paste in your third smoke image, positioning it like the image below:
Change this layer’s blend mode to ‘screen’ to hide it’s black background and then reduce it’s opacity to 40% to make the smoke more subtle:
Apply a layer mask and mask off most of the smoke, leaving one main plume like below:

Apply a hue/saturation and color balance adjustment layer (giving each a clipping mask):
Hue/Saturation Adjustment Layer Settings:
Hue: 0
Saturation: -100
Lightness: 0
Color Balance Adjustment Layer Settings:
Highlights: -66 / 0 / +9
Midtones: -4 / 0 / +21
Shadows: -25 / 0 / +5

This is the result:

Step 10
Create a new layer called ‘smoke from cigarette’.Apply one of the brushes from your smoke brush set using a white paintbrush:

Apply a color overlay blending option to this layer:
Color Overlay Blending Option Settings:
Blend Mode: Normal
Color: 88b7cf
Opacity: 100%

The result:

Step 11
Download one of the smoke images from the resources section for the tutorial again, and paste it onto a new top layer called ‘smoke overlay’.Keep the smoke really large so that it covers most of your canvas:

Change this layer’s blend mode to ‘screen’ and reduce it’s opacity to 8%. This should create a subtle smokey atmosphere over your composition:

Duplicate this layer and change the duplicate’s blend mode to ‘color dodge’. This helps add a little brightness into the smoke:

Step 12
Create a new layer called ‘dodge/burn’.Go to edit>fill>50% gray. Then change this layer’s blend mode to ‘overlay’. This will hide your 50% gray, but allow you to non-destructively dodge/burn your image.
Use a 10%, soft paintbrush (black to burn, white to dodge).
The images below show your dodge/burn layer at ‘normal’ blend mode and then ‘overlay’ blend mode:


Step 13
For this step you’ll have to use a lot of your own judgement and creativity to get a nice effect. However, I’m going to show you how to use the ‘smudge’ tool non-destructively! You’ll be able to smudge your text and keep your text layers non-rasterized and fully editable.Create a new layer called ‘smudge’ directly above your text layers.
Set your smudge tool to 20% strength, using a nice soft brush, and then very importantly check the box ‘sample all layers’. This will mean that even though there is no data on this layer currently, you will be able to smudge the data on all other layers.
Proceed to smudge your lettering upwards in various areas until you’re happy with the result.
This shows the ‘smudge’ layer at 30% opacity (at 100% opacity the effect was too strong):

Move this layer to be your top layer. This will make the effect slightly less obvious:

Step 14
Create a new top layer called ‘smudge more’.Repeat the step used in Step 13 to smudge your lettering more. I reduced this layer’s opacity to 60% to make the effect less strong:

Step 15
I decided to mask off the corners of my cloud layer a little bit.Then to finish the image, I went to layer>flatten image.
I flattened my image, selected the entire canvas and hit ‘copy’.
Then in my history palette I undid the ‘flatten image’ step, so that I get all my original layers back.
I paste my copied flattened image onto a new top layer and then go to filter>convert for smart filters.
Then I go to filter>sharpen>unsharp mask. Apply the settings below:
UnSharp Mask Settings:
Amount: 100%
Radius: 0.5 pixels
Threshold: 0 levels

Once you’ve applied your unsharp mask you’ll see that the filter comes with a mask of it’s own. Select this mask and use a soft black paintbrush to mask off all areas of your filter apart from over the fingers/initial plume of smoke from your cigarette.
Remember, you’re not masking the images, just the unsharp mask filter. This means that your sharpening filter will only effect these areas, not the rest of your image, which is perfect as we want our letting and background to remain hazy, not sharp.

And We’re Done!
You can view the final outcome below. I hope that you enjoyed this tutorial and would love to hear your feedback on the techniques and outcome.
mrc
ReplyDelete